You’re standing at the trailhead, backpack strapped on, the crisp morning air filling your lungs—ready to escape the noise of daily life and immerse yourself in nature. But before you take that first step, ask yourself: Did I pack everything I actually need? One missing item—like a headlamp, first-aid supplies, or water treatment—can turn a peaceful hike into a survival situation. A solid hiking equipment checklist isn’t about overpacking; it’s about smart preparation that ensures safety, comfort, and confidence on any trail.
This guide delivers a practical, field-tested hiking equipment checklist built around the universally accepted Ten Essentials, expanded with clothing strategies, hydration and nutrition tips, navigation best practices, and emergency preparedness. Whether you’re hiking a local loop or venturing into remote backcountry, this breakdown tells you exactly what to bring, why it matters, and how to pack it efficiently. No guesswork. No clutter. Just what you need to hike safely and return with stories, not regrets.
Pack the Ten Essentials First
These aren’t suggestions—they’re survival fundamentals. Every hike, regardless of length or familiarity, requires these 10 categories of gear to handle emergencies, weather shifts, navigation errors, or injuries. Skip one, and you’re gambling with your safety.
Navigation Tools You Can Trust
Relying solely on your phone is a common—and dangerous—mistake. Batteries die, signals drop, and apps crash. Always carry two forms of navigation:
– Waterproof topographic map (or in a ziplock bag)
– Baseplate compass (and know how to use it)
– Smartphone with offline maps (AllTrails, Gaia GPS)
– Altimeter watch to verify elevation and trail progress
– Printed route description as backup
Pro tip: Practice map-and-compass skills on a short hike. GPS is helpful, but if you can’t orient yourself without it, you’re not truly prepared.
Sun Protection That Works—Even on Cloudy Days
UV radiation intensifies at elevation and reflects off snow, water, and rock. Sunburn can happen in under an hour, even in cool or overcast conditions. Pack:
– SPF 30+ sunscreen (apply before hiking, reapply every 2 hours)
– UV-blocking sunglasses (polarized lenses reduce glare)
– Wide-brimmed hat or cap (protects face, neck, and ears)
– SPF lip balm (lips burn fast and are often forgotten)
– UPF-rated sun shirt (lightweight, breathable, and more effective than sunscreen alone)
Critical reminder: High-altitude hikes demand full sun protection—don’t assume “it’s not sunny” means you’re safe.
Extra Clothing for Sudden Weather Changes
Hypothermia can set in at 50°F with wind and rain. The key is layering, not bulk. Always pack:
– Insulating mid-layer (fleece jacket or lightweight puffy)
– Waterproof outer shell (rain jacket with hood)
– Warm hat and gloves (even in summer)
– Extra pair of wool or synthetic socks
Rule of thumb: If the forecast says “sunny,” assume wind. If it says “clear,” assume clouds. Always bring insulation.
Headlamp with Backup Power
Many hikers get caught after dark due to delays, wrong turns, or fatigue. A headlamp is non-negotiable.
– LED headlamp (hands-free use is essential)
– Extra batteries (stored separately)
– Backup light source (small flashlight or phone with power bank)
Expert note: Use red-light mode to preserve night vision and avoid blinding your hiking partners.
First-Aid Kit Tailored to Your Trip
A drugstore kit won’t cut it. Customize yours:
– Blister care: Moleskin, Leukotape, adhesive pads
– Wound supplies: Bandages, gauze, antiseptic wipes, medical tape
– Tools: Tweezers, small scissors, safety pins
– Medications: Ibuprofen, antihistamines, personal prescriptions (e.g., EpiPen, inhaler)
– Improvised tools: Handkerchief (sling or tourniquet), duct tape (gear repair)
Pro tip: Add a small notepad to record symptoms if someone is injured.
Fire-Starting Tools (For Emergencies Only)
This isn’t for campfires—it’s for survival warmth, signaling, or morale.
– Waterproof matches or stormproof lighter
– Ferro rod or firestarter cube
– Tinder: Cotton balls soaked in petroleum jelly work well
Important: Only use fire where legal and safe. This gear is for emergencies.
Multi-Tool and Repair Supplies
Gear fails. Be ready.
– Pocket knife or multi-tool (Leatherman, Swiss Army)
– Duct tape (wrap around water bottle)
– Tenacious Tape or gear patch kit
– Zip ties, safety pins, needle and thread
Fix fast: A broken strap or zipper can end your hike—unless you’re prepared.
Extra Food (One Day’s Worth)
Hiking burns 200–300 calories per hour. Pack more than you need.
– High-calorie snacks: Nuts, jerky, energy bars, dried fruit
– One extra meal (in case of delay or emergency)
– Resealable bag for trash (pack it out)
Avoid: Sugary snacks that cause energy crashes.
Water and Treatment Methods
Dehydration impairs judgment and physical ability fast.
– Carry 1 liter per hour of hiking (more in heat, altitude, or dry climates)
– Water bottles or hydration bladder
– Water filter (Sawyer Squeeze, LifeStraw)
– Chemical treatment (chlorine dioxide drops or tablets)
– Backup method (filter + chemical = safest combo)
Never drink untreated water—even clear streams can carry giardia.
Emergency Shelter (Even on Day Hikes)
An unexpected overnight stay is more common than you think.
– Lightweight bivy sack or emergency space blanket
– Tube tent or ultralight tarp
– Can double as ground cover or windbreak
Bottom line: This could save your life. Don’t skip it.
Choose the Right Backpack
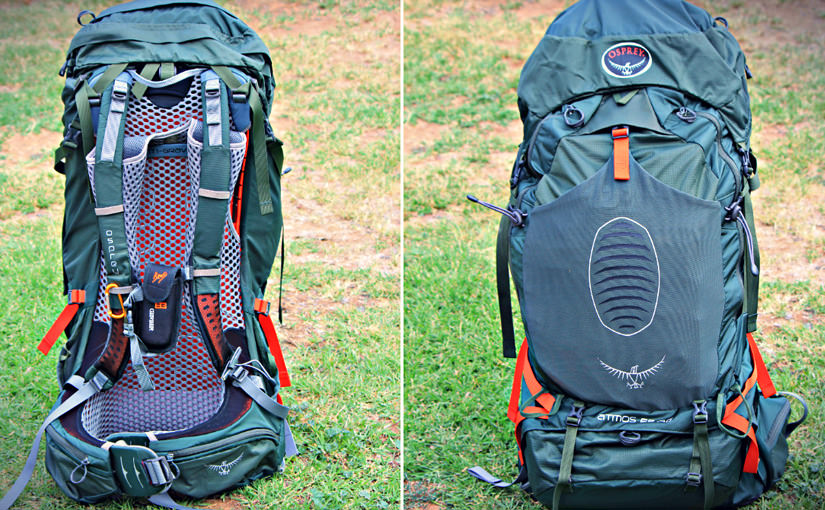
Your pack carries everything—so pick wisely.
– 5–10L: Short, easy trails (water, snacks, phone, first-aid)
– 10–20L: Full-day hikes, variable weather, remote trails
Key features:
– Padded shoulder straps and hip belt (transfers weight off shoulders)
– Ventilated back panel (reduces sweat)
– External attachment points (trekking poles, ice axe)
– Hydration reservoir sleeve
– Rain cover or pack liner (trash compactor bag works)
Weight rule: Daypack should weigh ≤ 20% of your body weight.
Dress for Changing Conditions
What you wear matters more than how fit you are.
The 3-Layer Clothing System

Base Layer: Moisture-Wicking Only
- Merino wool or synthetic (avoid cotton—“cotton kills”)
- Long-sleeve for cold, short-sleeve for heat
- Socks: Wool or synthetic blend (Smartwool, Darn Tough)
- Liner socks reduce friction and prevent blisters
Mid Layer: Insulation
- Fleece jacket or softshell
- Puffy jacket (down or synthetic) for cold stops or high elevations
- Use it: Put on before you feel cold—prevents heat loss
Outer Layer: Weather Protection
- Waterproof rain jacket (Gore-Tex or equivalent)
- Rain pants or skirt—critical in storms
- Wind shirt for dry, breezy days
Check: Zippers, seams, and hoods are sealed and functional.
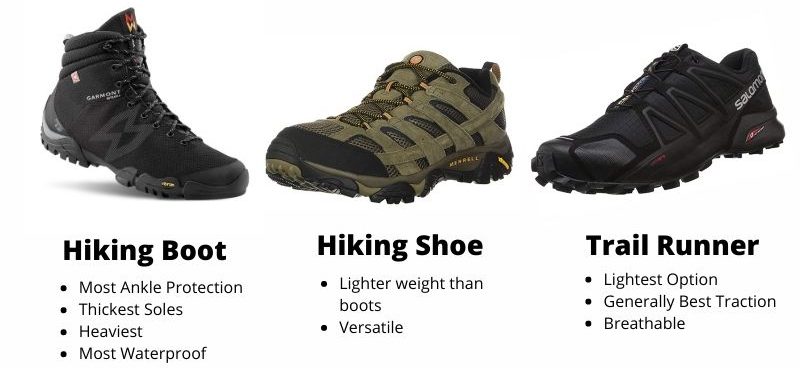
Pick the Right Footwear
Your feet carry you—don’t risk pain or injury.
Hiking Boots vs. Shoes vs. Trail Runners
| Type | Best For | Notes |
|---|---|---|
| Hiking Boots | Rugged terrain, heavy loads, ankle support | Waterproof (GTX) for wet trails |
| Hiking Shoes | Light trails, moderate loads | Faster drying, less support |
| Trail Runners | Dry, smooth trails, fast hiking | Minimal protection, poor in mud |
| Hiking Sandals | Water crossings, hot climates | Quick-dry, toe protection |
Fit rules: Snug heel, room for toes. Try on with hiking socks. Break in before long hikes.
Hydration: How Much Water and How to Treat It
- Carry 1 liter per hour (adjust for heat, altitude, exertion)
- Signs of dehydration: Dark urine, headache, fatigue
- Treatment options:
- Filter: Removes bacteria/protozoa (Sawyer, LifeStraw)
- Chemical: Kills viruses (chlorine dioxide)
- UV (SteriPEN): Fast, but needs batteries and clear water
- Boiling: 1 minute (3 minutes above 6,500 ft)
Best practice: Use filter + chemical backup for maximum safety.
Nutrition: Fuel for the Trail
- 200–300 calories per hour
- Best snacks: Nuts, jerky, energy bars, peanut butter packets
- Lunch ideas: PBJ, wrap, rice cake
- Electrolytes: Add Nuun or Liquid IV in hot weather to prevent cramps
Emergency Preparedness: Be Ready
- Check weather before leaving
- Share your itinerary with a trusted contact
- If lost: STOP—Stop, Think, Observe, Plan
- Emergency devices: Whistle, signal mirror, PLB, or satellite messenger (Garmin inReach)
Final Hiking Equipment Checklist (Printable)
Always Pack These
- [ ] Daypack (10–20L with hip belt)
- [ ] Water (1L/hour) + treatment
- [ ] Extra food (1 day’s worth)
- [ ] Map + compass
- [ ] Headlamp + extra batteries
- [ ] First-aid kit
- [ ] Multi-tool
- [ ] Firestarter
- [ ] Emergency shelter
- [ ] Sun protection
- [ ] Extra clothing layers
- [ ] Whistle
- [ ] Bear spray (in bear country)
- [ ] Itinerary shared
Final Note: Your safety starts before you hit the trail. Use this hiking equipment checklist every time. Pack smart, hike safe, and leave no trace.