
Driving at night feels dangerous when your headlights scatter light everywhere except the road ahead. A poor headlamp beam pattern blinds oncoming traffic while leaving you in the dark, creating a hazardous situation for everyone involved.
This guide explains exactly what a correct beam looks like and how to test your own setup. You will learn to identify common flaws, fix misalignments, and choose upgrades that meet legal safety standards without causing glare.
Defining the Ideal Headlamp Beam Pattern

A proper headlamp beam pattern is not just about raw power or high lumen counts. It relies on precise optical engineering to direct light exactly where you need it most. The goal is maximum road illumination with zero distraction for other drivers.
The Role of the Hotspot Zone
The hotspot is the most intense part of your low beam, usually positioned slightly off-center. This concentrated area lights up distant road signs, obstacles, and lane markers effectively.
- Located just below the cutoff line for optimal reach
- Positioned slightly right of center in left-hand drive vehicles
- Provides clear visibility from 50 to 75 meters ahead
If your hotspot sits too high, it creates dangerous glare. If it is too low, your effective viewing distance drops significantly.
Importance of the Cutoff Line
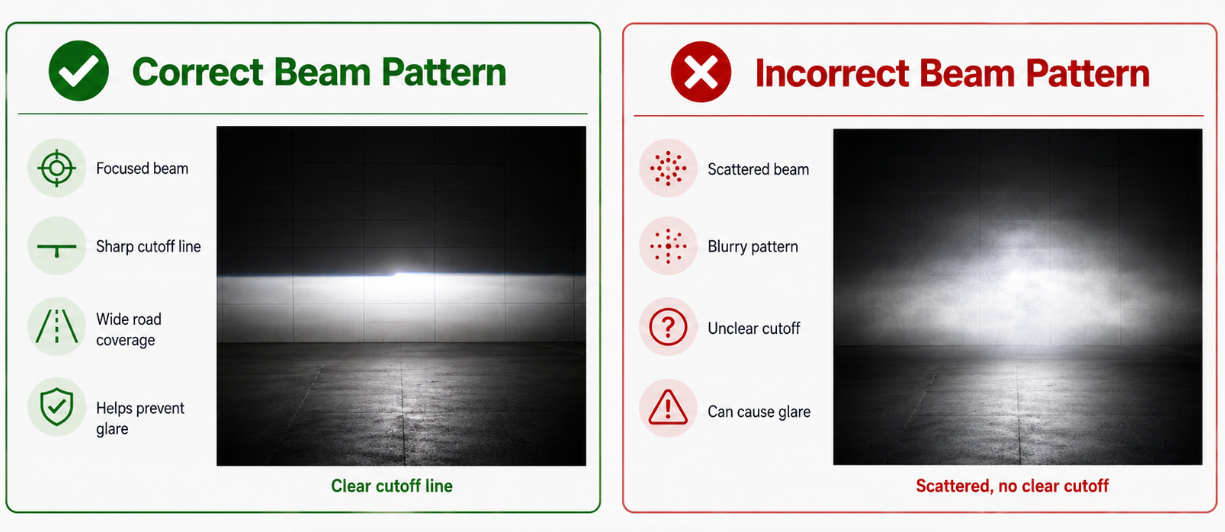
The cutoff line is the sharp horizontal edge where your beam stops projecting upward. This feature is critical for preventing light from shining directly into the eyes of oncoming motorists.
- Must appear as a distinct, straight line across the wall
- Should show no fuzzy edges or light spikes above the boundary
- Ensures compliance with DOT and ECE safety regulations
A missing or soft cutoff line indicates your bulb and housing are mismatched. This often happens when people install LED bulbs in housings designed for halogen filaments.
Achieving Fluid Foreground Illumination
Below the cutoff line, the light should spread evenly across the road surface. This foreground illumination helps you spot pedestrians, curbs, and debris close to your bumper.
- Avoids dark spots or harsh shadows near the vehicle
- Creates a gradual transition from the bright hotspot to the edges
- Widens toward the driver’s side for better shoulder visibility
Poor optics often create a “tunnel vision” effect, leaving the immediate foreground dangerously dark.
How to Test Your Beam Pattern at Home

You do not need expensive equipment to verify your headlight performance. A simple wall test in your driveway can reveal alignment issues and optical flaws.
Step-by-Step Wall Test Procedure
Follow these steps to set up a reliable testing environment for your vehicle. Accurate results require a flat surface and a dark background.
- Park your vehicle exactly 25 feet away from a flat wall or garage door.
- Mark the ground level and the vertical centerline of each headlight with tape.
- Ensure the vehicle is on level ground with no heavy cargo inside.
- Turn on your low beams in a dark environment with no other lights on.
- Observe the projected pattern on the wall for specific characteristics.
Pro Tip: The top of your cutoff line should generally sit about 2% below the horizontal centerline of your headlight when projected at this distance.
Interpreting Your Results
Look closely at the shape and clarity of the light on the wall. Specific visual cues tell you if your system is working correctly.
- Sharp horizontal cutoff: Indicates good optical focus and alignment.
- Hotspot placement: Should be just below the line and slightly right of center.
- Even foreground: Shows a smooth wash of light without gaps.
- Glare above cutoff: Signals misalignment or incorrect bulb type.
- Asymmetrical beams: Means one side is higher or brighter than the other.
- Scattered light: Suggests damaged lenses or poor bulb seating.
If you see light spilling above the cutoff line, you must recalibrate your headlights immediately.
Fixing Common Beam Pattern Problems
Even quality headlights can develop issues over time. Identifying the root cause helps you apply the right fix quickly.
Resolving Blurry Cutoff Lines
A fuzzy or indistinct cutoff line usually points to a mismatch between your bulb and housing design. This scatters light and reduces safety.
- Wrong bulb type: LEDs in halogen reflectors often cause this issue.
- Lens degradation: Oxidation or internal fog scatters the light beam.
- Damaged projector: Scratches on the lens ruin the sharp edge.
Solution: Replace the bulb with one designed for your specific housing type. You may also need to polish the lens or replace the entire assembly if damage is severe.
Correcting Asymmetric or Tilted Beams
If one headlight shines higher or angles differently than the other, your alignment is off. This creates an uneven road view and annoys other drivers.
- Misaligned adjusters: Vibrations or impacts can shift the aiming screws.
- Suspension issues: A sagging spring changes the vehicle angle.
- Improper seating: The bulb might not be clicked fully into place.
Solution: Use a screwdriver to adjust the aiming screws according to your manual. Check your suspension load and reseat the bulb to ensure a tight fit.
Eliminating Excessive Glare
Beams that blind others often result from improper aiming or non-compliant aftermarket parts. This is a major safety hazard.
- Over-lit bulbs: Extremely high Kelvin ratings can increase scatter.
- Upward aiming: Headlights pointing too high project light into traffic.
- Non-compliant housings: Cheap aftermarket parts often lack proper shielding.
Solution: Re-aim your headlights using the wall test method. Consider switching to certified 5000K LEDs that mimic the filament position of original halogen bulbs.
Upgrading Lights While Maintaining Pattern Integrity
Upgrading to brighter lights is popular, but it must be done carefully. Preserving the correct headlamp beam pattern is more important than gaining extra lumens.
Selecting Optics-Compatible Bulbs
Not every LED bulb works in every housing. Choosing the wrong type ruins the beam pattern instantly.
- Look for labels like “projector-optimized” or “reflector-safe.”
- Verify the filament or LED chip matches the original focal point.
- Check for DOT, SAE, or ECE certification marks on the packaging.
Brands like Philips and Sylvania often test their LEDs specifically for beam pattern compliance in various housing types.
Benefits of Projector Retrofits
For older vehicles with reflector headlights, installing projector housings offers the best upgrade path. Projectors provide superior light control compared to reflectors.
- Delivers a sharper and more defined cutoff line
- Controls light scatter more effectively
- Meets strict legal standards for aftermarket modifications
- Improves overall aesthetic and modernizes the look
This upgrade takes moderate effort but ensures your new bulbs perform exactly as designed.
Legal Standards and Safety Compliance

Headlight regulations exist to protect all road users. Understanding the difference between regional standards helps you stay legal and safe.
DOT Versus ECE Standards
Different regions enforce different rules for headlamp beam patterns. Knowing your local standard ensures your vehicle passes inspection.
| Feature | DOT (U.S.) | ECE (Europe) |
|---|---|---|
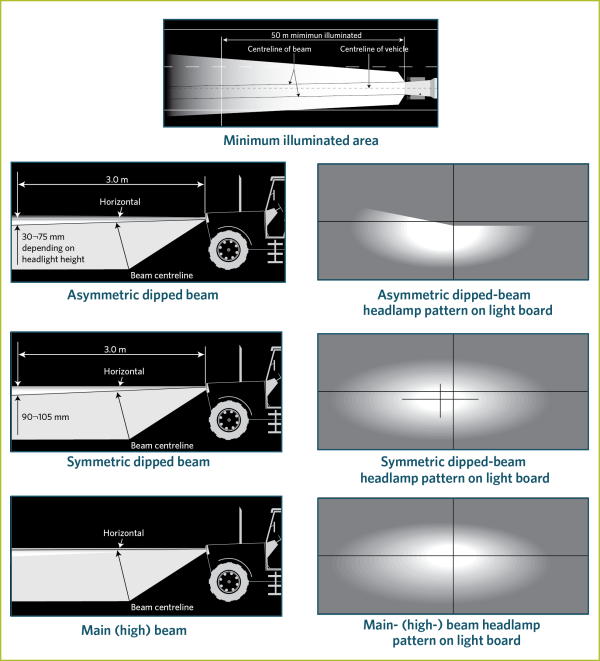
| Cutoff Shape | Horizontal and flat | 15-degree upward slant to right |
| Hotspot Location | Slightly right of center | Right side, lower left focus |
| Certification | FMVSS 108 compliant | UN Regulation 112 compliant |
| Aftermarket Rules | Bulb swaps often allowed | Full assembly certification required |
ECE patterns generally offer better illumination on the right shoulder, which helps on winding rural roads.
Legality of LED Upgrades
Swapping bulbs is not always legal. Many jurisdictions restrict bulb-only upgrades if they alter the intended beam pattern.
- Bulb-only replacements: Often non-compliant if not certified for your specific housing.
- Complete assemblies: Legal if the entire unit carries DOT or SAE certification.
- HID kits: Illegal in halogen housings due to extreme glare risks.
Always check your local state laws, as places like California and New York enforce these rules strictly.
Maintenance Tips for Consistent Performance
Regular maintenance keeps your headlamp beam pattern effective. Neglecting your lights leads to reduced visibility and safety risks.
Cleaning Lenses to Prevent Scatter
Dirt and oxidation on the lens surface scatter light and blur the cutoff line. Clean lenses ensure light exits the housing cleanly.
- Wash headlights with car shampoo every week.
- Apply a UV-protectant polish every six months.
- Seal lenses with an anti-yellowing coating to prevent future damage.
Checking Alignment After Impacts
Bumping a curb or driving over rough terrain can knock your headlights out of alignment. Regular checks prevent long-term issues.
- Inspect beam pattern every six months.
- Re-aim after off-roading or carrying heavy loads.
- Adjust immediately if you notice increased glare or dark spots.
Inspecting for Moisture and Seals
Condensation inside the housing distorts the beam and damages internal components. Water intrusion is a common cause of beam failure.
- Wipe vents dry if you notice dampness.
- Replace cracked seals immediately to stop water entry.
- Replace the entire unit if water pools inside the lens.
Frequently Asked Questions About Headlamp Beam Pattern
What makes a headlamp beam pattern legal?
A legal beam pattern must have a sharp cutoff line to prevent glare and stay within intensity limits set by DOT or ECE standards. The light must not project above the horizontal plane intended for low beams.
Why is my LED headlight beam pattern scattered?
Scattered light usually occurs when an LED bulb is placed in a housing designed for a halogen filament. The different light source location disrupts the reflector or projector focus.
How often should I check my headlight alignment?
You should check your alignment every six months or after any impact to the front of the vehicle. Heavy loading or suspension changes also warrant an immediate check.
Can I use LED bulbs in my old halogen headlights?
You can physically install them, but the beam pattern may be illegal and unsafe. Only use LEDs specifically certified for use in halogen reflector or projector housings.
What is the difference between DOT and ECE beam patterns?
DOT patterns typically have a flat horizontal cutoff, while ECE patterns feature a 15-degree upward slant on the right side. This slant improves visibility of roadside signs in European driving conditions.
Key Takeaways for Perfecting Your Headlamp Beam Pattern
Achieving the correct headlamp beam pattern is essential for safe night driving and legal compliance. Focus on maintaining a sharp cutoff line, a properly placed hotspot, and smooth foreground illumination to maximize visibility without blinding others. Regular testing and proper bulb selection ensure your lights perform exactly as intended.
Take action today by performing a simple wall test on your vehicle. If your beams fail to meet these standards, adjust your aim or upgrade to compatible components immediately for safer roads.