
Blinding oncoming drivers or struggling to see the road at night often points to misaligned headlamps rather than bad bulbs. Proper alignment ensures you see clearly while keeping other drivers safe from dangerous glare.
This guide teaches you how to check headlamp alignment using professional beamsetters or the classic 10-meter wall method. You will learn exact settings for cars and trucks plus troubleshooting tips for modern LED systems.
Why Your Headlights Might Fail Inspection
Incorrect headlamp aim reduces your stopping distance visibility by up to 40 percent. Many vehicles fail safety inspections simply because the beams point too high or scatter light incorrectly.
Regulations require specific downward tilt angles based on your vehicle type. Ignoring these standards creates hazards for everyone on the road and leads to legal penalties.
Use a Beamsetter for Precision Testing
A beamsetter simulates the standard 10-meter test within a compact device using optical technology. This tool allows accurate checks in small workshop spaces without needing a long driveway.
How Optical Compression Works
The device uses a Fresnel lens to shrink the 10-meter distance down to just 50 centimeters. This 20-to-1 compression means a tiny 5 mm error on the screen equals a massive 10 cm deviation on the road.
Floor flatness is critical for accurate results since minor unevenness skews the reading significantly. Always ensure your workspace meets DIN ISO 10604 standards for surface tolerance.
Position the Device Correctly
Place the unit between 30 and 70 cm in front of the headlamp according to manufacturer specs. Center it vertically and horizontally within 3 cm of the light source for valid measurements.
Use a laser sight to align the device with the vehicle centerline. Wheel-mounted units need re-alignment for each lamp while rail systems only need one setup per vehicle.
Set the Correct Inclination Percentage
Find the forward inclination percentage printed on your headlamp housing label. Common values include 1.2 percent for most cars and 1.0 percent for vehicles with auto-leveling suspension.
Trucks and buses often require a steeper 3.0 percent drop to account for higher mounting heights. Setting the wrong value on the beamsetter wheel ruins the entire adjustment process.
Check Low Beam Alignment Steps

The low beam pattern uses an asymmetrical design to light up the roadside without dazzling oncoming traffic. Proper alignment of this cut-off line is the most critical step in the process.
Align Asymmetrical Cut-Off Lines
The horizontal part of the beam must touch the dividing line on the aiming screen perfectly. The “kink” where the beam rises for roadside visibility must pass vertically through the central marking.
Ensure the bright core of the light falls to the right of the vertical center line for right-hand traffic. Cover and uncover the lamp repeatedly to spot the exact transition point of the kink.
Verify Symmetrical Beams If Applicable
Older vehicles or specific models may use symmetrical low beams with no upward kink. In these cases the cut-off line should run straight and horizontal across the entire screen width.
Adjust the beam until the line is level and centered on the markings. Do not attempt to create a kink if your vehicle design calls for a flat distribution pattern.
Test High Beam and Fog Lamps
Auxiliary lighting systems require separate verification after you finish adjusting the main low beams. Each system has unique targeting requirements for safe operation.
Aim the High Beam Accurately
Switch to high beam mode and look for the center of maximum intensity on the screen. This hot spot must hit the central cross marking exactly for proper long-range illumination.
Re-check your low beam alignment if you adjusted the high beam. Many halogen and Bi-Xenon systems share adjusters so moving one affects the other.
Adjust Fog Lamps to Standard
Activate your fog lights and ensure the cut-off line runs horizontally along the dividing line. These lamps typically aim lower than low beams to prevent reflection in bad weather.
Use the available adjustment screws to level the beam across its full width. A common setting for fog lamps is a 2.0 percent downward tilt.
Handle Advanced Lighting Systems
Modern vehicles with adaptive driving beams or matrix LEDs need special procedures before testing. Standard adjustment methods can damage these complex systems if done incorrectly.
Activate Glare-Free High Beam Mode
Connect a diagnostic tester to the OBD2 port to access the vehicle service menu. Select the headlamp adjustment option to lock the system into a fixed calibration pattern.
Failure to enter this mode results in shifting patterns that make measurement impossible. The system must project a static square-shaped cut-off line for accurate aiming.
Align Adaptive Beams Properly
Once in service mode align the vertical edge of the glare-free cut-off with the central marking. Even slight misalignment causes extreme glare due to the sharp edges of these beams.
Precision is non-negotiable with these sensitive systems. A small error can blind oncoming drivers more severely than traditional halogen misalignment.
Address Bi-Xenon and LED Modules
Bi-Xenon lamps often use a single bulb with a moving shield mechanism. Adjusting the high beam may shift the low beam aim so always verify both settings.
Sealed LED matrix units often cannot be adjusted manually by users. Consult professional recalibration services if these units appear misaligned to avoid voiding warranties.
Apply the 10-Meter Wall Method
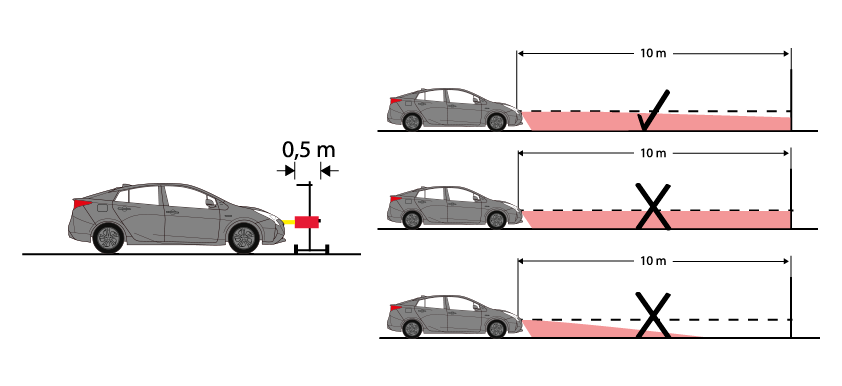
Use this manual technique when a beamsetter is unavailable or for vehicles with headlamps mounted over 140 cm high. It requires a flat surface and a light-colored vertical wall.
Prepare the Test Area
Position your vehicle exactly 10 meters from the wall with headlights facing straight ahead. Ensure the ground is level and the wall is clean and free of obstructions.
Gather masking tape a measuring tape and a spirit level for marking. Accuracy depends entirely on precise distance measurement and level positioning.
Mark the Wall Correctly
Draw a vertical center line extending from the vehicle longitudinal axis to the wall. Mark a horizontal line at the exact height of your headlamp centers.
Draw a target line below the height line based on your required drop percentage. For a 1.2 percent tilt mark this line 12 cm lower than the headlamp height.
Adjust Each Headlamp Individually
Cover the right headlamp and adjust the left one until the horizontal cut-off touches your target line. Move the beam laterally so the kink hits the corresponding side mark.
Repeat the process for the right headlamp using the opposite lateral mark. Use a screwdriver on the adjustment screws for fine control during this process.
Follow Regulatory Standards by Vehicle

Legal requirements for headlamp aim vary significantly based on vehicle type and registration date. Adhering to these standards ensures your vehicle passes safety inspections.
Passenger Cars Post 1990
Most passenger cars registered after 1990 with headlamps under 1200 mm high require a 1.2 percent tilt. Vehicles equipped with auto-leveling suspension typically use a 1.0 percent setting instead.
Fog lamps on these vehicles generally need a 2.0 percent downward angle. Always check the specific label on your headlamp housing for the manufacturer recommended value.
Trucks Buses and Heavy Vehicles
Heavy vehicles without auto-tilt systems require a steeper 3.0 percent low beam setting. This compensates for the higher mounting position and potential load shifts.
Fog lamps on trucks and buses should be set to 4.0 percent. These stricter angles prevent light from reflecting off wet roads into the eyes of other drivers.
Motorcycles and Agricultural Tractors
Motorcycles typically follow a 1.0 percent standard with an allowable range between 0.5 and 2.5 percent. Ensure the bike is upright on a level surface during testing.
Agricultural tractors have wider tolerances ranging from 0.5 to 6.0 percent depending on headlamp height. Front-mounted add-ons follow a specific formula based on installation height.
Measure Glare with a Luxmeter

Perfectly aimed lights can still fail if they produce excessive glare intensity. Modern beamsetters include digital luxmeters to quantify this output accurately.
Perform a Glare Value Test
Measure the light intensity at the highest permissible point of the low beam pattern. Halogen lamps must not exceed 1.0 lux while Xenon HID lamps have a limit of 1.3 lux.
Exceeding these limits indicates a defective headlamp unit rather than an aiming issue. Adjustment cannot fix internal optical failures that cause excessive brightness.
Diagnose Internal Damage
Scratched or oxidized lenses often scatter light and cause glare failures. Damaged reflectors or moisture inside the housing also contribute to unsafe light distribution.
Clean your lenses thoroughly before concluding the unit is defective. If glare persists after cleaning and aiming replace the headlamp assembly immediately.
Prepare the Vehicle Properly
Vehicle condition directly impacts the accuracy of your headlamp alignment results. Skipping preparation steps leads to incorrect settings that fail under real driving conditions.
Conduct a Pre-Check Inspection
Verify that all lighting functions work including low beam high beam and fog lights. Inspect lenses for cracks yellowing or cloudiness that could distort the beam pattern.
Set the vehicle illumination control unit to basic mode or zero. This disables automatic leveling systems that might counteract your manual adjustments.
Ensure Correct Load Condition
Keep the fuel tank at least half full during the alignment process. Sit in the driver seat or place equivalent weight to simulate normal operating conditions.
Ensure tires are properly inflated and remove any unnecessary cargo. Vehicles with level-regulating suspension must be in manual basic mode to prevent automatic corrections.
Troubleshoot Common Alignment Issues
Drivers often experience specific symptoms that point directly to headlamp misalignment problems. Identifying these signs helps you diagnose the root cause quickly.
Why Oncoming Drivers Flash Lights
Frequent high beam signals from other drivers usually mean your beams are tilted too high. An asymmetrical kink aimed too far out can also cause blinding glare.
Double check your vertical aim settings and perform a lux test. Dirty lenses can also scatter light upward so clean them before readjusting.
What If Visibility Is Poor at Night
If you cannot see far enough your beams are likely aimed too low. This often happens after suspension work or when adjustment screws loosen over time.
Degraded lenses can cut light output by up to 80 percent reducing visibility. Replace aged bulbs as halogen units lose significant brightness over their lifespan.
Diagnose Recurring Misalignment
Headlamps that drift out of alignment quickly often have loose mounting brackets. Corroded adjusters or worn suspension components can also cause persistent aiming issues.
Fix underlying mechanical problems before attempting to realign the lights. Ignoring sagging springs or broken clips will result in repeated failures.
Frequently Asked Questions About Headlamp Alignment
How often should I check my headlamp alignment?
You should check alignment annually or after any front-end impact or suspension repair. Regular checks ensure optimal visibility and prevent accidental blinding of other drivers.
Can I adjust LED headlights myself?
Sealed LED matrix units often require professional diagnostic tools for adjustment. Attempting manual adjustment on these systems can void warranties or cause damage.
What is the standard drop for passenger cars?
Most passenger cars require a 1.2 percent downward tilt for low beams. Vehicles with automatic leveling systems typically use a 1.0 percent setting instead.
Why do my headlights fail the glare test?
Failed glare tests usually result from oxidized lenses or damaged internal reflectors. If cleaning and aiming do not fix it the headlamp unit likely needs replacement.
Do I need special tools for alignment?
Professional beamsetters offer the highest precision but the 10-meter wall method works too. You will need a level measuring tape and masking tape for the manual method.
What happens if I ignore misaligned headlights?
Misaligned lights reduce your stopping distance visibility and increase accident risk. You may also face fines or fail mandatory vehicle safety inspections.
Key Takeaways for Checking Headlamp Alignment
Proper headlamp alignment protects you and others by balancing visibility with safety. Always prepare your vehicle correctly and follow specific percentage settings for your vehicle type.
Use a beamsetter for precision or the 10-meter wall method for manual checks. Verify glare levels with a luxmeter and replace defective units that exceed intensity limits.
Schedule an alignment check today if you notice reduced night visibility or complaints from other drivers. Safe driving starts with seeing clearly without blinding others on the road.