
Foggy, yellowed headlamps scatter light instead of focusing it, creating a dangerous driving hazard at night. This oxidation happens when UV rays and road debris degrade the polycarbonate plastic on your vehicle over time.
You can fix this issue without expensive replacements by using simple DIY methods to clean foggy headlamps effectively. This guide explains how to diagnose the damage type and choose the right restoration technique for your specific situation.
Diagnose External Oxidation Versus Internal Moisture
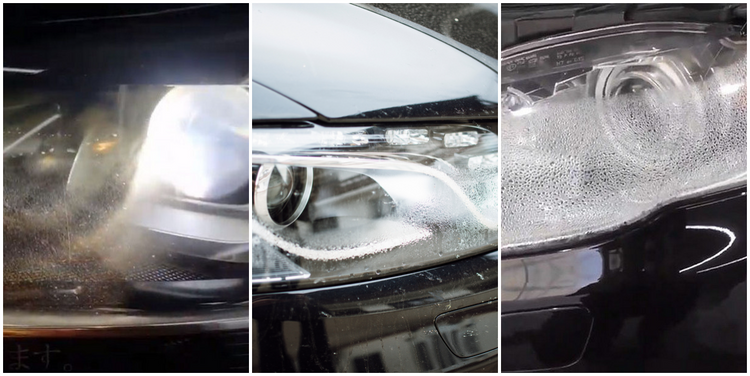
You must identify where the fogging exists before attempting any cleaning method. The location of the haze determines whether surface polishing will work or if you need major repairs.
Perform the Touch Test
Run your fingers gently across the lens surface to feel for texture issues. If the plastic feels rough, gritty, or pitted, you are dealing with external oxidation caused by UV damage. All surface cleaning methods described later in this article work effectively on this type of damage.
Check for Internal Condensation
Inspect the inside of the housing if the outer surface feels completely smooth to the touch. Water droplets or cloudiness inside the unit indicate a broken seal that allows moisture entry. Polishing the exterior will not fix internal fogging, so you may need to remove the headlight assembly to dry and reseal it.
Quick Test: Spray water on the lens to see how it behaves. Water should bead up and roll off a healthy surface, while it will sheet or stick if the UV protection layer is gone.
Use Toothpaste to Remove Mild Hazing

Toothpaste serves as an excellent budget solution for lightly fogged headlights with minor discoloration. This method uses mild abrasives found in gritty pastes to polish away surface oxidation without expensive tools.
Gather Required Supplies
- Gritty toothpaste containing baking soda or peroxide (avoid gel formulas)
- Soft cloth or an old toothbrush for scrubbing
- Spray bottle filled with warm water
- Car wax for sealing the surface after cleaning
Apply and Polish the Lens
- Coat the entire lens with a thick layer of toothpaste, ensuring you cover all cloudy areas generously.
- Scrub the surface in small circular motions using your toothbrush or cloth to lift the oxidation.
- Let the paste sit on the plastic for 3 to 5 minutes to allow the abrasives to break down the haze.
- Rinse thoroughly with warm water and buff the lens dry with a clean microfiber towel.
- Apply a layer of car wax immediately to seal the surface and block future UV damage.
Repeat this process two or three times for the best results, as most users see dramatic improvement after the first round.
Pro Tip: Use a basic baking soda toothpaste rather than whitening gels because it offers more abrasion for faster cleaning.
Understand Method Limitations
This technique will not fix deep pitting or heavy yellowing that has penetrated the plastic deeply. If the lens still looks dull after two full applications, you should move to a sanding kit for better results. Results typically last 6 to 12 months, so treat this as regular maintenance.
Restore Severely Yellowed Lenses with Sanding
Deeply hazy or brown headlights require removing a thin layer of degraded plastic to restore clarity. The aggressive sanding method using a grit sequence is the industry standard for severe damage.
Prepare the Work Area Properly
- Wash the headlight with soap and water to remove all dirt and grime.
- Mask off surrounding paint with tape to prevent accidental scratches during sanding.
- Place a vertical strip of tape down the center of the lens to compare progress between treated and untreated sides.
Sand in Correct Grit Sequence
Use wet sanding techniques to prevent heat buildup and achieve a smooth finish on the plastic.
Start with 500-Grit Sandpaper
Soak the paper and lens with water before sanding in small circles across the entire surface. Continue this step until the lens looks uniformly frosted, which indicates the oxidized layer is gone.
Move to 800-Grit Paper
Rinse and dry the lens before sanding again to remove scratches left by the 500-grit stage. Focus extra attention on corners and curves that may need hand-sanding for complete coverage.
Finish with 3,000-Grit Paper
Keep the surface wet while sanding until a white, milky film appears on the plastic. This film indicates that micro-scratches are being polished out, leaving the lens clear but slightly hazy without a sealant.
Warning: Never skip grits in the sequence because jumping from 500 to 3,000 will leave visible scratches that ruin the finish.
Seal Against Future Oxidation
Unsealed plastic will yellow again within weeks, so you must apply a protective coating immediately. Use the clear coat wipe from your kit to apply two full coats, letting each dry completely for protection that lasts up to 2 years.
Tool Hack: Use a drill with a foam sanding pad for faster 500-grit work, but keep it moving constantly to avoid melting the plastic.
Try Chemical Wipes for Quick Results
Chemical-based kits offer a middle ground between toothpaste and sanding for drivers who want less mess. These systems use specialized solutions to dissolve oxidation before applying a ceramic coating.
Remove Oxidation with Chemical Wipes
Wipe the lens with the provided oxidation remover solution and watch for yellow residue on the rag. This residue confirms the chemical is pulling out degraded material, and you may need up to 8 wipes per headlight.
Lightly Sand by Hand
Use the included 2,000-grit pad to smooth the surface before switching to 3,000-grit for final polishing. These pads are often stiff, so apply firm hand pressure especially on curved edges for consistent results.
Apply Ceramic Coating
Wipe on the ceramic coating with the included applicator to create a clear, glossy finish. Some brands claim lifetime durability, though real-world results vary based on your local climate and sun exposure.
Best For: Drivers who want good results without power tools or deep sanding efforts.
Compare All Cleaning Methods

Choosing the right method depends on the severity of your fogging issue and your available time. The following comparison helps you select the best approach for your specific needs.
| Feature | Toothpaste Method | Sanding Kit | Chemical/Ceramic |
|---|---|---|---|
| Best For | Mild haze | Severe yellowing | Moderate cloudiness |
| Cost | ~$1 | ~$20 | ~$20 |
| Time Required | 15–20 min | 45–60 min | 30–45 min |
| Effort Level | Low | High | Medium |
| Durability | 6–12 months | Up to 2 years | Claimed lifetime |
| Tools Needed | Cloth/toothbrush | Sandpaper, water, tape | Wipes, pads |
| Reapplication | Every 6 months | Every 2 years | Rarely |
Rule of Thumb: Use toothpaste and wax for slight fog, sanding kits for brown and pitted lenses, and chemical options for fast, clean results.
Follow a Universal Restoration Workflow

Every successful restoration follows a proven four-phase process regardless of the specific method you choose. Adhering to this workflow ensures safe and effective results for your vehicle.
Phase 1: Prep the Surface
Clean the headlight with mild soap and water, then dry it with a microfiber towel. Tape off paint around the lens to prevent accidental scratches during the cleaning process.
Phase 2: Progress Through Grits
Always sand wet to reduce heat and prevent clogging of the sandpaper. Rinse and inspect between each grit while moving in consistent circular motions to prepare the surface.
Phase 3: Polish for Shine
Apply a rubbing compound with a microfiber cloth after sanding to remove remaining micro-scratches. Buff until the lens is glossy and clear before moving to the final sealing step.
Phase 4: Seal for Longevity
Apply a UV-resistant sealant, wax, or ceramic coating to protect the newly exposed plastic. Let it cure fully before driving and reapply every 6 to 12 months to maintain protection.
Pro Tip: Work in the shade because direct sunlight dries wet sanding solutions too fast and can leave streaks on the lens.
Prevent Re-Fogging with Maintenance
Cleaning is only half the battle, so you must take steps to prevent future oxidation. Proper maintenance keeps your lights clear longer and protects your investment.
Wax Every 6 Months
Apply carnauba wax every six months even after professional restoration. This adds a sacrificial UV barrier that repels water and slows down the oxidation process significantly.
Park in Shade or Garage
UV exposure is the number one cause of yellowing, so reduce it by parking indoors when possible. Using a car cover provides an additional layer of protection against harsh sunlight.
Avoid Harsh Cleaners
Never use household cleaners, ammonia, or abrasive polishes on your headlights. These substances strip protective layers and accelerate damage to the polycarbonate plastic.
Inspect Annually
Check headlights each year for early signs of haze or discoloration. Catching oxidation early means you can fix it with toothpaste instead of needing extensive sanding later.
Know When to Replace, Not Restore

Restoration works for 90% of foggy headlights, but some cases require replacement for safety. You should know when a DIY fix is no longer sufficient for your needs.
Replace If Damaged
- The lens is cracked or split open
- There is persistent internal fogging after drying attempts
- The housing is warping or discolored from heat
- Previous restoration attempts left uneven surfaces or melted plastic
In these cases, replacement is safer and more cost-effective than repeated fixes that do not solve the underlying problem.
Frequently Asked Questions About Cleaning Foggy Headlamps
Can toothpaste really clean foggy headlamps effectively?
Yes, toothpaste works well for mild oxidation because it contains mild abrasives that polish the surface. It is a cost-effective solution for light haze but requires reapplication every 6 to 12 months.
How long does a headlight restoration last?
Results vary by method, with toothpaste lasting 6 to 12 months and sanding kits lasting up to 2 years. Ceramic coatings claim lifetime durability, though environmental factors affect real-world performance.
Why do my headlights fog up again so quickly?
Headlights fog up quickly if you skip the sealing step after sanding. Unsealed polycarbonate plastic oxidizes rapidly when exposed to UV rays and moisture without protection.
Is internal fogging fixable with cleaning kits?
No, internal fogging indicates a broken seal that lets moisture inside the housing. Surface cleaning methods cannot reach inside, so you must reseal or replace the unit.
What is the cheapest way to clean foggy headlamps?
The toothpaste method is the cheapest option at approximately $1 using household items. It works best for mild cases and serves as an affordable maintenance solution.
Key Takeaways for Restoring Your Foggy Headlamps
Cleaning foggy headlamps improves safety by restoring proper light projection and visibility at night. You can choose between toothpaste for mild cases, sanding kits for severe damage, or chemical wipes for a balance of speed and results.
Always seal your headlights after cleaning to prevent rapid re-oxidation and extend the life of your restoration. Start by diagnosing your specific damage type, then follow the appropriate method to bring your headlights back to life.