
Your NEBO headlamp won’t turn on right before a night hike or critical work shift. Knowing how to charge a NEBO headlamp correctly saves your trip and protects the battery. Different models require specific cables and access steps to avoid damage.
This guide details charging steps for every major NEBO series including Transcend and Einstein. You will learn to identify your port type and interpret LED status lights accurately. Follow these instructions to restore power safely and maintain waterproof seals.
Identify Your NEBO Headlamp Model Type
Checking your specific model number prevents cable mismatches that damage ports. NEBO uses three distinct charging architectures depending on the series you own. Using the wrong connector can bend pins or ruin the internal battery module.
USB-C Versus Micro-USB Distinctions
Newer high-output models like the Transcend 3000 use USB-C connections. Older or compact units like the Einstein 400 rely on Micro-USB inputs. The Micro 450 features a modern external USB-C port for rapid charging.
Access Mechanism Differences
- Rotary Base: Requires unscrewing the magnetic base to find the port.
- Covered Port: Needs a rubber flap peeled back to reveal the input.
- External Port: Allows direct cable insertion without disassembly.
Charge Transcend and HL1000 Series
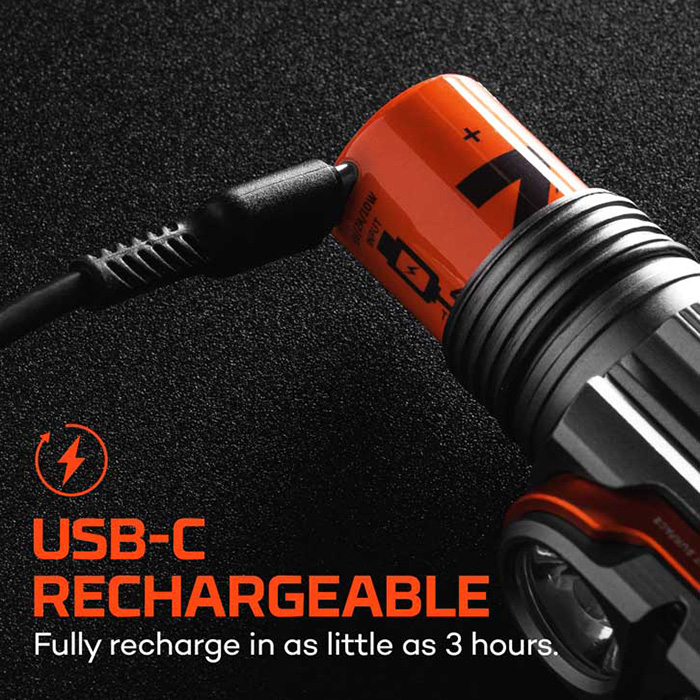
These powerful lights hide the USB-C port inside the battery compartment for maximum water resistance. You must access the internal battery cell to initiate the charging process properly.
Unscrew the Magnetic Base
- Remove the headlamp from any metal surface to release the magnet.
- Grip the main body and rotate the rear base counter-clockwise.
- Gently pull the base away to expose the cylindrical battery inside.
Flip Battery to Reveal Port
- Carefully lift the battery module out of the housing.
- Turn the battery over to find the USB-C port on the reverse side.
- Insert the USB-C end of your cable into this hidden port.
Monitor Charging Status Lights
- Red Light: Indicates the battery is actively accepting a charge.
- Green Light: Signals a full charge after approximately three hours.
- Action: Leave the unit connected until the light turns solid green.
Reassemble and Seal Unit
- Disconnect the cable once the green indicator appears.
- Reinsert the battery with the positive terminal facing down.
- Screw the base clockwise until snug to restore IPX7 water resistance.
Charge Einstein 400 and Mycro Models

These compact units utilize a Micro-USB port located under a protective rubber seal. Forcing a USB-C cable into these ports will cause permanent physical damage to the device.
Locate and Open Port Cover
- Find the rubber flap on the bottom of the Einstein or side of the Mycro.
- Gently peel back the cover labeled with the port type.
- Ensure the flap is folded back completely to avoid bending the cable.
Insert Micro-USB Cable Correctly
- Plug the Micro-USB end firmly into the exposed port.
- Connect the standard USB end to a wall adapter or power bank.
- Verify the red LED illuminates to confirm power flow.
Restore Waterproof Seal After Charging
- Unplug the cable immediately when the light turns green.
- Press the rubber flap down firmly until it sits flush with the body.
- Run your finger along the edge to ensure no gaps remain.
Charge Micro 450 for Fast Power
The Micro 450 offers the quickest turnaround time with its external USB-C design. You can restore full battery capacity in just thirty minutes using this method.
Access External USB-C Port
- Locate the USB-C port on the side of the headlamp body.
- Pull back the small rubberized cover protecting the input.
- No tools or disassembly are required for this model.
Connect and Verify Rapid Charge
- Insert any standard USB-C cable into the port.
- Watch for the red LED to confirm charging has started.
- Wait thirty minutes for the light to switch to green.
Secure Port Cover Tightly
- Remove the cable once the green light appears.
- Push the rubber cover back until it clicks into place.
- Check for debris that might prevent a proper seal.
Interpret NEBO LED Indicator Lights
Understanding the color codes prevents you from unplugging too early or ignoring a dead battery. All NEBO rechargeable models use a consistent red and green signaling system.
Charging Status Meanings
- Solid Red: The battery is currently charging.
- Solid Green: The battery is fully charged and ready.
- No Light: Check your cable connection or power source.
Low Battery Warnings
Transcend and HL1000 models feature Smart Power Control alerts. A solid orange light means you have over twenty-five percent power remaining. A pulsing orange light warns that power is below twenty-five percent.
Troubleshoot Common Charging Problems

Failure to charge often stems from simple user errors regarding cable types or port access. Follow these diagnostic steps if your indicator light does not appear.
No Red Light Appears
- Verify you are using the correct cable type for your model.
- Test the power source with another device to ensure output.
- Clean dust from the port using compressed air.
- Check that rubber seals are not blocking the connection.
Green Light Appears Too Quickly
- Issue: The light turns green in under five minutes.
- Cause: Loose connection or damaged battery cell.
- Fix: Try a different cable or contact NEBO support.
Unit Feels Hot During Charging
- Normal: Slight warmth during the process.
- Abnormal: Hot to the touch requires immediate unplugging.
- Safety: Never charge on flammable surfaces or in direct sun.
Maintain Waterproof Integrity During Charging
Water damage voids warranties if the unit was not sealed correctly after charging. Proper sealing is critical for maintaining your IPX4 or IPX7 ratings.
Verify Seal Closure
- Transcend: Ensure the base is screwed on tightly by hand.
- Einstein: Confirm the rubber flap lies completely flat.
- Micro 450: Listen for the click when closing the port cover.
Inspect Seals Regularly
- Wipe seals with a dry cloth after every use.
- Check for tears cracks or embedded dirt particles.
- Replace damaged covers immediately to prevent moisture ingress.
Optimize Battery Longevity Habits
Lithium batteries perform best when charged using specific maintenance habits. Extending battery life ensures your headlamp lasts for years of reliable service.
Avoid Full Discharges
Recharge your light when the low battery warning appears. Do not wait until the light completely dies before plugging it in. Partial charges do not harm lithium-based cells.
Store With Partial Charge
- Charge the battery to roughly fifty percent for long storage.
- Store the unit in a cool dry place away from direct sunlight.
- Avoid storing the battery fully drained or fully charged.
Use Quality Cables Only
Cheap cables may deliver unstable voltage that harms the charging circuit. Always use the included cable or a certified high-quality replacement. Carry a spare cable appropriate for your specific model type.
Frequently Asked Questions About Charging NEBO Headlamps
Can I charge my NEBO headlamp with a phone charger?
Yes, you can use any standard USB wall adapter or computer port. Ensure the power output matches standard USB specifications to avoid damaging the battery circuit.
How long does it take to charge a NEBO Transcend 3000?
A full charge for the Transcend 3000 takes approximately three hours. The LED indicator will turn from red to green when the battery reaches full capacity.
What if my NEBO headlamp gets wet while charging?
Stop charging immediately and dry the unit thoroughly before attempting again. The device is not waterproof while the charging port or battery compartment is open.
Why is my charging light blinking or not turning on?
This usually indicates a bad cable connection or incorrect cable type. Try cleaning the port and swapping to a known working cable for your specific model.
Can I leave my NEBO headlamp charging overnight?
It is best to unplug the device once the green light appears. While overcharge protection exists, disconnecting promptly maximizes long-term battery health.
Key Takeaways for Charging Your NEBO Headlamp
Mastering how to charge a NEBO headlamp requires identifying your specific model and port type first. Always match the cable correctly and ensure all seals are tight before exposing the light to moisture.
Proper maintenance of your charging routine extends battery life and ensures reliability. Check your LED indicators regularly and store your unit with a partial charge for best results. Your headlamp will remain ready for any adventure when you follow these precise steps.