
You’ve just arrived at the beach, the sun is blazing, and you’re ready to relax, only to face the dreaded tent struggle. Flapping fabric, loose corners, and poles that won’t stay up can ruin your setup in minutes. But the Neso tent is designed to be different: lightweight, versatile, and ready in under five minutes when you know how. Whether you’re on sand, grass, or clipped to a van, this guide shows you exactly how to set up your Neso tent for maximum shade and stability in any condition.
The key to a successful Neso tent setup lies in two principles: more weight equals more stability, and more tension equals more stability. Unlike traditional pop-up tents, the Neso uses sand-filled bags or stake anchors combined with strategic pole placement to create a taut, wind-resistant canopy. This guide covers all models, including Beach, Sidelines, and Party tents, and includes pro tips for windy days, off-beach mounting, and avoiding common mistakes.
Neso Tent Models: Know Your Type Before Setup
Before setting up, identify your Neso model. Each uses a different anchoring system and pole placement.
Beach Tent: Sand-Filled Stability
Uses built-in sand pockets at each corner. Fill each bag with about 20 lbs of sand or smooth rocks. Ideal for beaches, dunes, or any sandy surface.
Sidelines Tent: Stake-Based Ground Setup
Uses anchor straps and stakes with carabiner clips. Designed for grass, dirt, or firm ground. No sand required.
Party Tent: Dual-Environment Design
Can be set up on sand using sand bags or off-beach using stakes. Offers the most versatility across environments.
Universal Clip System: Beyond the Ground
All Neso tents feature a clip-based edge system that allows attachment to trees, fences, vans, or boats. This makes them ideal for camping, tailgating, or beachside picnics where traditional anchoring isn’t possible.
Set Up a Neso Beach Tent in 6 Steps
The Neso Beach Tent thrives on sand using weight-based anchoring. Done right, it stays put, even in wind.
Lay Tent Flat and Position
Unpack the tent and lay it completely flat on the sand. Face the open side toward the ocean or desired view. Ensure no fabric is bunched or folded. This is your foundation, so get it right.
Visual cue: The NESO logo should be visible on each corner strap.
Fill Sand Bags to 20 lbs
Each corner has a built-in sand pocket. Fill every bag with sand or smooth rocks until:
– Size: About the size of a basketball
– Weight: Approximately 20 lbs per bag
– Method: Use your hands or a small bucket to pack sand tightly
Pro tip: Compact the sand as you fill. Loose sand shifts and reduces stability.
Do not tie the bags. Just cinch the drawstring shut. Tight enough to hold, loose enough to adjust.
Pull Into a Taut “X” Shape
Grab opposite sand bags and pull them apart to stretch the fabric diagonally. Repeat with the other pair. The tent should form a tight “X” with no sagging.
Key principle: More tension equals more stability. A taut canopy resists wind and maximizes shade.
Brace Bags Against Sliding
Mound extra sand or small rocks around the base of each filled bag to prevent them from sliding inward when you raise the poles.
Critical: Do not bury the bags. Burying puts excessive pressure on the fabric and can cause tearing.
Snap and Extend the Poles
Take the two pole sections and snap them together until you hear a click. Shake out any sand from the joints before connecting.
Fully extend the assembled pole. Check for smooth operation with no kinks or resistance.
Prop Tent 1–2 Feet from Corners
Position the poles 1–2 feet inward from each corner, never directly at corners. Lift gently and the tent will pop into place.
Why not at corners? Placing poles at corners creates too much pressure on the fabric, risking tears and instability.
Adjust pole position slightly to level the canopy and maintain even tension.
Windy Day Setup: Adapt to Conditions
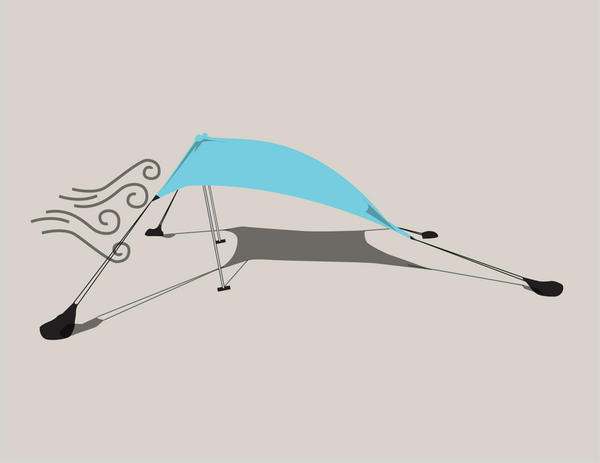
Wind does not have to ruin your beach day. Adjust your setup based on wind type.
Light Wind: Pole on Windward Side
Place the poles on the side where the wind is coming from. Angle them slightly into the wind to act as braces.
Result: The tent leans into the breeze, reducing flapping and strain.
Heavy Wind: Reduce the Front “Lip”
In strong, steady winds:
– Position poles 2 ft from corners
– Place them 6 inches from edge stitching
– This minimizes the front overhang that catches wind
Effect: Less surface area exposed means less lift and better hold.
Swirling Wind: Use 3–4 Poles
For unpredictable, gusty conditions:
– Add a third or fourth pole
– Position poles to create an opening underneath the tent
– Allow wind to flow under the canopy instead of pushing against it
Visual cue: You should see light passing under the edges. This means air is escaping, not building pressure.
Set Up a Neso Sidelines Tent on Grass or Ground
For parks, fields, or backyard use, the Sidelines Tent uses stakes instead of sand.
Lay Tent Flat on Ground
Unroll the tent on a level surface. Clear debris like sticks or stones that could damage the fabric.
Extend Anchor Straps Fully
Pull all four anchor straps outward to form a large “X.” Ensure they are fully extended before staking.
Twist in Stakes at NESO Logo
Insert stakes into the ground next to the NESO logo on each strap. Use the included plastic sleeve over the stake for extra grip and torque.
Pro tip: If the ground is hard, twist slowly and steadily. Don’t force it.
Attach Carabiner Clips
Clip the carabiners from the tent corners to the stakes. Ensure each clip is fully closed and secure.
Extend and Position Poles
Assemble and extend the poles. Prop the tent up with poles placed 1 ft from corners.
Check: Fabric should be taut, with no sagging or wrinkling.
Neso Party Tent: Beach or Off-Beach Setup
The Party Tent adapts to both sand and ground. Just switch the anchoring method.
Off-Beach Setup (Stake Version)
Follow the Sidelines Tent steps:
1. Lay flat
2. Extend straps into “X”
3. Stake at NESO logo
4. Clip carabiners
5. Extend poles
6. Prop up with poles 2 ft from corners
Note: The increased pole distance creates a higher, more open canopy, ideal for group shade.
On-Beach Setup (Sand Bag Version)
Use the standard Beach Tent method:
– Fill sand bags to 20 lbs
– Pull into taut “X”
– Brace bags with extra sand
– Prop with poles 1–2 ft from corners
No conversion kit needed. The same tent works both ways.
Convert Your Neso Tent for Off-Beach Use

The Neso is not just for beaches. Its clip system lets you attach it almost anywhere.
Clip Around Natural or Man-Made Structures
Use the edge clips to secure the tent to:
– Tree trunks or sturdy branches
– Fence posts
– Rocks or boulders
– Van roofs, boat rails, or truck beds
Pro tip: Test stability before relying on it. Ensure the structure won’t move or shift.
Ideal for: Camping, Tailgating, Van Life
This feature makes the Neso perfect for:
– Shade beside your RV or camper
– Picnic areas without flat ground
– Boat decks or dockside relaxation
The possibilities are endless. Just ensure each clip is securely fastened and the fabric is taut.
Avoid These 5 Common Setup Mistakes
Even experienced users make these errors. Don’t let them ruin your day.
1. Placing Poles at Corners
Setting poles directly at corners creates excessive pressure on fabric, leading to tears or collapse. Always place poles 1–2 ft inward.
2. Underfilled Sand Bags
Using small, light bags causes the tent to lift or flip in wind. Fill to basketball size, about 20 lbs each.
3. Burying Sand Bags
Covering bags completely with sand creates fabric stress and potential seam failure. Brace bags with sand around them and never bury.
4. Skipping the “X” Stretch
Not pulling fabric taut before raising poles results in a sagging canopy and poor wind resistance. Pull diagonally to create full tension.
5. Ignoring Wind Direction
Setting up blindly causes the tent to flap, lift, or collapse. Adjust pole position based on wind type.
Pole Assembly: Snap, Extend, Secure
Poles are simple but require care.
Snap Sections Until They Click
Join the two pole pieces with a firm push until you hear a click. This confirms they are locked.
Shake Out Sand Before Assembly
If sand got into the joints, shake it out. Sand inside causes friction and weak connections.
Fully Extend Before Use
Make sure the pole is completely straight and extended. A bent or partially collapsed pole won’t support the canopy properly.
Check: Run your hand along the pole to feel for kinks.
Pre-Use Setup Checklist
Run through this quick list before relaxing:
– All sand bags filled and cinched (20 lbs each)
– Fabric stretched in tight “X” configuration
– Bags braced with sand (not buried)
– Poles snapped, extended, and free of debris
– Poles positioned 1–2 ft from corners
– Canopy taut, no sagging
– Clips or stakes securely fastened
Time estimate: Under 5 minutes with practice.
Troubleshoot: Tent Won’t Stay Up?
If your Neso tent collapses or flaps, don’t give up. Fix it in seconds.
Recheck Sand Bag Weight
Take poles down and refill bags. Underfilled bags are the number one cause of instability.
Target: At least 20 lbs per bag. Use a handheld scale if unsure.
Re-Stretch the Fabric
Re-pull the “X” configuration. Even a small slack can reduce stability.
Adjust Pole Position
Move poles slightly inward or outward to balance tension. A level canopy is a stable canopy.
Add More Poles in Wind
In gusty conditions, use 3 or 4 poles to create airflow underneath.
Maintenance and Longevity Tips
Keep your Neso tent in top shape for years.
Clean After Use
Rinse with fresh water after beach use to remove salt and sand. Air dry completely before storing.
Store Dry and Loose
Never pack a damp tent. Mold and mildew can form in hours. Store in the carry bag loosely and don’t cram it.
Inspect Clips and Straps
Before each use, check:
– Carabiners for smooth operation
– Straps for fraying
– Sand pockets for tears
Replace damaged parts immediately.
Need Help? Contact Neso Support
If you’re stuck, help is available.
Phone Support: 888.267.8188
Speak with a real person for setup questions or part replacements.
Watch Instructional Videos
Neso offers video guides for general setup, windy condition configurations, and swirling wind pole placement.
Tip: Search “Neso tent setup” on YouTube for official demos.
Frequently Asked Questions About Neso Tent Setup
How long does it take to set up a Neso tent?
With proper technique, a Neso tent can be set up in under five minutes. Practice and pre-filled sand bags help speed up the process significantly.
Can I use a Neso Beach Tent without sand?
Yes, you can clip the Beach Tent to trees, fences, vans, or boats using the built-in clip system. However, for traditional ground anchoring without sand, the Sidelines or Party tent with stakes is a better choice.
How much sand do I need for each bag?
Each sand bag should be filled to about the size of a basketball and weigh approximately 20 lbs. For a four-corner tent, plan on roughly 80 lbs of sand total.
Where should I place the poles on a Neso tent?
Place poles 1–2 feet inward from each corner. Never place them directly at the corners, as this creates excessive pressure on the fabric and can cause tearing.
Can the Neso Party Tent work on both sand and grass?
Yes, the Party Tent is designed for dual environments. Use sand-filled bags on the beach or stakes with carabiner clips on grass, dirt, or firm ground. No conversion kit is required.
Final Takeaways for Setting Up Your Neso Tent
Setting up a Neso tent comes down to mastering two core principles: weight and tension. Heavier sand bags and a taut “X” stretch create the foundation for stability in any condition. Always position your poles 1–2 feet from the corners to protect the fabric, and brace your sand bags with extra material rather than burying them.
When wind picks up, adapt quickly. Use windward pole placement for light breezes, reduce the front lip for heavy gusts, and add extra poles for swirling wind. With these adjustments, your tent stays put while everyone else’s blows away.
Your next step is simple: grab your Neso tent, head to your favorite spot, and put these techniques into practice. Under five minutes from bag to shade, you’ll wonder why you ever struggled with a traditional setup.