
A disorganized camp kitchen can quickly turn a peaceful outdoor trip into a stressful scramble for clean utensils and cold drinks. The right tent camping kitchen setup makes mealtime simple, safe, and actually enjoyable, no matter where you pitch your tent. From selecting a stable cooking surface to packing smart storage and following Leave No Trace rules, every choice matters.
This guide walks you through building a fully functional, portable kitchen from scratch. You’ll learn which stoves and cookware fit your style, how to store food safely, and how to clean up without harming the environment. Whether you backpack solo or car camp with family, these strategies will save you time, space, and frustration.
Pick a Stable Camp Table for Your Workspace
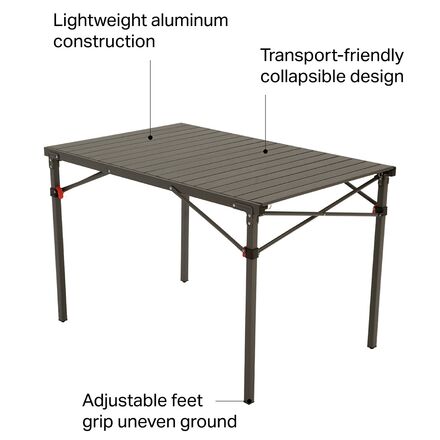
Why a Purpose-Built Table Matters
A sturdy camping table is the foundation of any tent camping kitchen setup. Unlike standard picnic tables, purpose-built camp tables feature weather-resistant materials, packable designs, and individually adjustable legs for uneven ground. This gives you a level, reliable surface for chopping, cooking, and plating.
Key Features to Look For
Prioritize these qualities when shopping:
– Weather-resistant construction such as powder-coated steel or polyethylene
– Adjustable legs to stabilize on rocky or sloped terrain
– Packable design that folds flat for easy transport
– A load capacity of at least 50 lbs
Eureka! is a trusted brand for durable, functional camp tables built for repeated use.
Best Options for Car Campers
For car camping, a folding picnic table works well. It doubles as seating and prep space. Position it near your tent but downwind from the cooking area to keep smoke away from your dining zone.
Organize Food Storage to Keep Meals Fresh

Choose the Right Cooler Size
A 50-liter cooler is the sweet spot for weekend trips. It holds enough ice, meat, dairy, and drinks without becoming too heavy to move. For longer trips, step up to a 50–70 quart cooler to handle extra food volume.
Top picks include the Igloo MaxCold for its lightweight, affordable design, or Coleman for proven durability.
Store Perishables the Smart Way
Pack meat, eggs, and dairy in sealed containers inside the cooler. Use ice packs instead of loose ice to avoid soggy messes and extend cooling power. Always pre-chill the cooler before loading groceries for maximum freshness.
Skip refrigerating bananas, onions, and watermelon. They do fine at room temperature and free up valuable cooler space.
Protect Dry Goods from Pests
Use sealed, stackable storage bins to organize pasta, cereal, spices, and snacks. They keep food dry and safe from rodents and insects. Alpina makes durable, modular bins that work well for car camping kitchens.
Stay Safe in Bear Country
When camping in bear-prone regions, store food in bear-safe containers or bear-proof coolers. Keep all food at least 200 feet from your sleeping tent, and never leave it unattended. Check with a ranger about local wildlife regulations before your trip.
Select the Right Camp Stove for Your Style
Lightweight Stoves for Backpackers
Backpackers need compact, fuel-efficient options. The Jetboil and MSR PocketRocket are top choices. They boil water fast for coffee, oatmeal, or dehydrated meals and fit easily into a small cook kit.
Always pack a backup lighter. Stove igniters often fail in wet or windy conditions.
Two-Burner Stoves for Car Campers
For car camping, a propane-powered two-burner stove from Coleman or Camp Chef delivers full kitchen functionality. Two burners let you boil water for coffee on one side while frying eggs on the other, making group meals much faster.
Place your stove on a stable, flat surface away from wind and foot traffic.
Add a Windscreen for Efficiency
A windscreen blocks gusts, traps heat, and can reduce fuel use by up to 30%. Just make sure it allows proper ventilation to prevent carbon monoxide buildup around the burner.
Pack Cookware That Saves Space

Nesting Cookware Sets
A nesting cookware set stacks pots, pans, and bowls together to save precious pack space. Look for sets with removable handles, built-in strainer lids, and lightweight materials like aluminum or titanium.
GSI Outdoors and Sea to Summit both make high-quality, space-saving cookware.
Best Pot for Backpacking
A 1-liter titanium pot is ideal for solo or duo trips. It’s light, durable, and often comes with a lid, cup, and utensil for full meal prep in one compact package.
Add a Griddle for Car Camping
A griddle or grill pan turns your two-burner stove into a breakfast powerhouse. Pancakes, bacon, and burgers all cook evenly on a flat, hot surface.
Stock Up on Essential Utensils
Choose Safe, Durable Dish Materials
Skip glass and ceramic dishes. They shatter easily and create hazards in the outdoors. Instead, use stainless steel plates and bowls for durability or BPA-free plastic for lightweight, shatterproof convenience. Choose utensils that nest together to save space.
Must-Have Kitchen Tools
Every camp kitchen needs:
– A durable knife with a protective sheath
– A multi-tool or pocket knife for cutting, opening cans, and repairs
– A spatula, ladle, and tongs in compact, clip-together versions
Keep your knife sharp and secure. Losing your blade in the woods is a real problem with no easy fix.
Smart Upgrades for RV Campers
RV kitchens benefit from space-saving tools like a magnetic spice rack, stackable pantry containers, and an expandable countertop for extra prep room.
Build a Reliable Organization System
Create a Dedicated Gear Box
Store all kitchen items in one camping gear box. Label it clearly and keep it packed at home between trips. Benefits include:
– No last-minute packing scrambles
– Everything in one easy-to-grab container
– Simple transport to and from the campsite
Plastic bins with handles or a rolling crate both work well.
Upgrade to a Chuck Box
A chuck box is a premium, custom storage unit with compartments for spices, utensils, and cleaning supplies. You can buy a pre-made version or build your own using plans from REI.com. It’s a game-changer for frequent campers who want everything neatly organized.
Label Every Container
Clear, labeled containers prevent confusion during busy meal prep. Mark spices, pre-mixed ingredients, and snacks with waterproof labels or permanent markers.
Use a Camp Kitchen Checklist
Keep a printed or digital checklist that covers your stove and fuel, cookware, utensils, cleaning supplies, and first-aid items. Review it before every trip to avoid forgotten essentials.
Set Up a 3-Bucket Wash Station

How to Build the System
Use three collapsible buckets for a complete wash station:
1. Wash bucket with hot water and biodegradable soap
2. Rinse bucket with fresh hot water
3. Final rinse bucket with clean hot water (optional but recommended)
Place the wash bucket inside the rinse bucket to catch spills and prevent water waste.
Follow Leave No Trace Rules
Never pour soapy water on the ground. Always filter out food scraps and grease first using a mesh strainer. Disperse clean rinse water at least 200 feet from water sources and campsites to avoid attracting wildlife and polluting the environment.
Clean as You Go
Wipe down surfaces and wash utensils after each meal. It reduces clutter, deters pests, and makes final cleanup much faster.
Manage Waste With Separate Bins
Use the Right Bin for Each Type
Keep waste streams organized with three separate bins:
– Garbage: A sturdy, critter-resistant container like a 5-gallon bucket
– Recycling: A sealed container to keep cans and bottles clean and dry
– Compost: Use the same bin for food scraps and dish storage to save space
Collapsible bins are ideal because they pack flat when empty.
Choose Multi-Purpose Bins
Save weight and space by using one bin for both compost and dish storage. Just clean it thoroughly between uses. Look for bins that hold their shape during use but fold down for transport.
Prep Meals Before You Leave Home
Chop and Pre-Cook at Home
Maximize camp efficiency by prepping ingredients ahead of time:
– Chop onions, peppers, and carrots
– Pre-cook bacon or potatoes
– Mix dry baking ingredients in labeled bags
You’ll cut down on cooking time and fuel use at the campsite.
Pre-Portion Meals for Easy Cooking
Divide meals into individual servings using zip-top bags or containers. Just add water or heat and you’re done. This works great for pancake mix, trail mix, and pasta sauce kits.
Follow Fire Safety at the Campsite
Keep Extinguishing Tools Handy
Always have a fire extinguisher, a bucket of sand, and a water source nearby when cooking. Quick action prevents small flare-ups from becoming big problems.
Practice Safe Stove Use
Follow these stove safety basics:
– Never leave the stove unattended while lit
– Place it on a flat, non-flammable surface
– Keep tents and backpacks at least 10 feet away
– Turn off propane when not in use
Tailor Your Setup to Your Camping Style
Backpacking Kitchen Essentials
Keep it ultralight and compact:
– Jetboil or MSR PocketRocket stove
– 1-liter titanium pot
– Collapsible bowl and cup
– Water filter or purification tablets
Every ounce matters on the trail, so pack only what you truly need.
Car Camping Kitchen Must-Haves
Go full-featured and comfortable:
– Two-burner propane stove
– 50–70 quart cooler
– Folding table
– Griddle or grill pan
– Storage bins for dry goods
Bring extras like a coffee maker or Dutch oven for gourmet camp meals.
RV Kitchen Enhancements
Turn your RV into a mobile kitchen with:
– A portable induction cooktop
– Magnetic spice rack
– Expandable countertop
– Built-in trash and recycling bins
Apply Pro Tips for a Smoother Camp Kitchen
Prep Ahead of Time
Pre-chopped veggies and pre-mixed meals mean faster cooking and less cleanup at camp.
Label Everything Clearly
Avoid digging through bins. Label spices, ingredients, and tools so anyone in your group can find them fast.
Always Use a Checklist
A camp kitchen checklist ensures you never forget fuel, soap, or utensils. Update it after each trip based on what worked.
Practice Fire Safety
Keep sand or a fire extinguisher within reach, and never cook inside the tent.
Clean as You Cook
Wash utensils, wipe spills, and pack away ingredients after each meal to attract fewer bugs and bears.
Bring a Backup Lighter
Stove igniters fail. A simple lighter or waterproof matches are essential backups.
Use Windscreens
They make stoves more efficient and reliable in windy conditions while still allowing proper airflow.
Repurpose Multi-Use Bins
One bin for compost and dish storage cuts down on clutter and weight, especially for car camping trips.
Frequently Asked Questions About Tent Camping Kitchen Setup
What size cooler do I need for a weekend camping trip?
A 50-liter cooler works well for most weekend trips. It holds enough ice, meat, dairy, and drinks without becoming too heavy to move. For larger groups or longer stays, upgrade to a 50–70 quart model for extra capacity.
How far should I store food from my tent in bear country?
Store all food, trash, and scented items at least 200 feet from your sleeping tent. Use bear-safe containers or bear-proof coolers, and never leave food unattended. Always check local regulations or ask a ranger before your trip.
Can I pour dishwater on the ground at camp?
No. Never pour soapy water directly on the ground. Instead, filter out food scraps with a mesh strainer and disperse clean rinse water at least 200 feet from water sources and campsites to protect the environment and avoid attracting wildlife.
What is the difference between a gear box and a chuck box?
A gear box is a simple, dedicated container that holds all your camp kitchen essentials. A chuck box is a premium, custom storage unit with built-in compartments for spices, utensils, and cleaning supplies. Chuck boxes can be purchased pre-made or built using plans from REI.com for frequent campers who want better organization.
Do I really need a windscreen for my camp stove?
Yes. A windscreen blocks gusts, traps heat, and can reduce fuel use by up to 30%. It makes your stove more efficient and reliable in windy conditions. Just ensure it allows proper ventilation to prevent carbon monoxide buildup.
What dishes are safest for camping?
Avoid glass and ceramic dishes since they break easily and create hazards. Instead, use stainless steel for durability or BPA-free plastic for lightweight, shatterproof convenience. Choose utensils that nest together to save pack space.
Key Takeaways for Building Your Tent Camping Kitchen Setup

A smart tent camping kitchen setup is about using the right tools efficiently. Start with a sturdy camp table to create a stable workspace. Choose a cooler that fits your trip length, and pair it with sealed bins for dry goods. Pick a stove that matches your camping style, whether that’s a lightweight Jetboil for backpacking or a two-burner Coleman for car camping.
Organize everything in a dedicated gear box or chuck box, and label every container. Set up a three-bucket wash station and follow Leave No Trace principles by dispersing wastewater at least 200 feet from campsites and water sources. Prep meals at home, practice fire safety, and clean as you go to keep your campsite tidy and pest-free.
Your next step: Build your camp kitchen checklist today based on your favorite camping style, then pack your gear box so it’s ready to grab and go for your next adventure.