
Nothing ruins a beach day faster than a flapping, collapsing tent. Whether you’re shielding kids from harsh sun or creating a private spot to relax, knowing how to set up a beach tent properly makes all the difference between an enjoyable afternoon and a frustrating battle with the wind. A well-secured beach tent stays stable in changing conditions, provides full shade coverage, and takes just minutes to assemble with no tools required.
This guide breaks down universal setup principles, brand-specific steps, and pro tips for stability across sand, pavement, or grass. You’ll learn how to maximize tension, position poles correctly, and anchor your shelter so it stays put all day long. From pop-up canopies to sand-bag designs, every successful setup follows the same core rules: lay flat, stretch into an X, add weight, and tension the fabric.
Lay the Beach Tent Flat Before Anything Else
Before anything else, unroll your beach tent and lay it completely flat on the ground. This is the foundation of every reliable setup, regardless of brand or model. Skipping this step leads to twisted poles, uneven tension, and a tent that won’t stay upright.
Spread Fabric Evenly
Ensure the canopy is fully extended with no twists or folds. If the fabric bunches or wrinkles, it won’t tension correctly later, so smooth it out corner to corner. For models like YENGIAM or Sun Ninja, align the corners to form a clean X shape. This pre-stretches the structure and prepares it for pole insertion.
Visual cue: Look for stitching lines or corner labels (like the NESO logo) to orient the tent correctly.
Position in Your Desired Location
Choose your spot wisely. Once anchored, moving the tent becomes difficult. Consider proximity to water, sun direction, and foot traffic. Once placed, avoid dragging the tent and lift it instead to reposition. This prevents fabric wear and protects the seams.
Create the X-Shape for Maximum Tension
The X formation is the secret to a stable, taut beach tent. It applies even tension across the canopy, preventing sagging and improving wind resistance.
Pull Corners Into an X
Grab opposite corners and pull outward. Do this diagonally, moving front-left to back-right, then front-right to back-left. This stretches the fabric and activates the anchor points.
Pro tip: On sand, use your feet to brace sand bags while pulling to create more tension.
Why the X Matters
According to Neso’s stability formula, more tension equals more stability, and more weight equals more stability. By forming a wide X, you distribute stress evenly and reduce strain on any single point. This is critical when wind hits the canopy unexpectedly.
Anchor With Sand Bags or Pockets
How you secure the base determines whether your tent survives a gust. Most beach tents use sand-based anchoring through removable bags or built-in pockets.
Fill Sand Bags Completely
For models like Neso Beach or SHADES, fill each sand bag until it’s basketball-sized, roughly 20 lbs. Overfilling increases stability significantly.
Steps:
1. Open bag flap or drawstring
2. Scoop sand using hands or a small shovel
3. Fill to the top and avoid underfilling
4. Cinch shut (tying is not required)
Warning: Never bury sand bags. This puts excessive pressure on the fabric and can tear seams.
Use Built-In Sand Pockets
Tents like the Sun Ninja have integrated sand pockets at each corner. Fill them to about ¾ capacity using the included compact shovel.
Advantages include no loose bags to lose, while disadvantages include less adjustability than standalone bags.
Key detail: Shake the pocket gently after filling to settle sand and ensure even weight distribution.
Brace Bags Against Sliding
Even heavy bags can slide inward when you raise the poles. Prevent this by piling extra sand around the base of each bag, placing smooth rocks alongside them, or using wind blocks like coolers or towels. This bracing step is essential for Neso tents during pole setup.
Assemble and Position the Poles

Poles give your beach tent height and structure, but where and how you place them matters more than you think. Incorrect placement can damage fabric or cause collapse.
Extend Poles Fully
Before inserting, extend all telescoping poles to their full length. Partially collapsed poles reduce stability and shade coverage.
Check: Listen for the click or lock mechanism to engage before proceeding.
Follow Brand-Specific Pole Placement
Each brand has a precise distance from the corners. Placing poles incorrectly can damage fabric or cause collapse.
| Model | Pole Position |
|---|---|
| YENGIAM | Directly into corner sockets |
| Neso Beach | 1–2 feet from corners |
| Sun Ninja | Under front corners |
| SHADES | Top right and left corners |
Critical rule: For Neso tents, never place poles directly at corners. This creates too much pressure and risks tearing the fabric.
Angle Poles for Wind Resistance
Wind direction changes how you should position poles:
– Light wind: Place poles on the windward side (facing the breeze); slight angle is okay
– Heavy wind: Move poles 2 feet from corners and 6 inches from edge stitching
– Swirling wind: Use 3 or 4 poles to create openings for airflow underneath
Expert note: Let wind flow under the tent, not against it. A lifted front lip acts like a sail and can flip your shelter.
Raise the Beach Tent Safely
Now that anchors are set and poles are ready, it’s time to lift the structure into place.
Lift From the Center
For pop-up or frame-style tents like YENGIAM, lift gently from the center while ensuring corner anchors stay in place. The frame should snap upward smoothly.
If resistance occurs, recheck that sand bags are braced, confirm no fabric is twisted, and add more sand if bags feel light.
Slide or Clip Poles Into Place
For Sun Ninja or SHADES, slide the poles under designated sleeves or clip them into corner connectors. Pull the canopy taut over the top and secure with ball caps or fasteners.
Visual cue: The canopy should look drum-tight with no sagging in the middle.
Final Tension and Stability Check
A quick inspection prevents mid-day failures and keeps your shelter secure.
Adjust for Even Tension
Walk around the perimeter and check that the fabric is equally tight on all sides, sand bags are still in place, and poles stand straight. If one side sags, tighten the anchor strap or add more sand to compensate.
Test Wind Flow
In breezy conditions, reduce the front overhang (lip) to minimize wind catch, create a low-profile opening on the leeward side, and use 3 poles instead of 4 for better flexibility.
Pro tip: In swirling winds, position poles to allow air to pass under the tent, reducing uplift force.
Surface-Specific Setup Tips
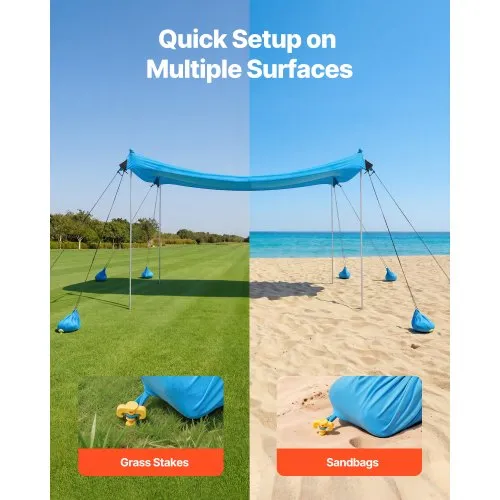
Where you set up directly affects your anchoring method and overall stability.
On Sand
Use sand bags or pockets, drive ground pegs (if included) deep into damp sand, and brace bags with extra sand to prevent sliding. Damp sand holds better than dry, so dig a few inches down if needed.
On Hard Surfaces (Concrete, Pavement)
Sand bags still work, but don’t expect them to sink. Rely on tension and weight, especially with the YENGIAM model, and avoid stakes since they won’t penetrate.
Hack: Place heavy items like coolers or backpacks on sand bags for added stability.
On Soft Ground (Grass, Dirt)
Use stakes for Neso Sidelines or Party Tent models, twist stakes in using the clear plastic sleeve for extra torque, and attach carabiner clips securely.
Note: Stakes are ineffective on pure sand. Use sand bags instead for beach environments.
Troubleshoot Common Setup Problems
Even with care, issues happen. Here’s how to fix them fast and get back to enjoying your day.
Tent Won’t Stay Up?
Cause: Insufficient weight or tension
Fix: Add more sand to bags, re-brace, and re-stretch the X formation. For Neso tents, take poles down and repeat sand bag setup with heavier fill.
Fabric Sagging?
Cause: Uneven tension or pole misalignment
Fix: Adjust pole position, pull corners outward, and re-tighten anchors.
Poles Keep Slipping?
Cause: Loose connectors or soft sand
Fix: Ensure pole ends are fully seated and pack sand around the base for added grip.
Wind Blowing It Over?
Cause: Poor pole placement or too much front lip
Fix: Reposition poles to windward side, reduce overhang, and create airflow gaps underneath.
Emergency tip: If winds pick up suddenly, lower the tent and wait it out rather than risking damage.
Break Down and Store Properly
A good takedown preserves your beach tent for next time and extends its lifespan significantly.
Remove Poles First
Always disassemble poles before touching anchors. This prevents sudden collapse and fabric strain that can damage your shelter.
Empty Sand Completely
For sand bags or pockets, open each one fully, shake out all sand, and let dry in sun if damp.
Warning: Storing wet or sandy tents leads to mold and zipper damage over time.
Fold Neatly, Pack Tightly
Follow the manufacturer’s fold pattern:
1. Collapse the frame (if applicable)
2. Fold canopy from sides to center
3. Roll or bundle compactly
4. Store in carry bag with all components
Pro tip: Keep poles and stakes together in a small pouch to avoid loss during transport.
Frequently Asked Questions About Setting Up a Beach Tent
How long does it take to set up a beach tent?
Most beach tents take 3 to 10 minutes to set up depending on the model. Pop-up designs like YENGIAM can be ready in under 3 minutes, while sand-bag models like Neso typically take 5 to 10 minutes including filling and bracing.
How much sand do I need for sand bag anchors?
Fill each sand bag to approximately basketball size, roughly 20 lbs per bag. Overfilling is better than underfilling since more weight equals more stability according to Neso’s design principles.
Where should I place the poles on a Neso beach tent?
For Neso Beach tents, place poles 1 to 2 feet from corners. Never place poles directly at corners, as this creates too much pressure on the fabric and can cause tearing. In heavy wind, move them 2 feet from corners and 6 inches from edge stitching.
Can I set up a beach tent on concrete or pavement?
Yes, though sand bags won’t sink into hard surfaces. Rely on tension and weight for stability. For YENGIAM models, the tension cord and structure weight provide enough support without ground pegs. Placing heavy items like coolers on sand bags adds extra security.
How do I keep my beach tent from blowing away in wind?
Position them based on wind conditions. In light wind, place poles on the windward side. In heavy wind, reduce the front lip and move poles 2 feet from corners. In swirling wind, use 3 or 4 poles to create openings that let air flow underneath rather than against the canopy.
Can beach tents be used on grass or camping trips?
Yes. Models like Neso Sidelines and Party Tent work well on grass using stakes instead of sand bags. Twist stakes into the ground next to the NESO logo on anchor straps, and use the clear plastic sleeve for extra torque. Attach carabiner clips to secure the setup.
Final Thoughts on Setting Up a Beach Tent
Setting up a beach tent doesn’t have to be frustrating. With the right technique (lay flat, stretch the X, add weight, tension the fabric) you’ll have a stable, shade-rich retreat in minutes. Remember these key principles: always lay the canopy flat first, form the X shape for tension, maximize weight in your anchors, and adjust pole positions based on wind conditions.
Whether you’re using a pop-up YENGIAM, a sand-bag Neso, or a Sun Ninja with built-in pockets, these universal steps and brand-specific tips will keep your shelter secure all day. Pack your bags, check the wind forecast, and head to the beach with confidence knowing your tent will stay put.