Your hiking boots have carried you through mud, snow, and rocky ridgelines. They’ve molded perfectly to your feet, eliminating hotspots and blisters. But now, the sole is peeling away, the tread is worn smooth, or maybe your dog got a little too enthusiastic. Before you toss them, consider this: hiking boot repair can restore your trusted footwear to better-than-new condition—often at a fraction of the cost of replacement.
Professional resoling and repair aren’t just for vintage leather boots or elite mountaineers. They’re practical, sustainable, and smart. A full resole typically costs $105–$195, while high-performance hiking boots can run $260–$320 or more. That’s a 60–75% savings, plus you keep the broken-in fit you’ve earned over hundreds of miles.
Beyond cost, repairing your boots reduces environmental waste and preserves emotional value. These aren’t just shoes—they’re companions on your adventures. With skilled cobblers offering full sole replacements, upper restoration, and hardware fixes, there’s rarely a reason to start over. Whether it’s a Danner, Salomon, Kenetrek, or Crispi, most major brands can be rebuilt.
This guide walks you through common damage signs, DIY field fixes, when to go professional, top-rated repair shops, and how to prepare your boots for shipping. You’ll also learn maintenance habits that double the lifespan between repairs. If your uppers are intact and the midsole isn’t crushed, don’t replace—rebuild.
Spot the Damage: Know When Your Boots Need Help

Most hiking boot failures follow predictable patterns. Catching them early prevents irreversible damage.
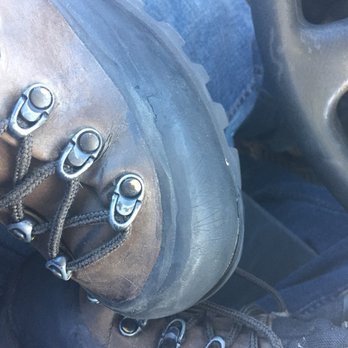
Sole Delamination: The Bottom Starts to Lift
Sole delamination happens when the outsole separates from the upper or midsole, often starting at the toe or heel. It’s common in boots exposed to moisture, extreme temperatures, or factory glue failure.
What to look for:
– A visible gap between the sole and upper.
– Water or grit getting inside during hikes.
– A flapping or loose sensation underfoot.
Why it happens:
– Poor initial adhesive bonding.
– Repeated flexing at stress points.
– Age-related glue breakdown (common after 3–5 years).
A temporary fix can get you home, but only a professional rebond with industrial adhesive like Foss will last.
Worn-Out Soles: Gone Is the Grip
Tread wear is inevitable, but ignoring it risks structural failure.
Warning signs:
– Lugs flattened or missing.
– Midsole or welt exposed to ground contact.
– Uneven wear (e.g., one heel worn down).
– Loss of stability on slippery or uneven terrain.
Don’t wait: Once the midsole compresses or the welt wears through, water intrusion and upper damage follow quickly.
Best fix: Full resole—not half-sole patch. Half-soles create weak seams and uneven support, increasing the risk of future delamination.
Torn Uppers & Seam Failure
The upper protects your foot and maintains waterproof integrity. Even small rips compromise performance.
Common causes:
– Abrasion from sharp rocks or roots.
– Dog chewing (yes, it’s fixable).
– Stitching fatigue after 500+ miles.
Repair potential:
– Small tears: patch and seal with flexible adhesive.
– Large rips or chew marks: internal and external reinforcement with matching leather or synthetic.
– Seam splits: re-stitch using waxed nylon thread.
“9 out of 10 dog-chewed boots are repairable.” – Cobblers Direct
Broken Eyelets, Hooks, or Buckles
Hardware failure weakens lacing and can lead to dropped hikes or blisters.
Solutions:
– Replace metal eyelets with durable brass or stainless steel.
– Reattach speed hooks or lace anchors.
– Fix broken buckles on gaiter-integrated boots.
Pro tip: Never attempt DIY eyelet replacement without proper setting tools—improper installation can tear leather and void repair eligibility.
DIY Fixes vs. Professional Repairs: Know the Limits
Not every issue needs a cobbler—but know when to call one.
Quick Field Fixes That Work
Stop Delamination in Its Tracks
- Clean the gap with an alcohol wipe.
- Inject McNett Freesole or Seam Grip into the separation.
- Apply pressure:
- Heel: weigh down with a rock or water bottle for 24+ hours.
- Toe: wrap tightly in duct tape, insert a pen or tent stake to press surfaces together.
This stops progression—but isn’t permanent. Get it professionally rebonded ASAP.
Replace Blown Laces
- Carry spare laces in your repair kit.
- Use durable cord (paracord works in a pinch).
- Request new laces with your next resole service.
Professional Repairs You Shouldn’t Skip
Full Resole: Rebuild the Foundation
A full resole replaces the entire outsole and heel, restoring grip, rigidity, and longevity.
Why choose full over half?
– Half-soles create weak seams prone to splitting.
– Full soles maintain structural balance.
– Aesthetically cleaner finish.
Outsole options:
– Vibram Megagrip: Best wet-trail traction.
– SBR Rubber: Industrial durability.
– Mont Compound: Designed for alpine conditions.
“After resoling, my boots felt stiffer—because the old soles had lost their shape.” – Isaac Jackman, Dublin Coblery
Upper Restoration & Patchwork
For chewed, torn, or abraded uppers, skilled cobblers use precision patching and stitching.
Process includes:
– Internal backing patch to prevent stress on original material.
– External patch matched to color and texture.
– Reinforced whip-stitch or saddle-stitch with waxed thread.
Materials used:
– Full-grain leather for durability.
– Suede/nubuck for breathability and appearance.
Even severe dog damage can be fully repaired—don’t discard yet.
Replacing Eyelets & Hardware
Loose or missing eyelets compromise lacing tension and accelerate upper wear.
What pros do:
– Remove damaged hardware cleanly.
– Install new brass or stainless steel eyelets.
– Re-flange properly to prevent future pull-out.
DIY risk: Without proper setting tools, you risk tearing the leather—better left to experts.
Top Hiking Boot Repair Services (U.S. & Global)
Choose a repair shop based on specialization, turnaround, and reputation.
Kenetrek Repair Center – Bozeman, MT
Specializes in: Kenetrek mountain and pac boots.
Packages:
– Mountain Boot Resole: $175
Includes new outsoles, minor repairs, performance insoles, laces.
– Pac Boot Resole: $125
New rubber bottoms, liners, laces.
Key details:
– Customer pays inbound shipping.
– Return shipping covered (U.S. only).
– Boots must be clean—dirty pairs may incur cleaning fees.
– Use official repair form (downloadable online).
Address:
Kenetrek Repair Center
96 Northstar Lane
Bozeman, MT 59718
Mr. Cobbler Co. – Grand Junction, CO
Specializes in: Crispi hiking and hunting boots.
Price: $105 per pair.
Vibram outsole choices:
– Kletterlift: 8 mm SBR rubber, classic lug.
– Olympia: 11.2 mm forefoot / 28 mm heel, rugged industrial.
– Predator: Megagrip compound, superior trail grip.
– Teton: Mont compound, alpine tread pattern.
Shipping: Return shipping included.
Turnaround: ~8 weeks.
Contact:
Mr. Cobbler Co.
2536 RimRock Ave, Suite 400-118
Grand Junction, CO 81505
(970) 241-9123
Cobblers Direct – Texas (Mail-In)
Repairs all major brands: Danner, Merrell, Salomon, Red Wing, Vasque, Muck Boots, Ariat.
Services offered:
– Full resole and heel replacement.
– Upper restoration (leather, suede, nubuck).
– Dog chew repair.
– Boot stretching (up to ½ size wider).
– Zipper and elastic repairs.
Bonus: Free professional boot shine with every repair ($9 value).
Deep clean & refinish add-on:
– Stain removal.
– Color restoration.
– Lanolin conditioning.
– Waterproofing reapplication.
Isaac Jackman – Dublin, Ireland (EU Option)
Reputation: Trusted technician for technical boot resoling.
Case study:
– Full resole on Mindle (MLE) leather hiking boots.
– Two-piece sole with clean seam join.
– Restored lateral rigidity and original support.
– Cost: €95 vs. €260–€320 for new.
Tested over 50+ km of forest trails—no slippage, no peeling, improved grip.
Prepare Boots for Shipping: Avoid Extra Fees
A little prep saves money and speeds up service.
Clean Before You Ship
Why it matters: Many shops charge extra for dirty boots.
Steps to clean:
1. Brush off mud with stiff-bristled brush.
2. Wipe down with damp cloth.
3. Remove insoles and dry separately.
Kenetrek requires clean boots—failure may delay repair.
Remove Insoles
- Prevents odor transfer.
- Allows cobbler to inspect midsole condition.
- Reduces risk of mold during shipping.
Document Damage
Take clear photos before mailing:
– Close-up of sole separation.
– Torn upper or chew marks.
– Broken hardware.
Include notes like:
– “Left toe delamination.”
– “Right upper chewed by dog.”
– “Loose eyelet near ankle.”
Use the Repair Form
Most shops provide downloadable forms. Fill out completely:
– Name, address, phone.
– Boot model and brand.
– Specific repair requests.
– Emergency contact (if needed).
Retain a copy and tracking number until boots return.
Extend Boot Life: Maintenance That Works
Preventive care doubles the time between repairs.
Dry Boots Properly
Never place near heaters or fire.
Correct method:
– Remove insoles.
– Stuff with newspaper to absorb moisture.
– Store upside down to drain water from heel.
– Air dry in ventilated area for 24–48 hours.
Heat cracks leather and melts adhesives—slow drying wins.
Clean After Every Hike
Routine maintenance:
– Brush off dirt and debris.
– Wipe with damp cloth.
– Clean insole to prevent odor and bacteria.
Deep clean (annually):
– Use mild soap or Nikwax Footwear Cleaning Gel.
– Scrub gently with soft brush.
– Rinse with damp cloth—never submerge.
Re-Waterproof Annually
Waterproofing degrades over time.
Signs it’s time:
– Leather looks dry or lightens in color.
– Boots absorb water instead of beading it.
Recommended products:
– Nikwax Waterproofing Wax for Leather
– Aquaseal Leather Waterproofing
Application tips:
– Apply sparingly—excess clogs breathable membranes.
– Let dry 12+ hours before use.
Store Boots Correctly
Do:
– Keep in cool, dry place.
– Stuff loosely with newspaper.
– Store upright or hang by laces.
Don’t:
– Leave in plastic bags (traps moisture).
– Store in direct sunlight (UV damages glue and dyes).
Repair vs. Replace: The Real Cost Comparison
| Factor | Repair | Replace |
|---|---|---|
| Cost | $105–$195 | $260–$320+ |
| Break-In Time | None | 10–50 miles required |
| Fit & Comfort | Already broken-in | Risk of blisters, poor fit |
| Environmental Impact | Low (reuse) | High (new production) |
| Emotional Value | Maintained | Lost |
| Performance | Often improved (new sole = better support) | Varies by model |
“Resoling saved me 70%—and I kept the fit I love.”
Final Verdict: Resole Your Hiking Boots
If your boots meet any of these criteria, resole them:
✅ Uppers intact (no major cracks or rot)
✅ Leather still flexible
✅ Comfortable, broken-in fit
✅ Sole worn, separated, or slick
✅ Midsole not fully compressed
“Do not throw them away.”
A professional resole doesn’t just extend life—it enhances performance. New soles restore rigidity, improve traction, and bring back confidence on rugged trails.
Your boots don’t need to be new to be great. They just need a second life.
Next Steps: Keep Your Boots on the Trail
- Inspect your current pair for wear.
- Clean and dry them thoroughly.
- Photograph any damage.
- Choose a trusted repair service (Kenetrek, Mr. Cobbler Co., Cobblers Direct, etc.).
- Ship with completed form and tracking.
With expert care, your favorite hiking boots can last for thousands more miles—saving money, reducing waste, and keeping your feet happy mile after mile.