
Your Black Diamond headlamp fails mid-hike with no light or a flickering beam. You are not alone as these power issues often stem from simple battery errors or corroded contacts. Whether prepping for a night trail run or alpine climbing, a malfunctioning lamp ruins plans.
This guide delivers a step-by-step Black Diamond headlamp troubleshooting plan based on verified repair methods. You will learn to diagnose power loss, fix flickering lights, handle Icon model flaws, and perform advanced soldering repairs to save your gear.
Verify Battery Orientation Using Internal Diagrams
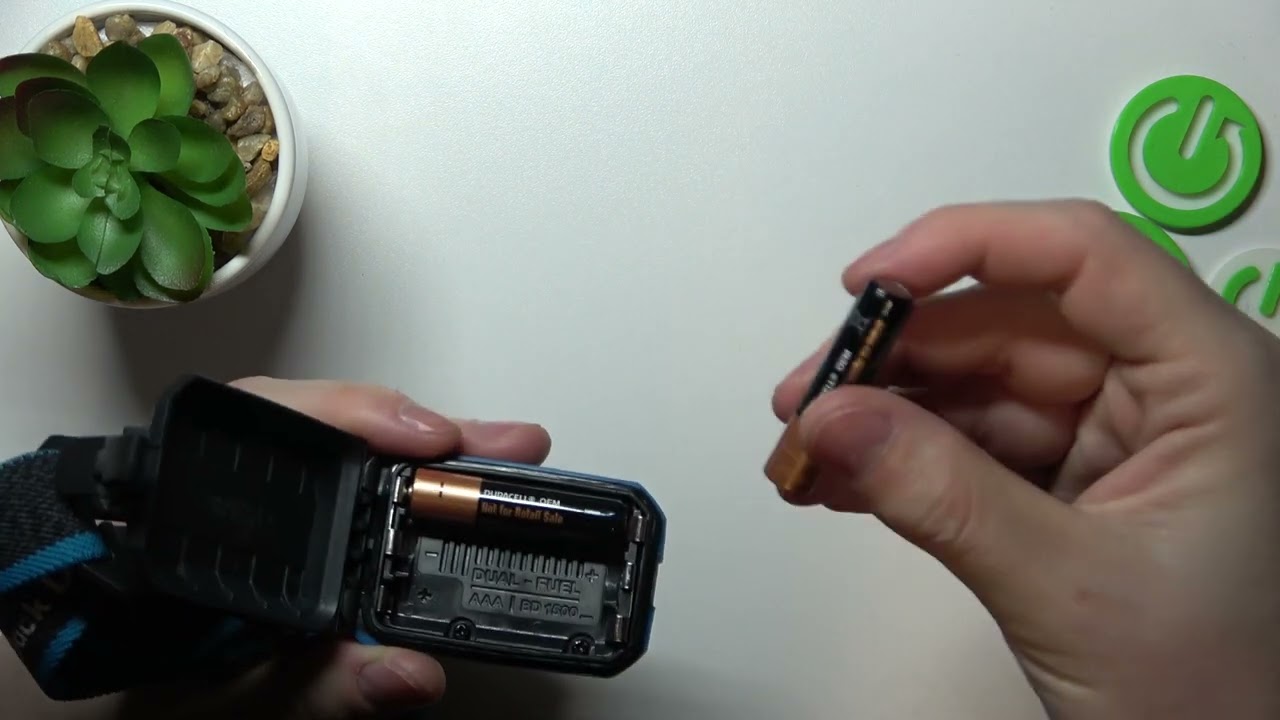
Incorrect battery placement is the primary reason Black Diamond headlamps refuse to power on. Even if batteries look correct, the circuit remains open if polarity symbols do not match the molded plastic guide.
Check Polarity Symbols Inside Compartment
Look closely at the battery compartment interior for small positive (+) and negative (–) indicators. On many models, one side requires positive ends facing up while the opposite side needs negative ends up. Misalignment breaks the electrical path immediately. Always trust the printed diagram over your initial assumption.
Match Batteries to Asymmetric Layouts
Some units use an asymmetric configuration where battery pairs face opposite directions.
* Side A may require positive ends facing each other.
* Side B may require negative ends facing each other.
Inserting both pairs with positive ends up prevents the device from turning on. Flip one pair according to the internal guide and press the power button firmly. If the light activates, the issue was purely orientation.
Pro Tip: Use a permanent marker to label the correct polarity on the outside edge of the compartment for quick future reference.
Clean Corroded Battery Contacts to Restore Flow
Dirt, sweat, and moisture create oxidation on metal contacts that blocks electrical flow. White-green crust or dark pitting on spring terminals indicates corrosion that must be removed.
Identify Terminal Buildup Visually
Inspect the flat contact points and spring terminals for any discoloration. Even minor dullness on the metal surface can prevent conductivity. This buildup acts as an insulator between the battery and the headlamp circuit.
Safely Remove Oxidation Steps
- Remove all batteries from the compartment.
- Dip a cotton swab in isopropyl alcohol (70% or higher).
- Gently scrub each contact point until the metal shines.
- Wipe dry with a clean, lint-free cloth.
- Let the area air dry completely before reinserting batteries.
Avoid using water or abrasive tools like steel wool. These can damage the plating or leave conductive debris that causes shorts.
Warning: Never install batteries in a damp compartment. Moisture increases corrosion risk and may short-circuit the unit permanently.
Test Battery Quality and Chemistry Compatibility
Even brand-new batteries can be faulty or incompatible with your specific headlamp model. Voltage drops under load often mimic total power failure.
Rule Out Defective or Weak Cells
Swap in a fresh set from a trusted brand like Duracell or Energizer. Avoid discount or off-brand alkalines as they often deliver inconsistent voltage. A simple swap confirms if the power source is the root cause.
Choose Lithium for Cold Weather Use
Alkaline batteries lose voltage rapidly below 40°F (4°C), causing premature shutdowns. Lithium AA batteries maintain stable output in subzero conditions and last significantly longer. If your headlamp dies in winter but works in summer, switch to lithium cells immediately.
Expert Note: Lithium batteries have a slightly higher nominal voltage than alkalines. Most modern Black Diamond circuits handle this well, but always verify model compatibility.
Diagnose Switch Failure Symptoms Accurately
The single-button switch may click normally while failing internally. Tactile feedback does not guarantee electrical connection within the housing.
Feel for Internal Click vs True Activation
Press the power button and listen for the click. If it feels normal but produces no light, try rapid toggling five to ten times. This action can dislodge debris or restore contact on worn internal points. Holding the button down for five seconds may also trigger a mode reset on some models.
Detect Intermittent Connection Issues
If the light flickers when you press the switch or only works at certain angles, internal contacts are likely worn. This symptom indicates a need for disassembly and inspection. Do not assume the LED is dead when the switch is the actual culprit.
Common Mistake: Replacing batteries repeatedly while ignoring a faulty switch mechanism. Always test switch behavior after confirming battery health.
Address Icon-Specific Flickering Failure Patterns
The Black Diamond Icon model has a known failure mode where lights work for about 20 minutes before flickering and dying. This persists even with new batteries and indicates a hardware flaw.
Recognize 20-Minute Shut-Off Pattern
This specific symptom points to loose circuit board connections or internal short circuits. It is not a battery drain issue. The design defect causes the unit to fail after a brief period of stable operation.
Inspect the Battery Compartment Seal
Remove batteries and examine the rubber gasket around the compartment door. Look for cracks, hardening, or misalignment. A compromised seal allows moisture ingress, leading to internal corrosion and the characteristic flickering failure. Replace the gasket if it appears damaged.
Check for Icon Recall Eligibility Immediately
Black Diamond issued a safety recall on certain Icon models due to overheating and fire risks from internal short circuits. If your unit flickers, shuts off, or feels warm, stop using it.
Verify Serial Number Against Recall List
- Flip the headlamp over and locate the serial number on the back.
- Visit the official Black Diamond support page.
- Enter the serial number to check eligibility.
- If recalled, request a free replacement immediately.
Urgency: Do not attempt internal repairs on recalled units. Return them to the manufacturer to avoid safety hazards.
Disassemble Spot Model for LED Repair Access

Older Black Diamond Spot models often suffer bright white LED failure while reading LEDs still work. This requires opening the housing to access the LED assembly.
Open Housing Safely
- Use a Phillips #0 screwdriver to remove the two housing screws.
- Gently pry apart the plastic casing without forcing it.
- Watch for the LED assembly with its heat sink to fall out upon opening.
A detached LED assembly will show visible gaps between the solder pads and the circuit board. This physical separation breaks the circuit for the high-power LED.
Re-Solder Detached LED Assembly Securely
Corrosion or thermal stress can break the solder joints anchoring the high-power LED to the board. Repairing this requires precision and heat.
Prepare the Circuit Board Surface
Clean old flux and corrosion from the two solder pads using alcohol and a brush. Align the LED assembly precisely over the pads to ensure a proper connection.
Secure Assembly During Soldering
The heat sink draws heat away, making soldering difficult. Use this stabilization method:
* Insert two small screws and nuts through adjacent mounting holes to hold the LED assembly.
* Place toilet paper or a cloth over the heat sink.
* Apply firm hand pressure through the paper to keep the assembly flush with the board.
Apply Heat and Solder Joints
Use a high-wattage soldering iron (60W+) for this task. Heat each pad until solder flows fully, which may take 5–10 seconds per joint. Let it cool undisturbed for one minute before reassembling.
Pro Tip: Apply a tiny drop of conformal coating or silicone sealant around the joint post-repair to prevent future moisture damage.
Use Correct Tools for Reliable Repairs
Having the right tools prevents damage and increases repair success rates significantly. Do not attempt disassembly with improper equipment.
Essential Toolkit List
- Phillips #0 screwdriver for opening housing without stripping screws
- Soldering iron (60W+) to reattach LED assemblies with heat sinks
- Isopropyl alcohol and swabs to clean contacts and remove corrosion
- Small pliers and tweezers to handle tiny components during disassembly
- Multimeter (optional) to test continuity in switch and wiring
Know When to Contact Black Diamond Support
If troubleshooting fails, escalate the issue to the manufacturer. This is crucial if the unit is under warranty or exhibits recall symptoms.
Escalate for Warranty or Safety Issues
Stop using the headlamp if internal wiring is melted or charred. Contact Black Diamond if:
* The unit is under the typical 3-year warranty.
* It exhibits recall symptoms like flickering or heat.
* DIY repair attempts have failed.
Users report responsive customer service, often receiving replacements even for older units with confirmed manufacturing defects.
Follow the Full Diagnostic Flow Checklist
Maximize repair success by following this logical sequence. Skipping steps can lead to misdiagnosis or unnecessary replacements.
- Check battery orientation using the internal diagram.
- Clean all contact points with alcohol.
- Test with fresh lithium or high-quality alkaline batteries.
- Toggle the switch repeatedly to test responsiveness.
- Inspect the rubber seal, especially on Icon models.
- Verify the serial number against the recall list.
- Disassemble and inspect for loose connections if skilled.
- Re-solder detached LED pads if needed.
- Contact support if internal damage persists or warranty applies.
Prevent Future Failures with Proper Care
Extend the life of your headlamp with simple maintenance habits. Proper storage prevents corrosion and seal degradation.
Store Properly to Avoid Corrosion
- Remove batteries when storing for more than two weeks.
- Keep the device in a dry, room-temperature environment.
- Place it in a sealed bag with a silica gel packet.
Perform Seasonal Maintenance
Every 3–6 months, clean battery contacts and inspect seals for cracks. Test all modes and brightness levels to ensure readiness. Preventive care extends headlamp life by years.
Frequently Asked Questions About Black Diamond Headlamp Troubleshooting
Why won’t my Black Diamond headlamp turn on with new batteries?
Incorrect battery orientation is the most common cause. Check the polarity symbols inside the compartment, as sides often require opposite alignments. Clean the contacts with alcohol if orientation is correct.
What causes the Black Diamond Icon to flicker after 20 minutes?
This is a known hardware flaw involving loose circuit board connections or moisture intrusion. Check the rubber seal for cracks and verify if your serial number is part of the official safety recall.
Can I fix a detached LED on my Black Diamond Spot?
Yes, if you have soldering skills. You must disassemble the housing, stabilize the LED assembly, and use a high-wattage iron to re-solder the pads to the circuit board.
Should I use lithium or alkaline batteries for cold weather?
Always use lithium batteries for cold weather. Alkaline cells lose voltage rapidly in freezing temperatures, causing the headlamp to shut down prematurely.
How do I know if my headlamp is part of a recall?
Locate the serial number on the back of the unit. Enter this number on the official Black Diamond support website to check against the recall list for overheating risks.
Key Takeaways for Effective Black Diamond Headlamp Troubleshooting
Most Black Diamond headlamp troubleshooting cases resolve by correcting battery orientation or cleaning corroded contacts. The Icon model’s 20-minute flicker is a specific defect requiring recall verification before repair attempts. Advanced users can restore function by re-soldering detached LED assemblies with proper tools. When in doubt, contact Black Diamond support for potential warranty replacements. Keep your gear reliable by storing it without batteries and performing regular maintenance checks.