
If your Coast headlamp is not working, the sudden loss of light can be frustrating and dangerous. Many users face issues where the device refuses to turn on, flickers erratically, or fails to charge due to specific design flaws or battery leakage.
This guide helps you diagnose dead batteries, repair stripped charging threads on A9R models, and fix broken circuit board traces. You will learn actionable steps to restore power and prevent future failures without buying a new unit.
Check Battery Health and Contact Corrosion
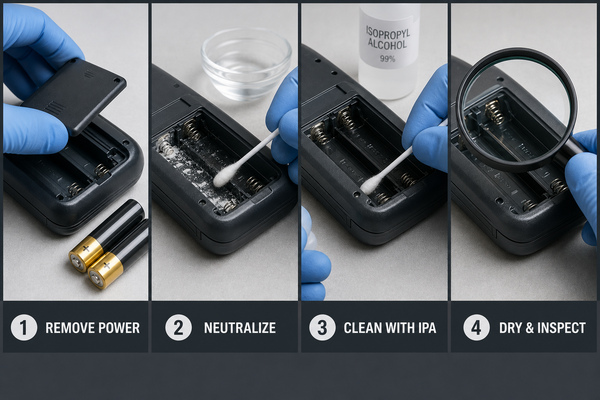
Dead or leaking batteries are the most common reason a Coast headlamp stops functioning. Even if batteries appear new, they may fail under the load required by high-lumen LEDs.
Test with Fresh Power Sources
Start by installing brand-new, high-quality batteries to rule out power failure.
* Use fresh alkaline or lithium cells for non-rechargeable models.
* Ensure rechargeable 14500 Li-ion batteries are only used if your manual explicitly supports them.
* Never mix old and new batteries or combine different brands in the same device.
Critical Note: Leaving dead batteries inside your light for months invites leakage. This chemical spill causes irreversible corrosion on copper traces and is a leading cause of permanent failure.
Clean Corroded Battery Contacts
Battery leakage creates white or green crust around contact points that blocks electricity.
- Remove all batteries from the compartment immediately.
- Dip a cotton swab in isopropyl alcohol (70% or higher concentration).
- Gently scrub both positive and negative terminals inside the housing.
- Use a clean pencil eraser to remove stubborn oxidation from metal surfaces.
- Let the area dry completely before reinserting fresh batteries.
Inspect the metal for deep pitting. If the corrosion has eaten away the metal contact, you may need advanced repairs.
Repair Stripped Charging Threads on Coast A9R
The Coast A9R penlight often fails to charge due to a specific design flaw involving its threading. If your light shows no charging indicator, the mechanical connection is likely broken.
Why A9R Charging Fails Over Time
This model uses plastic threads inside a stainless steel body to secure the front charging tip. Friction from attaching the magnetic cable wears these threads down until they strip.
When the tip loosens:
* Electrical contacts fail to connect properly.
* The device cannot charge even when plugged in.
* The light appears dead because the battery remains empty.
Warning: There is no indicator light during charging. You will not know the connection has failed until the light refuses to turn on.
Apply Teflon Tape to Restore Connection
You can fix stripped threads quickly using standard plumbing tape.
Required Tools:
* Teflon (PTFE) thread tape
* Cloth (to protect the finish)
Repair Steps:
1. Unscrew the front tip by hand or use pliers wrapped in a cloth.
2. Inspect the barrel threads for visible wear or missing plastic.
3. Apply exactly one full wrap of Teflon tape around the threaded end of the main body.
4. Reattach the tip firmly but gently without forcing it.
5. Test charging by connecting the cable and waiting one to two hours.
Pro Tip: Apply tape proactively when you first notice any wiggle in the tip. Do not wait for complete failure.
Diagnose Broken Circuit Board Traces

If your Coast headlamp powers on briefly or dies instantly with fresh batteries, a microscopic break in the internal circuit board is the likely culprit.
How Battery Leakage Kills the Circuit
Leaking batteries release corrosive chemicals that eat through thin copper pathways on the PCB. These breaks often occur at sharp bends where the copper is weakest.
Even if the board looks clean, a break here cuts power to the smart control chip. This chip manages:
* Button press detection
* Mode cycling
* Brightness regulation
Without this connection, the light appears completely dead despite having power.
Confirm the Break with a Multimeter
You need a multimeter to verify continuity across the board.
- Set your multimeter to continuity mode (the beep function).
- Identify the trace running from the battery terminal to the control chip.
- Place one probe before the suspected break and the other after it.
- Listen for a beep. No sound means the trace is broken.
Expert Note: Use magnification like a phone macro lens or jeweler’s loupe. Many breaks are invisible to the naked eye.
Repair Copper Traces with a Wire Jumper
When corrosion damages the copper too severely for direct soldering, you must bypass the break with a tiny wire jumper.
Tools Needed for PCB Repair
- 30 AWG stranded copper wire
- Soldering iron and fine solder
- Magnifying glass
- Silicone conformal coating or RTV silicone
Step-by-Step Jumper Fix
- Disassemble the headlamp carefully to access the PCB.
- Locate the broken trace using visual inspection and multimeter testing.
- Cut a short piece of 30 AWG wire long enough to bridge the gap.
- Strip both ends of the wire and tin them with a small amount of solder.
- Solder one end to the trace before the break.
- Solder the other end to the trace after the break.
- Seal the repair with a drop of silicone conformal coating to prevent moisture ingress.
✅ This fix restores full functionality in most cases, allowing the light to cycle modes reliably.
Safety Warning: This is an advanced repair. If you are not comfortable soldering tiny connections, consider contacting a professional technician.
Test the Switch Circuit for Failure
If batteries and PCB traces check out, the mechanical switch itself may be faulty.
Bypass the Switch to Confirm Failure
This test determines if the issue is mechanical or electronic.
- Remove the tail cap or switch assembly if accessible.
- With batteries installed, use a metal object like a paperclip to briefly touch the negative battery terminal to the switch contact point.
- Observe the LED behavior closely.
Interpret your results:
* Light turns on: The switch is defective and needs replacement.
* No light: The problem is downstream, likely the LED or driver.
Caution: Only hold the connection briefly to avoid overheating the LED emitter.
For sealed switches common in headlamps, replacement may require sourcing a donor unit.
Assess LED and Driver Damage

When power reaches the circuit but the light will not illuminate, the LED module or driver chip may be damaged beyond simple repair.
Signs of LED Failure
- No light output even after bypassing the switch.
- Visible dark spots or cracks under magnification.
- Persistent flickering after cleaning and repair attempts.
LEDs rarely fail on their own. Physical impact is usually the cause of destruction.
Coast G25 Impact Failure Case
Users report that dropping a Coast G25, even from waist height, can crack the LED emitter. Once damaged, the light will not turn on regardless of battery health.
Unfortunately:
* Coast does not sell replacement LED modules to consumers.
* Repair requires micro-soldering skills and donor parts.
* Replacement is often more cost-effective than repair for budget models.
Prevention Tip: Avoid using compact lights like the G25 as primary headlamps in high-impact environments.
Handle Physical Damage and Dropping
Dropping your Coast light can cause multiple internal failures beyond just the LED emitter.
Common Impact-Related Failures
- Cracked circuit boards: Look for hairline fractures near mounting points.
- Loose battery springs: These can disconnect power intermittently.
- Misaligned reflectors: These cause beam distortion or reduced output.
What to do:
1. Disassemble and inspect for visible damage.
2. Re-seat all components and tighten loose contacts.
3. Test each subsystem independently.
If damage is severe, consider cannibalizing the unit for usable parts like clips, O-rings, or charging cables.
Contact Coast Support for Replacement
Coast warranties typically exclude drop damage and battery leakage. However, strategic communication can sometimes yield free replacements even for out-of-warranty units.
How to Get a Free Replacement
One verified success story involved a user whose G25 failed due to leakage. They contacted Coast, explained it was a gift, and noted they were unaware batteries needed removal. Coast shipped a brand-new unit without requiring the broken one back.
Your best approach:
1. Email or call Coast customer service directly.
2. Be honest but emphasize your lack of awareness about maintenance.
3. Mention if the item was a gift or used infrequently.
4. Avoid blaming design flaws; focus on unexpected failure.
Note: Third-party sellers like BatteryJunction offer support but usually only guide through basic troubleshooting.
Prevent Future Failures
Most “Coast headlamp not working” issues are preventable with simple maintenance habits.
Key Maintenance Tips
| Issue | Prevention Strategy |
|---|---|
| Battery leakage | Remove batteries when not in use for more than one week |
| Thread wear (A9R) | Apply one wrap of Teflon tape at the first sign of looseness |
| Contact corrosion | Clean contacts every 3 to 6 months with alcohol |
| LED damage | Avoid drops; do not use small lights as rough headlamps |
| Moisture damage | Seal PCB repairs with silicone conformal coating |
Recommended Models for Headlamp Use
If you need a reliable Coast headlamp, consider the HX500, KL35R, or HX3. Avoid using penlights like the A9R as primary headlamps unless modified with secure straps.
Frequently Asked Questions About Coast Headlamp Issues
Why is my Coast A9R not charging?
The A9R often fails to charge because the plastic threads inside the stainless steel body strip over time. This prevents the charging tip from making electrical contact. Applying a single wrap of Teflon tape to the threads usually fixes this connection issue.
How do I fix a Coast headlamp that flickers?
Flickering often indicates a broken copper trace on the internal circuit board caused by battery leakage. You must disassemble the unit, locate the break with a multimeter, and bridge it with a fine wire jumper to restore function.
Can I replace the LED in a Coast G25?
Coast does not sell replacement LED modules to consumers. If the LED emitter is cracked or burnt out due to impact, you typically cannot repair it without donor parts from another unit. Replacing the entire light is often more economical.
What causes the copper traces to break on Coast lights?
Battery leakage produces corrosive chemicals that eat through the thin copper pathways on the PCB. These breaks often happen at sharp bends in the trace and interrupt power to the control chip, causing total failure.
Does Coast offer a warranty for battery leakage?
Standard warranties usually exclude damage from battery leakage or user negligence. However, contacting customer support and explaining the situation politely, especially if the item was a gift, can sometimes result in a free replacement.
Key Takeaways for Fixing Your Coast Headlamp
A “Coast headlamp not working” diagnosis often points to dead batteries, stripped A9R charging threads, or corroded circuit traces. Most issues are fixable with fresh power sources, Teflon tape, or a simple wire jumper repair.
Always remove batteries during long-term storage to prevent leakage. If your unit is physically damaged or beyond repair, contact Coast support before discarding it, as they may offer a replacement.
Take action today by checking your battery contacts and testing your charging connection to restore your light.