
Nothing ruins a camping trip faster than an unlevel tent trailer. A lopsided camper doesn’t just make sleeping uncomfortable—it can damage your appliances, strain your frame, and turn a relaxing getaway into a frustrating ordeal. When your camper sits crooked, the refrigerator won’t cool properly, doors stick shut, and even walking inside feels off-balance. Learning how to level a tent trailer correctly takes just minutes and protects both your comfort and your investment for seasons to come.
The process is straightforward when you follow a clear sequence: level side to side first, disconnect from your tow vehicle, then adjust front to back. Use reliable tools like a bubble level or ratchet-based system, and avoid common mistakes like using stabilizer jacks to lift the trailer. Whether you’re working with basic wooden blocks or a premium BAL Tire Leveler, this guide walks you through every step to ensure your popup camper sits perfectly level on any terrain.
Choose the Right Campsite Before You Unload
Park on Firm, Level Ground
Always start by selecting the flattest site available. Many campgrounds mark individual sites as level, slightly sloped, or downhill—use that information to guide your choice. Position the trailer so the natural terrain helps rather than hinders your leveling efforts. Avoid soft soil, loose gravel, or uneven grass that shifts under weight. When the ground feels unstable, place plywood sheets or ground mats beneath the tires to create a solid foundation.
Assess the Terrain Before Raising the Roof
Never raise the roof until you’ve confirmed the site is workable. An uneven foundation worsens once the roof goes up, adding stress on cables and frame components. Walk around the trailer and visually inspect for tilt. If one corner sits noticeably lower, plan your leveling strategy before unhooking from the tow vehicle.
Level Side to Side First
Identify the Low Side
Place a bubble level across the trailer frame near the front. Check both directions. If the bubble drifts left or right, that tells you which side sits lower. Correcting side-to-side imbalance first ensures your fridge operates correctly and prevents structural strain from uneven weight distribution.
Use Stackable Blocks or Ratchet Levelers
For minor slopes, stackable leveling blocks (Lego-style yellow and orange ramps) work well. Drive the low-side tire onto the blocks until the level reads true. For greater precision and ease, consider a BAL Leveler or Anderson Leveling System. These portable platforms let you drive onto them and ratchet up the low side smoothly, eliminating guesswork and back-and-forth adjustments.
Avoid Frame Damage with Proper Equipment
Never rely on makeshift wood pieces that can splinter or shift under load. Instead, choose durable interlocking blocks or axle-mounted systems like the BAL Tire Leveler, which lifts the tire rather than the frame. These systems support up to 6 inches of lift and install securely under the axle without stressing your chassis.
Disconnect Before Front-to-Back Leveling
Unhook from the Tow Vehicle
Once side-to-side leveling is complete, disconnect the trailer from your tow vehicle. This allows the tongue weight to settle independently, giving you an accurate reading for front-to-back adjustment. Skipping this step leaves the hitch pulling the trailer out of true level.
Prevent Driveline Tension with Wheel Chocks
With the trailer disconnected, place wheel chocks behind the tires to prevent any movement. This stabilizes the unit completely and ensures your adjustments hold firm during fine-tuning.
Adjust Front-to-Back Alignment

Check with a Bubble or Laser Level
Place a 2-foot spirit level along the trailer’s frame rail or across the doorway threshold. Hold it front to back. If the bubble leans forward or backward, adjust the tongue height using the A-frame jack or add blocks under the front wheels as needed.
Use Built-In Indicators or Apps with Caution
Some popup campers feature built-in level indicators near the door. While convenient, these aren’t always perfectly accurate. For better results, rely on a physical level. Free smartphone leveling apps exist, but they’re less reliable due to phone case interference or calibration issues.
Fine-Tune with Adjustable Jacks
If your trailer has an A-frame tongue jack, crank it up or down to raise or lower the front. Make small adjustments and recheck the level after each turn. On extreme slopes, place leveling blocks under the front tires to reduce strain on the jack.
Verify Level Across the Entire Frame
Test at Multiple Points
Don’t trust a single reading. Check the level at the front, center, and rear of the trailer. Some frames twist slightly, creating a situation where the front reads level but the back sits off. Consistent alignment across the full length prevents long-term wear and appliance problems.
Recheck After Adding Weight
Once you fill water tanks or load gear, recheck the level immediately. Added weight shifts balance, especially in longer trailers. It’s smart to verify again after deploying awnings or extending slide-outs.
Deploy Stabilizer Jacks the Right Way
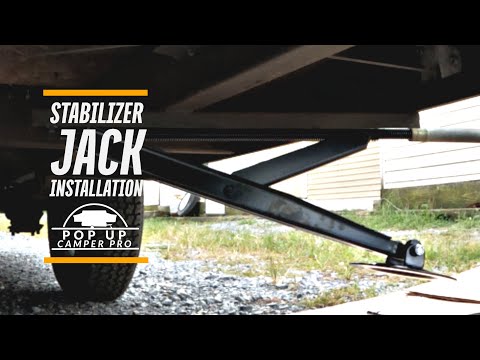
Use Only for Stability, Never for Lifting
After the trailer sits fully level, extend the stabilizer jacks located at each corner. These reduce interior sway when you move around but should never lift the trailer off the tires. Over-tightening can bend the frame or damage mounting points.
Avoid Heavy-Duty Jack Overuse
Heavy-duty jacks provide strong support but increase frame damage risk if cranked too tight. Lower them just until contact is made with the ground, then give one or two extra turns at most.
Set Roof Cables to Proper Tension
Achieve Guitar-String Firmness
Roof support cables must be taut but not over-tightened. The ideal tension feels like a plucked guitar string—firm with slight give. Too loose creates roof wobble; too tight risks damaging roof joints or bending support poles.
Inspect Cables During Every Setup
Before raising the roof, confirm all cables are intact and properly routed. Replace frayed or rusted cables immediately. Misaligned cables cause uneven roof deployment and potential leaks.
Assemble Beds While the Roof Is Still Down
Maximize Access and Safety
One of the biggest setup mistakes is assembling beds after the roof goes up. Set up all bed frames while the roof remains down. This gives you full access to sockets, poles, and latches without awkward reaching or balancing.
Follow the Frame Assembly Steps
Insert the support pole into the top socket until it clicks. On the opposite end, slide it into the base ring. Then secure the top of the pole into the lower ring to lock the roof in place. Repeat for all corners until the structure feels solid.
Seal All Exterior Gaps
Apply Velcro Weather Seals
Run velcro strips along roof seams, door edges, and side panels. Press firmly to ensure full adhesion. This creates a waterproof, bug-proof barrier. Pay special attention to the four corners and the main roof seam—these are the most common leak points.
Prevent Rain Intrusion
Even light rain seeps through unsealed joints. A properly sealed tent trailer stays dry and comfortable throughout your trip. After attaching velcro, do a visual check for any gaps or loose ends.
Install and Test the Door System
Latch the Door Frame Securely
Push the two metal tabs on the door frame into the roof slots. They should slide in smoothly and lock in place. If you feel resistance, realign the frame before forcing it.
Attach and Seal the Screen Door
Remove the glass panel (if applicable) and slide in the screen. Use bottom latches to secure it. Then apply velcro along both sides to seal it tightly against the frame, keeping insects out completely.
Confirm Smooth Door Operation
Test the latch by opening and closing it several times. It should move freely without wobbling or sticking. A loose door compromises both weatherproofing and security.
Final Verification Checklist
Confirm Appliance Functionality
Once leveled, turn on the refrigerator and verify it runs smoothly. An unlevel fridge won’t cool, leading to spoiled food. Also check that stove burners sit flat and interior cabinets close properly without strain.
Double-Check All Systems
Walk through this quick verification list:
– Side-to-side and front-to-back levels read true
– Stabilizer jacks are deployed without lifting
– Roof cables have proper tension
– Velcro seals are fully attached
– Door latches securely
– No strain on windows or hinges
Recheck After Setup Changes
After extending awnings or filling water tanks, recheck the level one more time. Weight distribution shifts can tilt the trailer, especially on soft ground.
Avoid Common Leveling Mistakes
Don’t Use Jacks to Level
Stabilizer jacks are not leveling tools. Using them to lift the trailer risks frame damage and uneven weight distribution. Always level with tire blocks or a ratchet system first.
Avoid Single-Point Level Checks
Never assume the trailer is level based on one measurement. Always check the front, center, and rear. Frame flex or ground softness creates false readings that lead to problems later.
Never Skip Wheel Chocks
Even on flat ground, always use wheel chocks. Wind, shifting soil, or accidental bumps can cause the trailer to roll. Safety should always come first.
Maintain Your Leveling Equipment
Inspect Blocks and Bolts After Each Trip
Check stacking blocks for cracks or wear. For mounted systems like the BAL Tire Leveler, verify bolts are tight and free of corrosion. Replace any damaged parts before your next adventure.
Store Blocks Properly
Keep leveling blocks in a dry, shaded area. Prolonged sun exposure warps plastic over time. Metal components should be wiped down to prevent rust formation.
Upgrade to More Efficient Leveling Tools
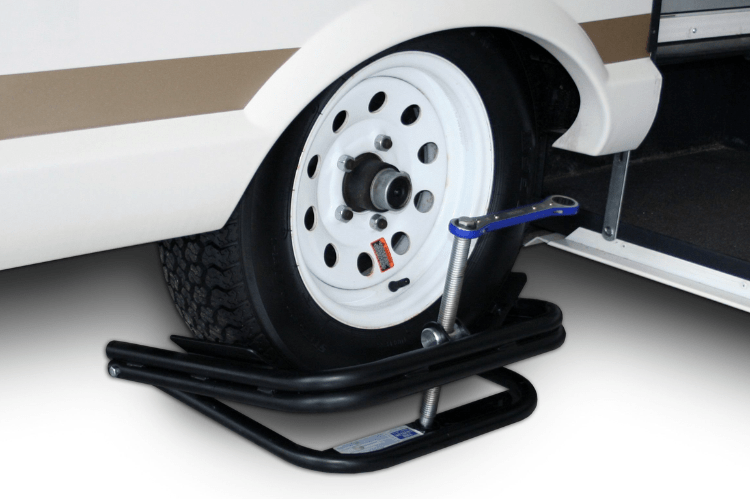
Consider the BAL Leveler System
For frequent campers, the BAL Leveler transforms the entire setup routine. Its ratchet mechanism lifts the low side smoothly, handles up to 6 inches of slope, and maintains level even after settling. Setup time drops from 15 minutes to under 5.
Invest in Long-Term Value
Quality tools like the BAL Tire Leveler cost more upfront (typically $80 to $100) but save time, protect your trailer, and eliminate setup stress. They install in under 15 minutes and last for years with minimal maintenance.
Optimize Setup for Any Terrain
Handle Mountain or Sloped Sites
On uneven ground, use tri-leveler jacks or stackable blocks to achieve the needed lift. Prioritize side-to-side leveling first, then fine-tune the front. If the slope feels extreme, reposition the trailer to a better spot when possible.
Adapt to Weather Conditions
In wind, secure awnings early and avoid over-extending them. In rain, double-check all velcro seals before storms arrive. On soft ground, use larger base pads to distribute weight and prevent sinking.
Frequently Asked Questions About Leveling a Tent Trailer
Why does my refrigerator not work when the camper is unlevel?
Popup camper refrigerators rely on gravity to circulate refrigerant through the cooling system. When the camper sits unlevel, the refrigerant doesn’t flow properly, preventing the fridge from cooling and potentially damaging the compressor over time.
Can I use stabilizer jacks to level my tent trailer?
No. Stabilizer jacks are designed only to reduce interior sway and movement once the trailer is already level. Using them to lift the trailer can bend the frame, damage mounting points, and create unsafe weight distribution.
How long does it take to level a popup camper?
With basic tools like wooden blocks, expect 10 to 15 minutes for leveling. Using a ratchet-based system like the BAL Leveler reduces this to under 5 minutes. Full setup from arrival to functional living space typically takes under 30 minutes.
Where should I place the level when checking my camper?
Check the level in multiple locations—near the front, center, and rear of the trailer. Frames can twist slightly, so a single reading may be misleading. Placing the level across the floor or on the frame rail gives the most accurate results.
Do I need to disconnect from my tow vehicle before leveling?
Yes. Keep the trailer connected during side-to-side leveling only. Disconnect before making front-to-back adjustments so the tongue weight settles independently and you get an accurate reading.
What is the BAL Tire Leveler and is it worth the cost?
The BAL Tire Leveler is an axle-mounted system that lifts the low-side tire rather than the frame, handling up to 6 inches of uneven terrain. At $80 to $100, it costs more than basic blocks but saves time, prevents frame stress, and lasts for years with proper care.
Key Takeaways for Leveling Your Tent Trailer with Confidence
Leveling a tent trailer boils down to three core principles: always address side-to-side balance first, disconnect from your tow vehicle before adjusting front-to-back, and never use stabilizer jacks to lift the camper. These three rules prevent the most common setup mistakes and protect your camper from long-term damage.
Investing in quality tools makes the entire process faster and more reliable. A bubble level, wheel chocks, and either stackable blocks or a ratchet system cover every camping scenario. For campers who set up frequently, a BAL Tire Leveler pays for itself in time saved and frustration avoided.
Your next step is simple: gather your leveling equipment before your next trip, practice the sequence on flat ground at home, and make the process part of your standard arrival routine. Within a few setups, leveling becomes second nature—and every camping trip starts smoothly.