
A single dominant cola stealing all your light while lower branches wither in the shadows is one of the most frustrating problems in indoor growing. If you’re tired of wasted vertical space and uneven harvests, trellis netting is the fix. When installed correctly in a grow tent, this simple mesh transforms your canopy into a flat, productive layer that catches every photon your light puts out.
This guide shows you how to use trellis netting in a grow tent from start to finish. You’ll learn the exact measurements, attachment method, and training schedule that turn a basic SCROG setup into a yield-boosting machine. These techniques work in 2×2, 4×4, and larger tents alike.
Measure and Cut the Right Size Net
Use a 6-Inch Grid for Standard Tents
For most grow tents, a 6-inch grid trellis net provides the ideal balance of support and airflow. Cut your net to 6 squares by 6 squares (36″ x 36″) to fit a standard 35″ x 35″ tent frame. The slight overlap ensures you have material to secure without leaving gaps.
✅ Pro Tip: Always measure your tent’s interior dimensions before cutting. Frame sizes can vary by manufacturer.
Cut Clean Edges with Sharp Tools
Use sharp scissors or a utility knife to slice along the grid lines. Ragged cuts weaken the weave and make installation harder. Slow, deliberate cuts keep every square intact and ready for use.
❌ Avoid: Tearing or yanking the net. This distorts the grid and reduces overall durability.
Remove Plants Before Installation
Clear the Tent for Full Access
Take your plants out temporarily. You need unobstructed access to the tent poles to attach the net securely. Moving plants also prevents accidental stem or leaf damage during setup.
🌿 Best Practice: Place plants in a shaded, climate-stable area. Avoid direct sunlight or cold drafts while they wait.
Check Frame Stability First
Inspect every pole joint and corner connector. Lock any loose pieces into place before hanging the net. A shaky frame leads to sagging netting and uneven canopy support.
Secure the Net with Zip Ties
Why Zip Ties Beat Plastic Clips
Skip the plastic clips entirely. They loosen over time and let the net slide under the weight of growing branches. Zip ties create a permanent, drum-tight hold that won’t budge as your plants mature.
Attach the Net Step by Step
- Loop the zip tie in front of the net
- Wrap it around the back of the tent pole
- Pull the end through the locking slot
- Tighten firmly until the net feels taut
Repeat every 6 to 8 inches along all four sides. More ties mean better long-term support.
🔧 Visual Cue: The net should feel like a drumhead. If you can press down and create a dent, it needs more tightening.
✅ Use UV-resistant zip ties if your tent runs hot. Standard ties can become brittle under intense lighting.
Position the Trellis at Canopy Level
Hang During Early Vegetative Growth
Install the net when plants reach one-third to one-half of their final height. This leaves room for upward growth before you begin training branches through the grid.
📏 Ideal Height: 12 to 18 inches above the soil for most setups.
Adjust the Height Unevenly if Needed
Some tent corners have lower clearance than others. Use longer zip tie loops on one side to slope the net slightly, keeping it functional across the entire footprint.
🎯 Goal: The net should sit just above the top nodes, ready for weaving as branches grow upward.
Train Plants Through the Net

Start Early in the Vegetative Stage
Begin training when branches are still flexible and growing fast, usually 2 to 3 weeks into veg. Gently bend stems and tuck them under the netting, guiding each one outward into an open square.
✅ Training Frequency: Every 2 to 3 days during active vegetative growth.
Spread Branches Evenly Across the Grid
Push dense clusters into empty zones so each square holds roughly one main shoot. This creates the flat, even canopy that defines a successful SCROG setup.
❌ Avoid: Letting one branch dominate the center. This causes shading and uneven light distribution.
Use Soft Ties for Stubborn Stems
If a branch resists bending, secure it with soft rubber ties or garden twist ties until it holds its new position. Never force a stiff stem. Snapping it early costs you yield.
🌱 Pro Tip: Top your plants before training to encourage multiple colas and stronger lateral growth.
Maintain the Canopy as Plants Grow

Check Net Tension Every Week
As branches thicken and weight increases, the net can loosen. Re-tighten existing zip ties or add new ones to keep support consistent throughout the cycle.
🔍 Warning Sign: A sagging net leads to uneven light exposure and lower overall yields.
Keep Weaving New Growth Down
Every time a new shoot rises above the net, tuck it back down through an adjacent square. This constant weaving keeps the canopy flat and wide.
🕒 Time Estimate: 5 to 10 minutes per plant every few days during peak vegetative growth.
Prune Lower Foliage Under the Net
Once the canopy forms, trim yellowing leaves and small lower branches that receive little light. These drain energy without producing meaningful bud.
✅ Result: Better airflow, reduced mold risk, and more energy directed to top colas.
Optimize the Setup for SCROG
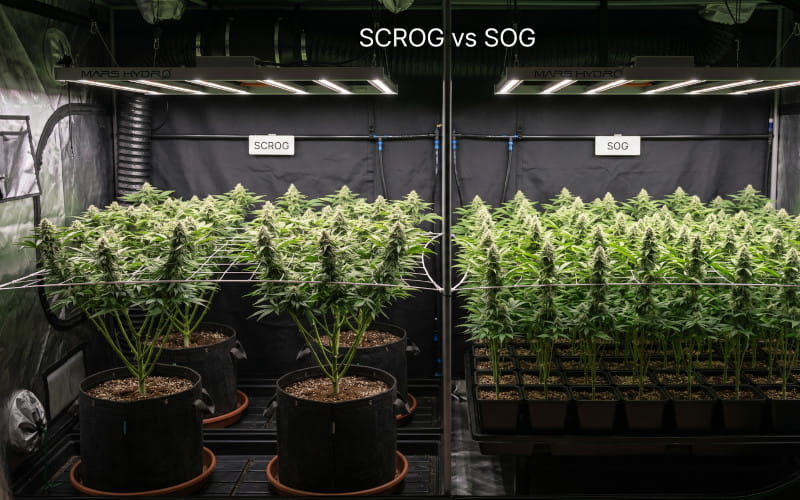
What SCROG Actually Means
SCROG (Screen of Green) uses a horizontal trellis net to spread plant growth into a single, even layer. Instead of one main cola dominating, you create multiple tops all sitting at the same height.
🔄 Core Principle: One light source, one flat plane of buds, maximum efficiency.
Key Benefits in a Grow Tent
- Higher yields compared to untrained plants
- Better light efficiency with no wasted photons on shaded areas
- More consistent bud size for easier harvesting and curing
- Ideal use of limited vertical space
✅ Best Strains for SCROG: Indica-dominant or hybrid varieties with strong lateral branching.
Troubleshooting Common Issues

Net Sags Under Plant Weight
Cause: Too few attachment points or weak ties.
Fix: Add zip ties every 6 inches and reinforce corners. A dual-layer netting approach helps with heavy yields.
Branches Snap During Training
Cause: Over-bending stiff or woody stems.
Fix: Train more frequently with smaller adjustments. Supercropping (gently crushing the stem) increases flexibility without breaking.
Uneven Canopy Development
Cause: Poor spacing or delayed training.
Fix: Rotate plants weekly and prune dominant tips to encourage side growth.
Mold or Humidity Builds Under the Net
Cause: Dense foliage blocks airflow.
Fix: Run oscillating fans continuously and prune excess leaves. Keep at least 2 to 3 inches between the net and the tallest shoots early on.
Upgrade Your Setup with Advanced Tips
Use Removable Netting for Easier Harvest
Mount the net on detachable bungee cords or hook-and-loop straps instead of permanent zip ties. You can lift the net slightly during harvest for better access to lower branches.
⚙️ DIY Hack: Silicone-coated wire or heavy-duty garden twist ties work as reusable, heat-resistant fasteners.
Layer Multiple Nets in Tall Tents
In 5- or 6-foot tents, install two nets at different heights:
– Lower net: Handles initial spread
– Upper net: Final canopy shaping
This stacking mimics outdoor sun exposure and pushes yields even higher.
Combine Trellis Netting with LST
Pair your trellis netting with Low-Stress Training (LST). Bend main stems sideways early, then use the net to lock them in place. You get multiple colas without topping the plant.
✅ Result: Healthier plants, faster growth, and bigger harvests.
Frequently Asked Questions About Trellis Netting in Grow Tents
When should I install trellis netting in my grow tent?
Install the net during the early vegetative stage, when plants are about one-third to one-half of their final height. Installing too late risks damaging stems that have already stiffened.
What size grid should I use for my trellis net?
A 6-inch grid works best for most grow tents. It provides enough support for branches without restricting airflow or light penetration.
Can I use clips instead of zip ties to attach the net?
Clips are not recommended. They loosen under the weight of mature plants and allow the net to shift. Zip ties provide a permanent, taut hold that stays secure throughout the grow cycle.
How often should I train my plants through the net?
Train every 2 to 3 days during active vegetative growth. Frequent, gentle adjustments prevent stem damage and keep the canopy developing evenly.
Do I need to remove the net during harvest?
Not necessarily, but removable mounting (bungee cords or hook-and-loop straps) makes harvesting easier. You can lift the net slightly to access lower branches without cutting the netting.
Will trellis netting work in a small 2×2 tent?
Yes. Cut the net to fit your tent’s interior dimensions (typically around 36″ x 36″) and follow the same installation steps. SCROG works in any tent with vertical space above the canopy.
Final Thoughts on Using Trellis Netting in Your Grow Tent
Trellis netting does far more than hold up branches. It’s a yield optimization tool that turns wasted vertical space into a productive, high-efficiency canopy. The key steps are simple: measure and cut the net to fit your tent, secure it firmly with zip ties, and train your plants consistently through the grid during vegetative growth.
Start early, weave often, and check tension weekly. These three habits alone separate average harvests from exceptional ones. If your tent has room above your plants, there’s no reason not to add a trellis.
Bottom line: A properly installed trellis netting setup is one of the simplest upgrades you can make for the biggest payoff in your grow tent.