
You’ve just unboxed your first grow tent and want to get growing fast. The problem? Poles, ducting, lights, and fans everywhere, and no clear starting point. Many beginners waste hours figuring out what goes where, often installing things in the wrong order. The fix is simpler than you think: every functional indoor grow environment really only requires two core components—a grow light and an exhaust fan. Everything else builds from that foundation.
This grow tent setup for beginners guide walks you through every stage of building a safe, efficient, sealed indoor garden. You’ll learn how to choose the right tent size, assemble the frame, hang ventilation and lighting, control odors, manage temperature, and avoid the most common beginner mistakes. By the end, you’ll have a fully operational grow space ready for healthy plants and consistent harvests.
Select the Right Tent Size for Your Space
Match Tent Dimensions to Your Growing Goals
Start with a tent that fits both your room and your ambitions. A 2’x2′ tent (around $55) suits the smallest spaces and works with a 100W LED like the Spider Farmer SF-1000. Expect modest yields, but it’s a great learning environment.
A 2’x4′ tent (around $90) strikes a popular balance. It accommodates a 200–300W light and produces several ounces per month, making it ideal for most beginners stepping into a grow tent setup.
For maximum yield in a manageable footprint, a 4’x4′ tent (around $80) is hard to beat. Pair it with a 480–600W LED like the Mars Hydro FC-E4800 or HLG 600 R-Spec, and you can harvest 1–2 pounds per cycle while one person easily handles the workload.
Factor in Height for Healthy Plant Development
Tents range from 5 to 7 feet tall. The minimum recommended height is 5 feet, though taller is better. Extra vertical space lets you run stronger lights and grow taller plants with longer, denser buds.
Short tents (under 5 feet) increase the risk of plants growing into the light. Workarounds include using lower-wattage lights, training plants horizontally, and monitoring height weekly. Taller tents also run cooler and promote better airflow.
Choose Budget-Friendly Brands That Perform
You don’t need to overspend on the tent itself. CoolGrows offers durable zippers and sturdy frames at lower prices than premium competitors. Vivosun makes affordable 2’x4′ models ideal for first-time growers. Most budget tents include reflective interiors, floor pans, and multiple vents, giving you everything needed to start.
Assemble the Frame and Tent Cover Correctly
Lay Out and Identify All Components
Before touching a pole, open the box and inventory every piece. A typical tent kit includes reflective fabric, pre-labeled poles (often marked E, F, G, H), plastic corner connectors, top rail hangers, and an instruction manual.
Pro Tip: Use the cardboard packaging insert to cut tape—never cut near the tent fabric. Confirm all poles are labeled and every connector is present before starting.
Plastic connectors are preferred over metal because they resist rust in humid grow environments.
Build the Base, Verticals, and Top Frame
Start with the bottom square frame using the longest poles. Snap each pole into the plastic connectors until you hear a firm click.
Next, add the vertical poles. Press firmly to ensure full engagement—loose connections cause sagging and instability over time. Install the top horizontal poles, then the cross poles that will support your equipment.
If your ceiling is too low for standing assembly, build the frame upright from the floor instead.
Slide the Tent Cover Over the Frame
Lay the tent fabric flat with the reflective side facing up. Slide the assembled frame into the cover from one end, working it section by section.
Once fully covered, stand the tent upright. Tuck each corner into its connector and zip the tent closed from back to front. This tightens the fabric and seals the structure into one unit.
Check for light leaks in a dark room using a flashlight. Seal any gaps with aluminum tape.
Install the Spill Tray Before Equipment
Secure the Waterproof Floor Pan
Attach the spill tray’s corners to the vertical poles using Velcro straps or ties. Gravity pulls it into position, creating a basin that catches several gallons of water during spills or floods.
This tray is removable and easy to clean, which makes it essential for mess control. Install it before hanging any equipment—once lights and fans are in place, access becomes much harder.
Hang Ventilation Before the Grow Light
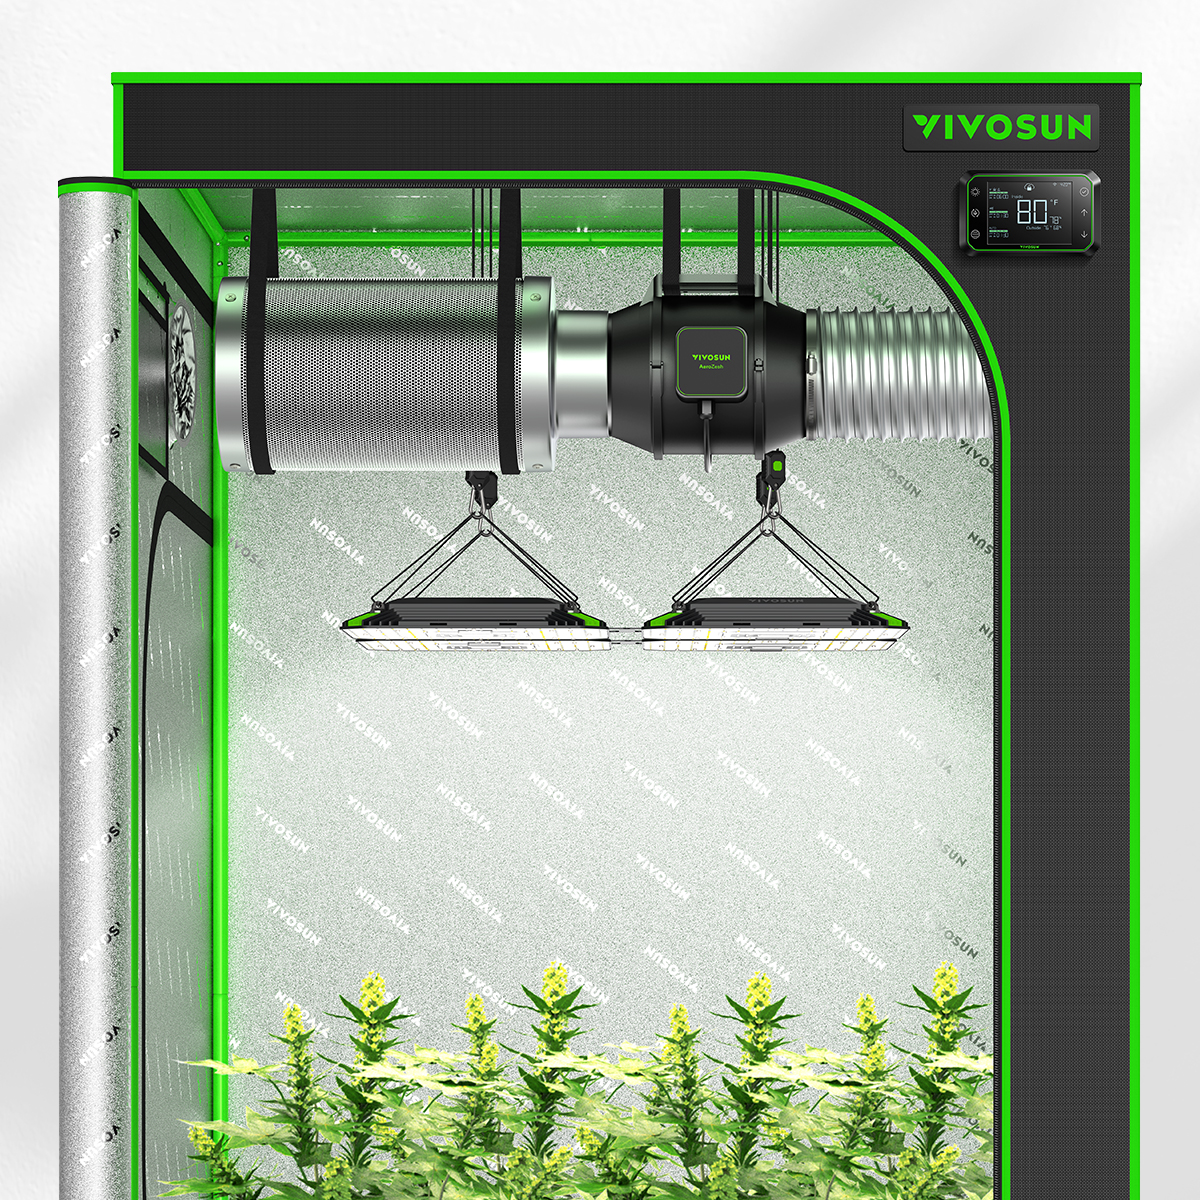
Why Ventilation Comes First
Always install your carbon filter and inline fan before mounting the grow light. Once the light is up, reaching above it to hang heavy components becomes awkward and risky.
Use rope ratchets for hanging. Each pair supports up to 150 lbs and makes height adjustments effortless. Hang the filter first, then place the fan beside it.
Choose the Right Setup Based on Temperature
Run your light for one hour with a thermometer on the tent floor to measure internal temperature.
- Above 78°F (25.5°C): Use Setup 1 (exhaust from top)
- Below 78°F: Use Setup 2 (fan outside) or Setup 3 (fan inside)
Setup 1 for hot tents:
1. Hang carbon filter with straps
2. Hang inline fan beside it, arrow pointing away from filter toward the vent
3. Connect ducting from fan outlet to the top vent
4. Place a dust filter on the outside of the carbon filter
5. Open a lower vent for intake
6. Close all other vents
Setup 2 for small spaces (fan outside):
1. Roll a dust filter and place it inside the carbon filter
2. Stack the inline fan on top, arrow pointing down
3. Attach ducting to the fan
4. Place the entire unit outside the tent
5. Connect duct to the lowest vent
6. Open the top vent for exhaust
Setup 3 for larger tents (fan inside):
1. Place dust filter on the outside of the carbon filter
2. Stack fan on top, arrow pointing up
3. Connect ducting and place the system inside the tent
4. Connect to the nearest vent and open the top vent
Mount the Grow Light Safely

Match Light Wattage to Tent Size
Use this quick reference for your grow tent setup:
| Tent Size | Max Light Power | Recommended Models |
|---|---|---|
| 2’x2′ | 100W | Spider Farmer SF-1000 |
| 2’x4′ | 200–300W | SF-2000, Mars Hydro TSL2000 |
| 4’x4′ | 480–600W | Mars Hydro FC-E4800, HLG 600 R-Spec |
Oversized lights without proper cooling will cook your plants.
Use Rope Ratchets for Easy Adjustments
Clip rope ratchets to the top rails and lower them to the floor. Place the light on the ground and attach ratchets to all four corners. Lift slowly and evenly.
Safety rule: Hanging hardware must support at least twice the light’s weight.
Carabiner alternative:
1. Attach carabiners to the top rails
2. Lower them to the floor
3. Clip to the light’s corners
4. Lift evenly by both ends
This method is smooth, tool-free, and ideal for heavy fixtures.
Add an Internal Circulating Fan

Prevent Mold and Strengthen Plant Stems
Stagnant air invites mold and weakens stems. One oscillating fan inside the tent keeps air moving and strengthens plants through gentle motion.
Mount it with clips or hang it from a pole. Position the airflow so leaves slightly vibrate without flapping. Avoid direct blasts on young plants—use the lowest speed setting.
Position the Carbon Filter Correctly

Filter Placement Is Critical for Odor Control
The carbon filter must sit at the start or end of the exhaust line—never in the middle. A mid-line filter allows air to bypass it, and smells escape immediately.
Hang the filter with rope ratchets since it’s heavier than it appears.
Best placement options:
– Inside the tent (back corner): Most effective because air passes through the filter before exiting
– On top of the tent: Saves space in short tents, though slightly less effective
Seal Every Connection
Use duct clamps or tape to ensure airtight seals between the filter, fan, and ducting. Any leak lets unfiltered air escape, and odor follows.
Maintaining negative air pressure (slightly lower pressure inside the tent) ensures air pulls in through the intake rather than leaking out through seams.
Control Odors When Opening the Tent
Manage Smell Escapes During Access
Every time you open the tent door, the seal breaks. Strong-smelling plants can perfume a room within seconds.
ONA gel works well for short-term odor control—but only outside the tent. Never place it inside; the scent sticks to buds.
For heavy odor situations:
– Run a second carbon filter in the room
– Place ONA gel nearby
– Open the tent briefly and close it quickly
Some growers keep a portable filter-fan combo on the floor to clear room smells in minutes.
Route Cords Safely and Add a Smoke Detector
Keep Electronics Off the Ground
Follow one rule: Electronics above waist, water below. Power strips, timers, and ballasts should always be elevated. If a spill occurs, water won’t short the circuits.
Run power cords through bottom vents, then up to the lights. Bundle cords with zip ties to keep them tidy and out of the growing space.
Install a Smoke Detector Inside the Tent
Place a smoke detector inside the tent. Overheating lights or faulty wiring can create fire risks. An early warning saves your entire setup.
Automate Light Cycles with Timers

Set Up Consistent Vegetative and Flowering Schedules
Use a timed outlet or surge protector with timer to automate lighting. Set the dial to the current time and push down tabs for the hours you want lights on.
- Vegetative growth: 18 hours on, 6 hours off
- Flowering stage: 12 hours on, 12 hours off
When plants reach 6 weeks old, switch to 12/12. Buds typically appear within 1–2 weeks after the switch. Consistency is critical for healthy growth.
Test Temperature, Airflow, and Light Leaks
Run a One-Hour Heat Test
After full assembly, turn on the light and fan, then close the tent. Place a thermometer on the floor and wait at least one hour.
- Below 78°F: Your ventilation is adequate
- Above 78°F: Upgrade exhaust capacity or add an intake fan
LEDs run cooler than HIDs, but even LEDs can overheat small tents. Adjust fan speed or add an oscillating fan if needed.
Seal Light Leaks in a Dark Room
Turn off all room lights and switch on the grow light. Inspect the tent for escaping light at zipper seams, vents, ducting gaps, and door edges.
Seal any leaks with aluminum tape or black electrical tape. Even small light leaks disrupt photoperiods and stress plants.
Follow the Final Setup Checklist
Confirm each step before adding plants:
• Frame assembled and covered
• Spill tray installed
• Hanging poles in place
• Carbon filter and fan hung
• Grow light mounted and leveled
• Internal circulating fan installed
• Ventilation system connected and sealed
• Timer set and tested
• Light leaks sealed
• Cords organized and elevated
• Smoke detector installed
Run a 24-hour test before introducing plants. Verify stable temperatures, working airflow, and zero smell leaks.
Avoid These 10 Beginner Mistakes
Steer clear of these common pitfalls in any grow tent setup:
- Building the tent in the wrong room – Assembled tents won’t fit through standard doors
- Installing the light first – Blocks access for hanging the filter and fan
- Placing the carbon filter mid-line – Renders it useless
- Leaving electronics on the floor – Water damage risk
- Skipping the temperature test – Leads to wrong ventilation choice
- Loose pole connections – Causes sagging and instability
- Not sealing ducts – Smell and heat leak out
- Using only two hangers for heavy lights – Upgrade to four for 200W+ fixtures
- Ignoring light leaks – Disrupts plant cycles
- Forgetting the smoke detector – Critical safety oversight
Frequently Asked Questions About Grow Tent Setup for Beginners
What size grow tent should a beginner buy?
Most beginners start with a 2’x4′ tent because it balances space, cost, and yield. It supports a 200–300W light and produces several ounces per month without being overwhelming. Smaller 2’x2′ tents work for limited spaces, while 4’x4′ tents suit growers chasing maximum yields.
Do I really need a carbon filter in my grow tent?
Yes, if you’re growing plants with strong odors. A carbon filter prevents smell trails from escaping your tent and room. It must be placed at the start or end of the exhaust line, never in the middle, and all connections must be airtight.
How long does it take to set up a grow tent?
Most beginners complete a full grow tent setup in 2–4 hours, depending on tent size and experience. Add another hour for the initial temperature test and light leak check. Running a 24-hour test before adding plants ensures everything works correctly.
Can I put my grow tent in a closet or small room?
Yes, as long as the room has ventilation and access to power. Many growers use closets, basements, or spare bedrooms. Just remember that assembled tents are wider than standard doorways, so build the tent in its final location.
How often should I run my exhaust fan?
Your inline fan should run 24 hours a day during the entire grow cycle. Continuous airflow regulates temperature, humidity, and CO₂ levels. Use a speed controller to adjust intensity based on temperature readings.
What’s the most common beginner mistake in grow tent setup?
Installing the grow light before hanging the ventilation. Once the light is up, reaching above it to mount a heavy carbon filter or fan becomes difficult and unsafe. Always hang the filter and fan first, then mount the light last.
Key Takeaways for Your First Grow Tent Setup
A successful grow tent setup for beginners comes down to three essentials: choose the right size, install ventilation before lighting, and seal everything tightly. Start with a 2’x4′ tent and a 200W LED, hang your carbon filter and fan first, and always test temperature and light leaks before adding plants.
Your next step is simple: pick your tent size, order your core components, and block out an afternoon for assembly. Follow the setup sequence in this guide, run your 24-hour test, and you’ll be ready to start growing within days.