
Picture this: your guests arrive, glance around, and immediately feel wrapped in a space designed just for your love story. A plain tent becomes magical when you layer light, fabric, and natural elements with intention. Knowing how to decorate a tent for a wedding is what separates a forgettable reception from an immersive experience guests talk about for years.
Below, you will learn how to transform ceiling to floor using proven techniques, theme ideas, and budget-friendly tricks. Whether you are styling a rustic barn celebration or a boho garden party, this guide gives you a clear roadmap from planning to final touches.
Lighting That Sets the Mood
Layer String Lights for a Warm Glow
String lights form the backbone of any well-lit tent. Drape them peak to peak, side to side, or wrap them around center poles to create a soft, romantic ambiance. For an Italian trattoria feel, crisscross multiple rows in a diamond pattern across the ceiling. Dense, symmetrical arrangements look luxurious, while sparse placement can feel accidental.
Expert Note: Choose warm white bulbs between 2700K and 3000K to mimic candlelight and flatter skin tones in photographs.
Add Lanterns and Fairy Lights for Depth
Layer fairy lights over your main strings for extra sparkle. Wrap them around floral garlands or weave them through hanging greenery to mimic starlight. Pair them with paper, metal, or glass lanterns hung at varying heights using fishing line.
Important: Lanterns create atmosphere, not true illumination. Always pair them with adequate overhead lighting.
Use Colored Up-Lighting for Drama
Place LED up-lights around the tent perimeter to wash walls in color. Use programmable RGB lights or gels to shift hues through the night, such as soft blue during dinner and vibrant purple during dancing. Match your color palette to the wedding theme for a polished, cohesive feel.
Project Gobos for a Personal Touch
Custom gobos project your initials, wedding date, or a “Mr. & Mrs.” design onto the ceiling or walls. This subtle detail ties your theme together from floor to sky and adds personality without cluttering the space.
Wrap Branches in Lights for a Natural Feel
Attach birch branches to tent poles and wrap them in fairy lights or drape ivy around them. This technique brings the outdoors in and creates a magical, forest-like canopy that feels organic and inviting.
Ceiling Decor That Wows

Drape Fabric for Romance
Sheer fabrics like tulle, chiffon, or voile soften harsh lines and add elegance overhead. Start with a flat base layer to prevent gaps, then pleat or gather panels for dimension.
Color Strategy:
• Navy blue tulle for depth
• Pink pongee across the lower third for warmth
• Yellow pongee strips to frame the sides
This layered approach creates a high-end look even with budget fabrics.
Hang Decor with Fishing Line
Use clear fishing line, twine, or rope to suspend paper lanterns, floral installations, vintage photos, or moss balls. Vary the hanging heights to create visual interest. For a “floating garden” effect, suspend clusters of baby’s breath or eucalyptus above guest tables.
Suspend Floral Chandeliers and Garlands
Hang garlands or floral arrangements above the dance floor, sweetheart table, or altar. Choose durable blooms like orchids or preserved greenery. Secure them to ceiling beams or center poles with zip ties or floral wire.
Budget Hack: Wildflowers, long grasses, or baby’s breath create lush arrangements at a fraction of the cost of premium florals.
Backdrop and Stage Design
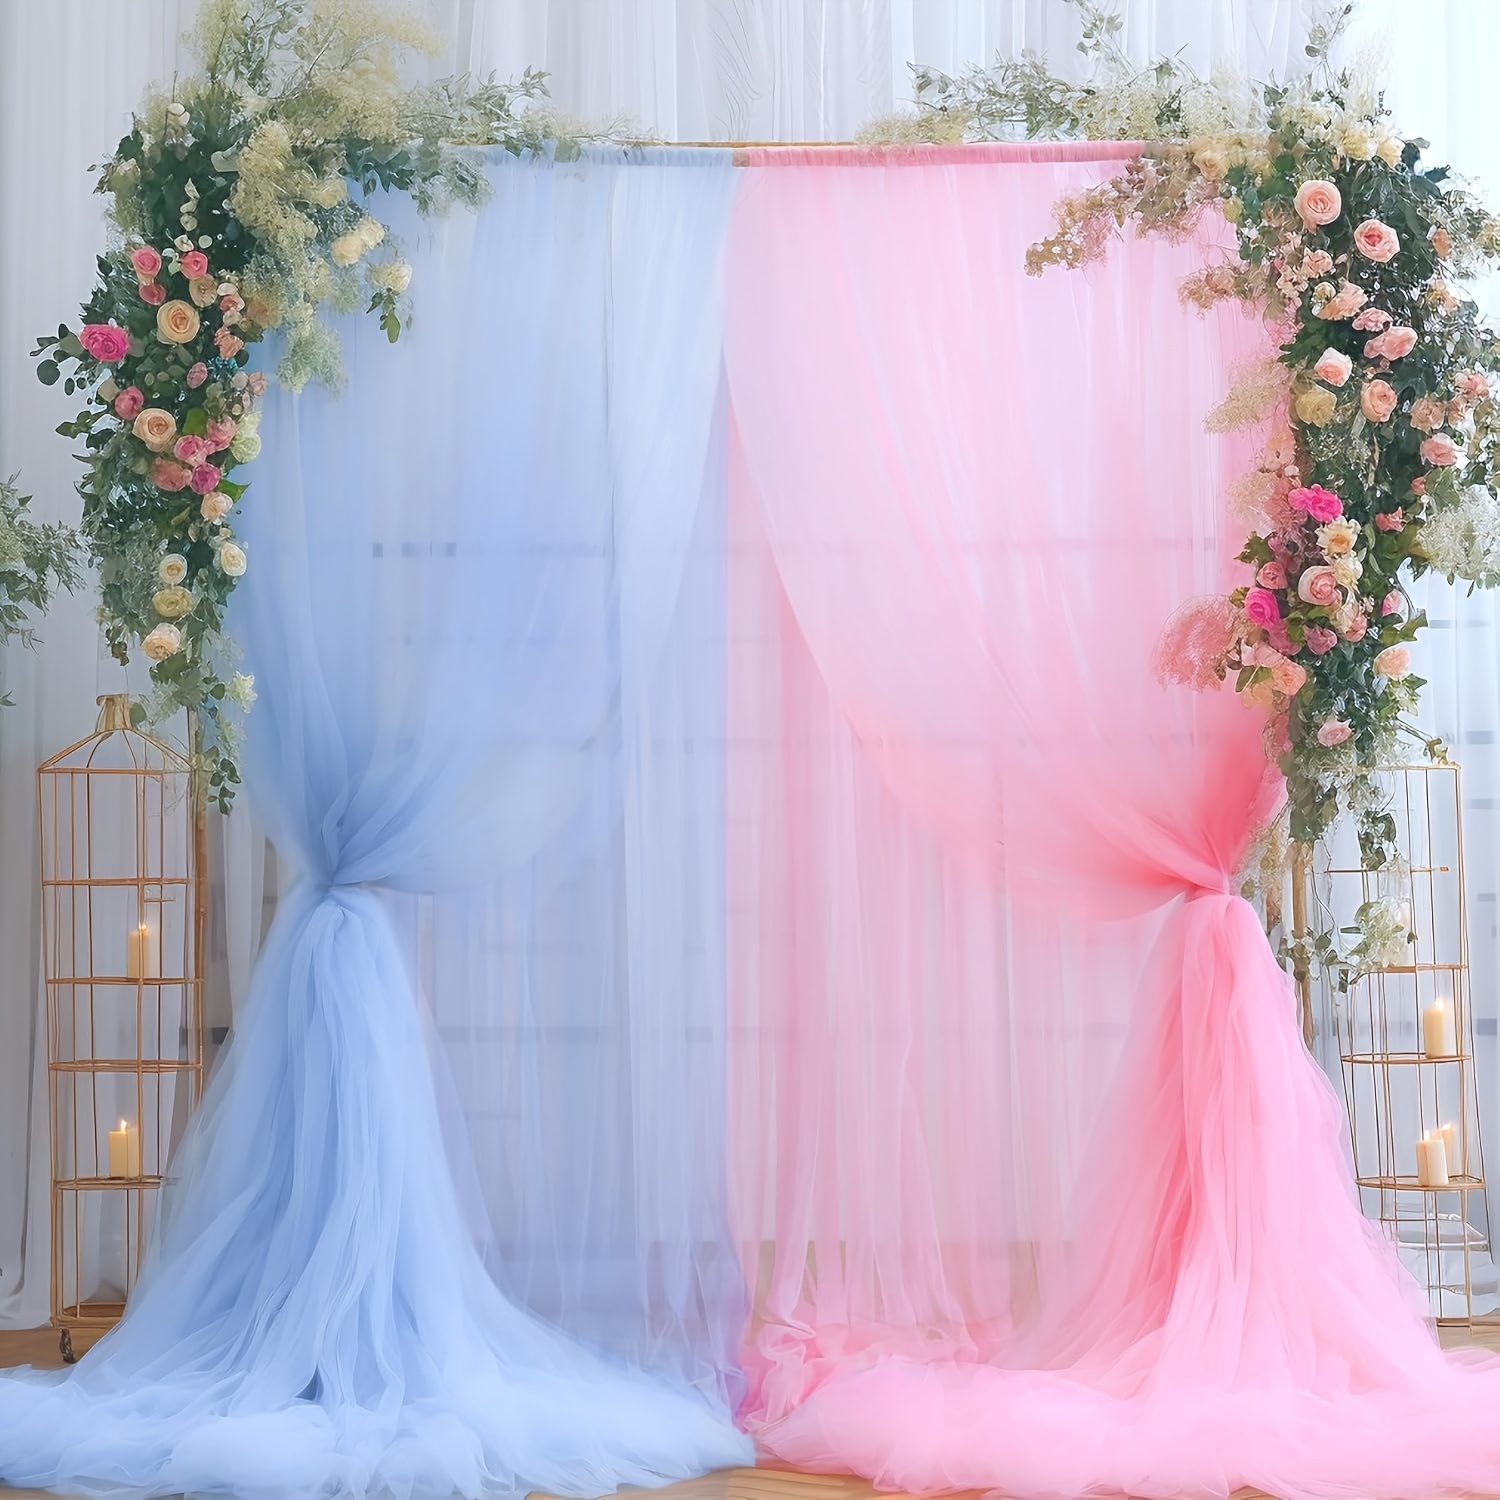
Build a Layered Fabric Backdrop
For ceremonies or photo areas, construct a backdrop using three fabric layers:
1. Navy tulle as the base for depth
2. Pink pongee across the lower third for warmth
3. Yellow pongee strips framing both sides to guide the eye upward
Maintain symmetry by measuring equal distances from each side (around 12 inches). Pleat carefully to prevent sagging and finish edges neatly before installation.
Wrap the Stage for a Seamless Look
Extend the backdrop’s elegance to the stage by wrapping it in coordinating fabric. Secure tightly with staples or clips, leaving no loose edges. A wrapped stage creates flow between elements and makes the entire space feel intentional.
Add Natural Elements to Backdrops
Incorporate birch branches, wooden crates, or hanging vines into your backdrop design. Attach small lights or fresh flowers for added charm. These organic touches enhance rustic, boho, or garden themes beautifully.
Flooring and Wall Treatments
Choose Weather-Resistant Flooring
Elevate the ground level with durable, easy-to-clean options:
• Outdoor rugs made of polypropylene or synthetic fibers
• Interlocking foam or plastic tiles
• Natural fiber mats like jute or seagrass
Layer rugs over tiles for added texture and comfort underfoot.
Decorate Walls Without Damage
Cover tent walls with waterproof tapestries, fabric panels, or printed vinyl banners. Use clips or tension rods to hang items without damaging the tent structure. Add sheer curtains or mesh screens for privacy while maintaining airflow.
Create Functional Zones
Divide your tent into purposeful areas using rugs, lighting, or furniture placement:
• Ceremony corner with altar and aisle
• Dining section with centerpieces and linens
• Dance floor with speaker access
• Lounge area with floor cushions and low tables
Smart zoning keeps guests comfortable and the event flowing naturally.
Furniture and Seating Arrangements
Choose Formal Seating for Elegance
Long banquet tables paired with upholstered chiavari chairs create a classic, refined atmosphere. Arrange them in straight rows or U-shapes to maximize guest interaction. Add chair sashes or napkins in your wedding colors for a polished finish.
Create Casual Lounge Areas
For cocktail hours or after-parties, design cozy nooks using floor cushions, ottoman poufs, low wooden tables, and weather-protected vintage sofas. This setup encourages relaxation and conversation.
Select Smart, Portable Furniture
Opt for lightweight, foldable, and stackable pieces like aluminum chairs, nesting tables, and storage benches. Organize decor in labeled bins for easy transport and setup.
Table Settings That Impress
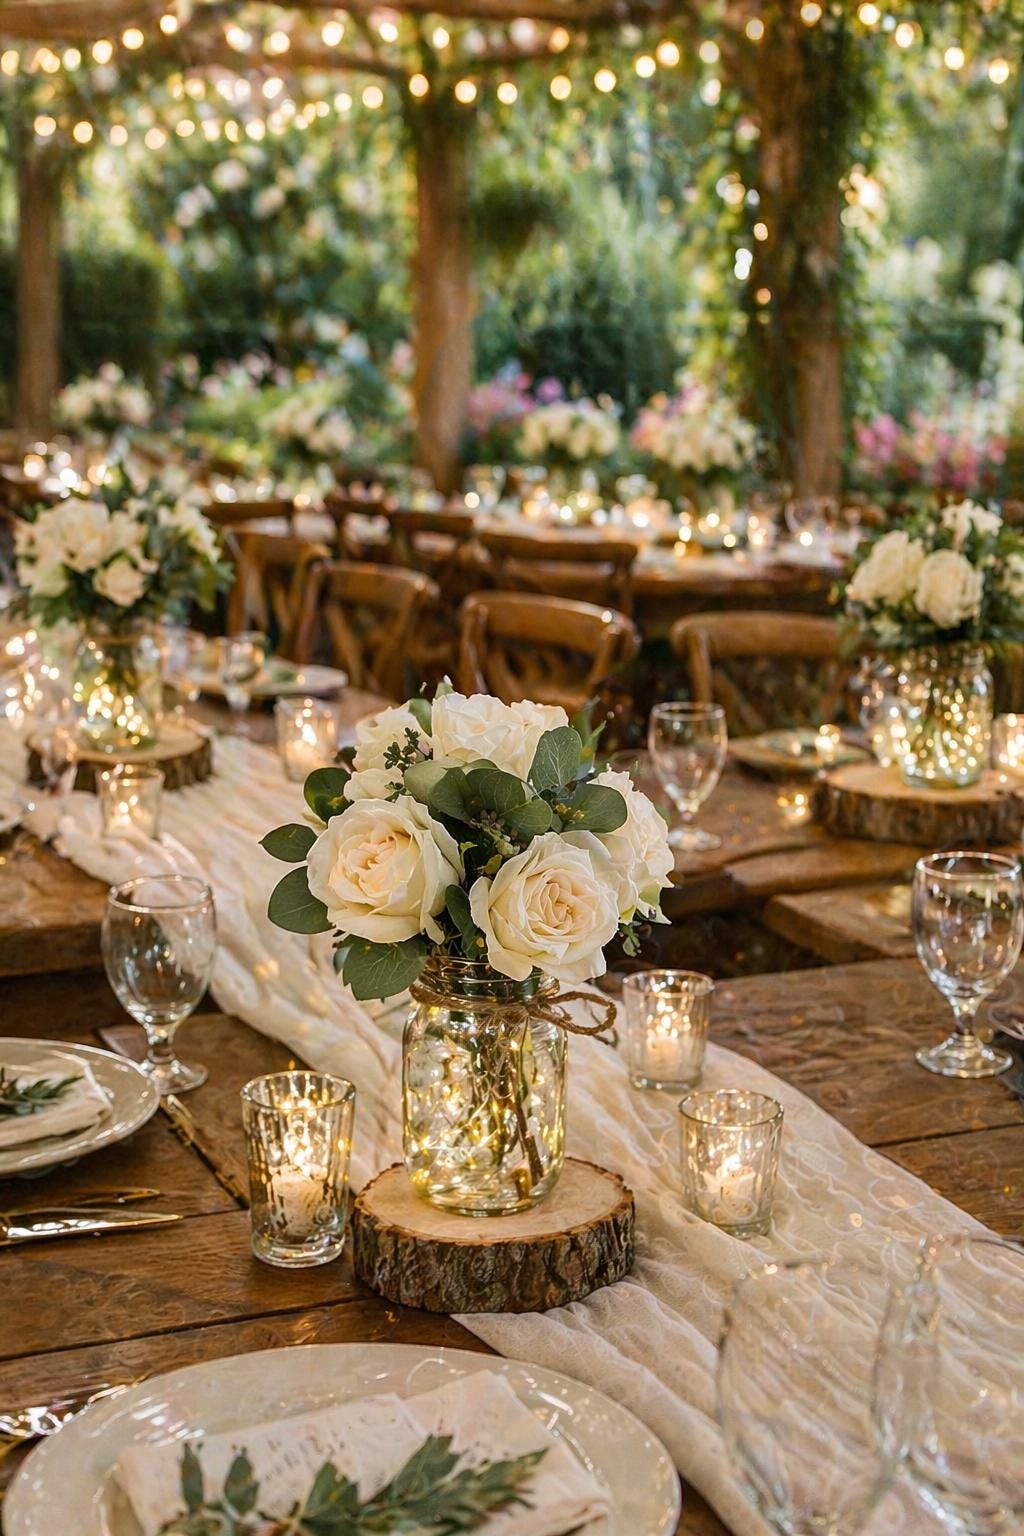
Layer Tablecloths for Visual Depth
Combine textures and colors to elevate each table:
• Base layer in solid linen
• Sheer overlay or lace on top
• Runner in burlap, velvet, or sequin
This layering technique draws the eye toward your centerpieces.
Style Mason Jar Centerpieces
Fill mason jars with wildflowers, baby’s breath, or succulents for rustic charm. Mix in candles, lanterns, or vintage books for eclectic flair. Mismatched vintage dishes add character and personality to each table.
Match Settings to Your Wedding Style
Coordinate centerpieces with your overall theme:
• Rustic chic: wood slices, mason jars, burlap
• Boho glam: macramé, mixed metals, jewel tones
• Garden party: pastel flowers, lace, delicate china
Theme-Based Decor Ideas

Rustic Chic Tent Design
Use natural materials like wooden crates, burlap runners, chalkboard signs, and mason jar lighting. Build your palette around cream, sage, terracotta, and warm wood tones for a cozy, down-to-earth elegance.
Boho Glam Aesthetic
Layer fringe curtains, Moroccan poufs, beaded gobos, and macramé wall hangings. Accent with gold, copper, or rose gold lighting for a free-spirited yet luxurious atmosphere.
Garden Party Elegance
Fill the tent with floral patterns, pastel linens, and lace draping. Hang paper flowers from the ceiling and use wicker furniture to create a soft, romantic setting.
Glamping-Inspired Comfort
Combine plush rugs, fairy lights in glass bottles, canopy beds, and outdoor heaters for a destination wedding feel. This theme works beautifully for weekend celebrations.
Practical Planning Essentials
Ensure Weather Resistance
Use only outdoor-rated materials throughout your decor. Confirm the tent includes sidewalls, ventilation, and proper anchoring for wind or rain. Choose waterproof fabrics, UV-resistant inks, and mold-resistant rugs.
Plan Your Power Setup
Map out your electrical needs in advance:
• Lighting circuits
• Sound system
• Charging stations
• Generator backup if no power source is available
Use outdoor-rated extension cords and conceal them under rugs or along tent edges.
Coordinate Sound and Lighting
Position speakers away from fabric walls to prevent muffled audio. Keep wires organized so they don’t create tripping hazards or interfere with lighting placement.
Budget-Friendly Decorating Tips
Save on Lighting
Choose solar-powered fairy lights, affordable string lights (test quality first), or pillar candles in glass jars for vintage charm without overspending.
Choose Affordable Florals
Wildflowers from local farms, baby’s breath as filler, and dried or preserved greenery deliver lush results at a fraction of the cost.
DIY Fabric Draping
Buy tulle and pongee in bulk, then pleat and layer to mimic high-end draping. Using three panels instead of two ensures full coverage.
Create Your Own Centerpieces
Thrift vintage dishes, paint wooden signs, and assemble mason jar arrangements. Thoughtful design makes budget materials look luxurious.
Safe and Secure Installation
Consult Your Tent Provider
Discuss weight limits for hanging decor, approved attachment methods, and safe removal procedures. Never staple into critical structural points of the tent.
Secure Decorations Properly
Use plastic clips instead of metal staples, tension rods, and hidden zip ties. Ensure nothing can fall or pose a fire hazard during the event.
Prioritize Guest Safety
Keep candles away from fabric and consider LED candles for peace of mind. Maintain clear exits and pathways throughout the event. Have a weather backup plan and a crew ready for last-minute adjustments.
Final Walkthrough and Adjustments
Test Everything Before Guests Arrive
Do a full walkthrough of the space. Turn on all lights, check sound levels, confirm backdrop stability, and walk the guest path yourself. Fixing issues early prevents day-of stress.
Prepare an On-Site Kit
Pack extras like zip ties, spare bulbs, touch-up paint, and emergency tape. Assign a point person to monitor decor throughout the event.
Plan for Easy Removal
Coordinate breakdown with the tent company. Remove decor gently to avoid damage, then pack items in labeled bins for storage or rental returns.
Frequently Asked Questions About Tent Wedding Decor
What is the best lighting for a wedding tent?
String lights layered with fairy lights and lanterns create the most flattering, romantic glow. Add up-lights and branch lighting for extra dimension and warmth.
How can I decorate a tent on a budget?
Use budget fabrics like tulle and pongee, affordable florals such as wildflowers and baby’s breath, and DIY centerpieces with mason jars. Solar-powered lights and thrifted vintage dishes keep costs low.
What fabric works best for tent backdrops?
Lightweight, opaque tulle works well as a base layer. Add pongee or chiffon for color and texture. Layer three panels for full coverage without gaps.
How do I hang decorations from a tent ceiling safely?
Use fishing line, twine, or rope. Consult your tent provider about weight limits and approved attachment methods. Never staple into structural points.
What flooring works best for an outdoor wedding tent?
Outdoor rugs made of polypropylene, interlocking foam tiles, and weather-resistant mats are durable choices. Layer rugs over tiles for extra comfort and visual depth.
How do I keep a tent cool during a warm wedding?
Ensure proper ventilation through sidewalls or mesh panels. Use light-colored fabrics, avoid heavy draping, and consider outdoor fans or misters.
Key Takeaways for Decorating Your Wedding Tent
Learning how to decorate a tent for a wedding comes down to layering light, fabric, and natural elements with purpose. Start with strong lighting, build upward with ceiling treatments, then anchor the space with thoughtful backdrops and flooring. Every choice should support your theme, enhance comfort, and guide your guests through the celebration.
Begin planning your decor timeline at least three months ahead. Prioritize safety, mix DIY projects alongside expert help, and remember that even simple materials can feel luxurious with intentional design. Your tent is not just shelter; it is the heart of your celebration.