
Nothing ruins a fun outing faster than wrestling with a tent that refuses to cooperate. Whether you’re setting up for a backyard party, a farmers market booth, or a beach day with friends, learning how to set up a pop up tent correctly saves you time, energy, and frustration. These tents promise instant shelter, but skipping key steps turns “instant” into “instant headache.”
The good news is that a smooth setup comes down to a few simple habits: choosing the right spot, using a partner, and locking every mechanism. This guide breaks down the entire process into clear, repeatable steps based on real manufacturer guidelines. You’ll avoid twisted frames, loose covers, and wobbly legs.
By the end, you’ll know exactly how to set up a pop up tent that stands sturdy, looks clean, and stays put, even when the breeze picks up.
Pick the Best Location Before You Unpack
Find Flat, Clear Ground
Start by scanning your site for a level area free of rocks, sticks, and sharp debris. A 10’x10′ tent needs about 100 square feet of flat space. Uneven ground causes the frame to twist and can prevent locking sliders from clicking into place. Clear the area fully before laying anything down.
For hard surfaces like pavement or concrete, plan to add sandbags or weights later since stakes won’t penetrate. Also check overhead clearance. Low branches and power lines can snag the canopy during extension.
Face the Wind the Right Way
Always lift the downwind side first during setup. Wind catching an open canopy acts like a sail and can flip the tent in seconds. Position yourself so the wind is at your back when you raise the first legs.
For long events, orient the narrowest side of the tent into the prevailing wind. This reduces resistance and keeps the shelter more stable throughout the day.
Open the Frame the Safe Way
Lift and Pull Legs Gently
Remove the tent from its polyester roller bag and lay it flat on the ground. Grasp two opposite legs and lift the canopy slightly to reduce friction against the ground. Begin pulling the legs outward to start expanding the frame.
Never force the frame. If you feel resistance, stop and check for tangled fabric or caught material. Forcing a stuck frame bends truss bars and damages locking pins.
Use the Diagonal Two-Person Method
Grab a partner and stand at opposite corners, forming a diagonal across the tent. On a count of three, both of you pull outward in a smooth, coordinated motion. This diagonal approach keeps the frame balanced and prevents twisting.
Keep tension even across all four corners. Never pull one side fully before the other. Uneven pulling is the top cause of twisted frames.
Lock the Frame at Every Point
Engage the Center Mast Lock
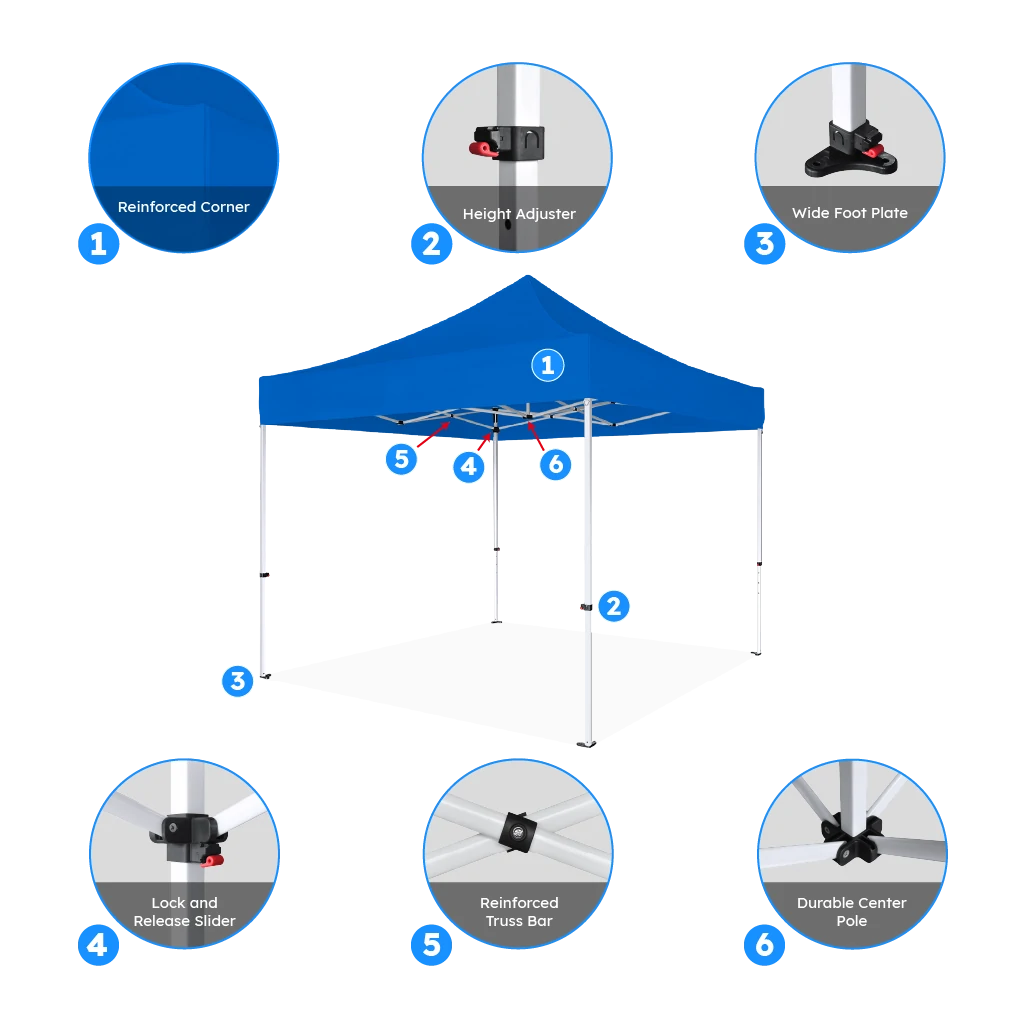
Once the frame reaches full extension, push up firmly on the center mast until you hear or feel a clear click. This sound confirms the internal locking mechanism is engaged. The center mast is the main support for the entire tent, so this step is non-negotiable.
If no click happens:
– Ensure the frame is fully open
– Check that the canopy isn’t caught in the locking mechanism
– Reposition your hands and try again
Secure All Four Corner Sliders
Each leg has a slider lock at the top corner. To lock each one:
1. Press down on the top corner of the frame with one hand
2. Push up on the leg slider with your other hand
3. Hold until it clicks into place
Repeat this for all four corners. Unlocked sliders are the number one reason pop-up tents collapse. Double-check every slider before moving forward.
Verify Quick Release Pins
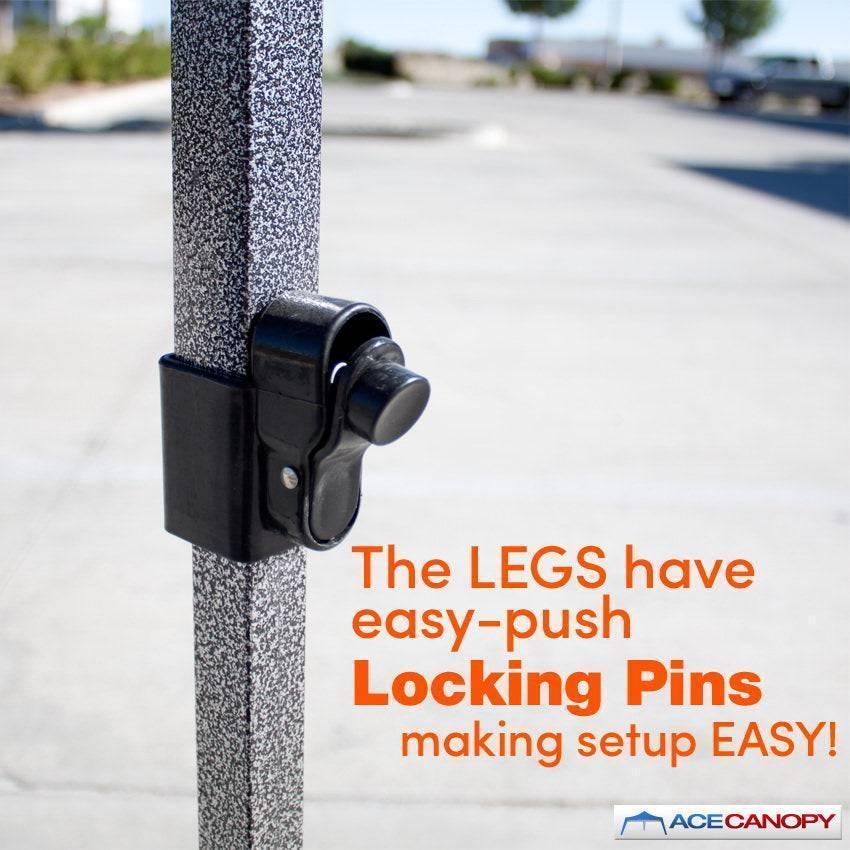
Check the quick release pins at the upper corners. Each pin must be fully clicked into place. These pins provide secondary stabilization and prevent accidental folding. They also control height adjustment, so confirming them now saves time later.
Attach and Tighten the Canopy Cover
Center the Cover Over the Frame
Before full extension, make sure the canopy cover sits over the frame with the peak perfectly aligned over the center mast. A misaligned cover causes uneven tension and flapping in wind.
If the cover shifts during setup, partially collapse the frame, re-center the fabric, and restart.
Fasten Corners with Velcro
Align the valance edges (the bottom edges of the canopy) with each frame corner. Use the built-in Velcro strips to secure them one at a time. Work in a circle, clockwise or counterclockwise, so you don’t miss any corners.
A flush fit means the top of the valance sits exactly against the frame corner. This creates a clean look and improves weather resistance.
Tighten Top Straps for a Taut Finish
Locate the Velcro straps attached to the tent top. Feed each strap through the corresponding slot on the truss bar, then pull tight and secure. A taut top:
– Sheds rain better
– Reduces wind flapping
– Extends fabric life
– Keeps the tent looking sharp
Check every strap. Loose straps lead to premature wear and noise.
Extend the Legs and Set the Height
Use Foot Pressure for Easy Extension
With both people on the same side of the tent:
1. Place your foot on the foot pad at the base of the leg
2. Use your hands to lift the upper frame section
3. The leg extends and locks automatically
Repeat on the opposite side. Both sides must be raised to keep the canopy level. Never kick or jump on the foot pad; use steady pressure.
Fine-Tune Height with Quick Release Pins
The quick release pins double as height adjustment tools. To adjust:
– Pull the pin out
– Raise or lower the leg to your preferred height
– Reinsert the pin into the desired hole
– Match heights on all four corners
Adjusting height helps with airflow on hot days and wind protection in breezy areas.
Add Sidewalls When Needed
Attach One Corner at a Time
Sidewalls add privacy, block wind, and shield against rain splash. Start at one corner and work around the tent, securing each panel to the legs with the Velcro flaps. Press firmly for full adhesion.
Overlap panels if you’re installing multiple walls.
Remove Sidewalls in Strong Wind
For safety, take down sidewalls when wind picks up. They increase surface area and act like sails in gusty weather. Store them in the roller bag until conditions improve.
Only use manufacturer-approved sidewalls to ensure a proper fit and material strength.
Run a Final Stability Check
Verify Every Lock
Walk around the entire tent and confirm:
– Center mast is locked (you heard the click)
– All four corner sliders are secured
– Every quick release pin is fully inserted
– No Velcro connections are loose
Re-check anything that feels off. A single missed lock can compromise the whole structure.
Inspect Tension and Alignment
Look up at the canopy. It should be taut, centered, and free of wrinkles. Check that the peak aligns with the center mast. If fabric sags or flaps, revisit the Velcro straps and tighten them again.
Test for Wobble
Gently shake the frame near the legs. There should be no wobbling or leaning. If the tent tilts:
– Check leg extension on each side
– Re-level using the height adjustment pins
– Make sure the ground is flat
On soft ground, consider adding stakes or weights for extra hold.
Fix Common Setup Problems
Straighten a Twisted Frame
If the frame feels stuck or twisted:
1. Partially collapse the legs
2. Lay the tent flat
3. Reopen using the diagonal two-person method
4. Keep movements slow and even
Twisting usually comes from pulling one side too far ahead of the other.
Correct a Misaligned Cover
If the canopy isn’t centered:
1. Unlock the corner sliders
2. Partially fold the frame
3. Reposition the cover so the peak lines up with the mast
4. Re-secure all Velcro corners before relocking
Never force the frame closed with the cover bunched underneath.
Free Stuck Locking Mechanisms
If a slider won’t engage:
– Wipe the track with a dry cloth to remove debris
– Apply silicone spray (never oil) to moving parts
– Try again with gentle pressure
Avoid using tools or excessive force. Both can damage the mechanism.
Build Speed With Practice
Run a Dry Setup at Home
First-timers should practice in a garage or backyard. Get familiar with:
– The sound of the center mast click
– How sliders feel when locked
– The smooth diagonal pulling motion
Knowing what “right” feels like prevents mistakes in real conditions.
Time Your Setup
With practice, most pop-up tents go up in under 5 minutes with two people. Time yourself to build confidence. Aim for consistency, not just speed. Keep the instruction manual in the roller bag for quick reference.
Care for Your Tent After Use
Clean and Dry Before Packing
Never store a wet tent. Moisture causes mold, mildew, and weakened fabric. After use:
– Wipe the canopy with a damp cloth
– Let it air dry completely
– Brush dirt off the frame
Use mild soap only when needed. Skip harsh chemicals that can break down the coating.
Store in the Roller Bag
Fold the tent following the manufacturer’s guidelines to avoid deep creases. Store it in a cool, dry place away from direct sunlight. UV rays degrade polyester over time, so a closet or under-bed container works best.
Inspect for Wear Before Each Use
Before your next outing, check:
– Velcro grip strength (replace if weak)
– Frame for bends or cracks
– Quick release pins for smooth operation
– Foot pads for stability
Replace damaged parts immediately. Use OEM components from the manufacturer for safety and fit.
Frequently Asked Questions About Pop-Up Tent Setup
How long does it take to set up a pop-up tent?
With two people and some practice, most pop-up tents go up in under five minutes. First-time users should allow 10 to 15 minutes while learning the locks and steps.
Can one person set up a pop-up tent?
Technically yes, but two people make it safer, faster, and far less frustrating. The diagonal partner method keeps the frame balanced and prevents twisting. Solo setup is not recommended for 10’x10′ models or any tent in windy conditions.
Do I need to stake down a pop-up tent?
Yes, if you’re on soft ground or expecting wind. Stakes or weights keep the tent from lifting or shifting. On hard surfaces like pavement, use sandbags or weight plates at each leg.
What if the center mast won’t lock?
Stop and check three things: the frame must be fully open, the canopy cannot be caught in the locking track, and nothing should block the slider. If it still won’t click, partially collapse the frame and try again with steady pressure.
Can I leave a pop-up tent up overnight?
You can, but only in calm weather and with proper anchoring. Remove sidewalls in any wind to reduce sail effect. Check locks and straps before leaving it unattended.
How do I clean the canopy without damaging it?
Use a damp cloth with mild soap for spot cleaning. Avoid bleach, harsh detergents, and pressure washers. Always let the fabric dry fully before folding and storing.
Final Thoughts on Setting Up a Pop-Up Tent
Setting up a pop-up tent comes down to three core habits: pick a flat, debris-free spot, use a partner for the diagonal pull, and lock every single mechanism before walking away. These three steps prevent the twisted frames, loose covers, and wobbly legs that frustrate new users.
Once you practice the full sequence a few times at home, your setup time will drop to just a few minutes. You’ll recognize the click of the center mast and the feel of a locked slider without thinking about it.
For the best results and access to replacement parts, reach out to the manufacturer directly. King Canopy customer support is available at 800-800-6296, and you can find videos, manuals, and accessories at kingcanopy.com. Grab your tent, grab a partner, and get ready to set up faster than ever before.