
You just bought a new canvas tent or pulled out your old favorite for the season—only to wonder if it will hold up in heavy rain. Even high-quality canvas tents from makers like RBM Outdoors or Davis Tents can lose their edge over time. While many come factory-treated and waterproof out of the box, years of sun, wind, and repeated use loosen the weave and weaken protection. That’s why understanding how to waterproof a canvas tent is essential for any serious camper.
The good news? You don’t always need chemicals. Canvas is a natural fiber that tightens when wet and dries, sealing tiny gaps around seams and stress points on its own. This means you can boost waterproofing with nothing more than a garden hose. But for older tents, homemade builds, or extreme conditions, commercial treatments like Woods Waterproofing or IOSSO Premium Water Repellent deliver deeper, longer-lasting defense.
In this guide, you’ll learn three proven methods, from free and chemical-free to high-performance product-based options. These steps will keep you dry, extend your tent’s life, and protect your investment for decades to come.
Activate Natural Fiber Tightening With the Garden Hose Method
Canvas isn’t just tough. It’s smart. When exposed to water, cotton fibers swell and expand. As they dry, they contract, pulling the weave tighter and sealing micro-gaps where leaks form. This natural process is your first line of defense, and it costs nothing.
When to Use This Method
This approach is perfect for new, factory-treated tents or annual maintenance on existing ones. It enhances built-in waterproofing without adding chemicals, making it ideal for eco-conscious campers and anyone with a breathable hot tent.
What You Need:
– Garden hose with shower nozzle
– Sunny, dry day
– Open outdoor space
Step-by-Step Application
-
Set Up the Tent
Pitch your tent fully with doors, windows, and stove jacks open. Close all zippers and flaps to keep water from entering during spraying. -
Spray Evenly
Using a gentle shower setting, wet the entire surface. Focus on the roof, walls, and seams. Let water run off naturally. Puddles are fine. -
Dry in Direct Sun
Leave the tent up until completely dry. Sunlight speeds drying and maximizes fiber contraction. Expect 2 to 6 hours depending on weather. -
Flip and Final Spray
Once dry, flip the tent and lightly spray the underside. Watch water bead and roll off. This confirms enhanced protection is active.
Time Required: Under 20 minutes of active work
Best For: RBM Outdoors, Davis Tents, and other factory-treated models
Re-Treatment Schedule and Warnings
Even natural protection fades over time. Re-tighten annually or after heavy rain exposure, extended storage, winter camping trips, or visible signs of wear.
Pro Tip: Never use a pressure washer. It damages the fabric. Stick to low-pressure spray only.
Warning: Avoid cold weather below 18°C (64°F). Cold fibers won’t contract properly, reducing effectiveness.
Apply Woods Waterproofing for Heavy-Duty Protection
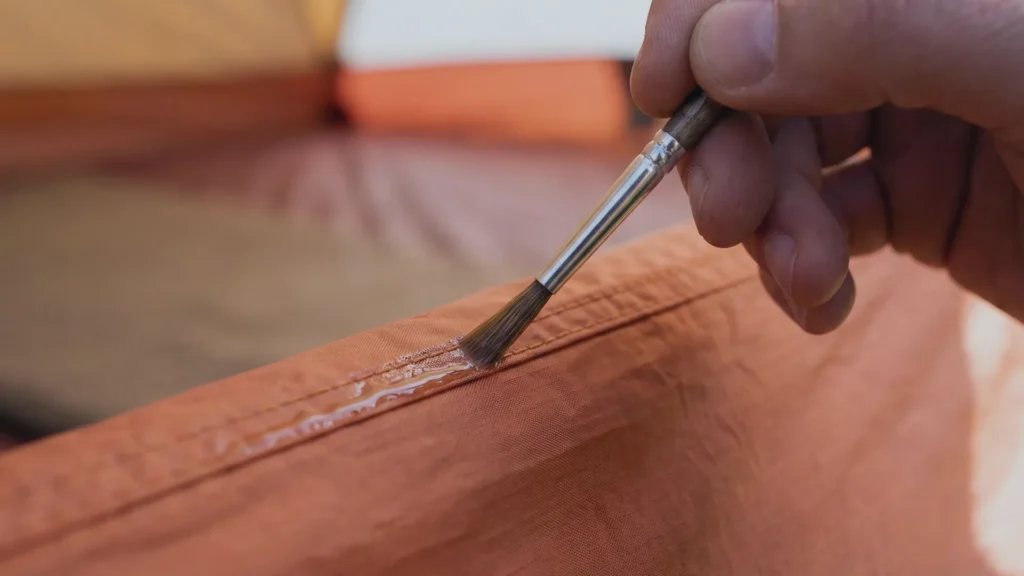
For older tents, homemade builds, or extreme conditions, natural tightening may not be enough. Woods Waterproofing is a trusted commercial treatment that delivers deep, durable protection while preserving breathability. It’s ideal for hot tents and cold-weather camping.
Choose the Right Conditions
Woods Waterproofing requires warmth to absorb and cure properly.
Ideal Application Conditions:
– Air temperature: 18°C (64°F) or higher
– Full sun exposure
– Dry, low-humidity day
Cold Weather Workaround:
Direct sunlight can heat canvas to 26°C even when air temperatures sit around 4°C. Use a thermometer to check surface temperature before applying.
Test Before Full Application
Always test on a scrap piece of canvas first.
What to Check:
– Discoloration
– Residue
– Fabric stiffness
Result Observed: Woods leaves a nearly invisible finish. Only a faint shadow appears where applied.
Apply in Two Thin Coats
Tools Needed:
– Soft brush
– Container for product
Step-by-Step:
1. First Coat
Brush on a thin, even layer. Saturate fibers without pooling. Focus on seams, zippers, and stress points.
-
Dry Completely
Wait 4 to 6 hours. Don’t rush. Moisture trapped under wet coating reduces effectiveness. -
Second Coat (Recommended)
Apply only after the first coat is fully dry. This ensures deep penetration and long-term durability.
Coverage: Varies by tent size. One can (~$55 at Canadian Tire) typically covers a standard wall tent.
Pro Tip: Work in sections for even coverage. Over-application reduces breathability and attracts dirt.
Use IOSSO Premium Water Repellent for Multi-Threat Defense
When you need eco-friendly, comprehensive protection, IOSSO Premium Water Repellent stands out. Recommended by Davis Tent, it’s PFAS-free, includes a UV inhibitor, and protects against water, oil, bird droppings, and pollution. This makes it ideal for long-term outdoor use and multi-fabric applications.
Know Your Options
Available Sizes:
– 32oz bottle: Covers ~40 sq ft
– Gallon container: Up to 150 sq ft
Price Range: $24.95–$65.00
Best For: Multi-fabric use, UV-heavy environments, eco-conscious users
Spray On and Let Dry
IOSSO is simple to apply with no brushing required.
Steps:
1. Spray Generously
Hold nozzle 6 to 8 inches from fabric. Cover all surfaces, especially seams and high-risk areas.
-
Let Dry Completely
No wiping or buffing needed. Dries to an invisible, residue-free finish. -
Reapply as Needed
Check annually or when water stops beading.
Key Benefits:
– PFAS-free formula
– UV protection extends fabric life
– Maintains breathability
– Safe for Sunbrella and solution-dyed acrylics
Pro Tip: Apply in a well-ventilated area. Avoid windy days to prevent overspray.
Focus on High-Risk Areas for Maximum Protection

No matter which method you choose, some areas are more prone to leaks. Target these zones for the best results.
Seal Seams and Stress Points
Critical Zones:
– Seams (especially roof-to-wall joints)
– Zippers and flap closures
– Stove jacks in hot tents
– Corners and edges
– Door and window frames
For Chemical Treatments:
Apply a second coat to these areas. Use a brush for precision with Woods; spray thoroughly with IOSSO.
For Garden Hose Method:
Ensure water fully saturates these zones during spraying. Natural fiber tightening is most effective where leaks typically start.
Expert Note: Homemade tents require extra care. Always test products on scrap material first.
Maintain Breathability in Hot Tents
Hot tents generate heavy condensation from internal heating. Over-sealing traps moisture, leading to mildew and discomfort.
Avoid Over-Waterproofing
Risks of Non-Breathable Treatments:
– Trapped water vapor
– Interior dripping
– Mold growth
– Fabric rot
Best Choices for Hot Tents:
– Woods Waterproofing: Specifically formulated for breathable fabrics
– IOSSO: Non-silicon, allows vapor escape
– Garden Hose Method: 100% breathable, ideal for maintenance
Never Use: Silicone sprays or wax-based sealants. They block breathability entirely.
Pro Tip: Pair waterproofing with proper ventilation. Open roof vents and use a wood stove to manage humidity.
Recognize When to Re-Treat Your Tent

Even the best treatment wears off. Know the signs so you can act before damage occurs.
Signs Waterproofing Has Failed
Visual Clues:
– Water soaks in instead of beading
– Faded or worn fabric
– Mildew spots
– Interior water stains
Performance Issues:
– Dampness inside during rain
– Musty odors
– Increased condensation
When to Re-Waterproof:
– Annually as prevention
– After heavy use
– Before winter camping
– When water no longer beads
Quick Test: Spray a small area. If water beads, protection is intact. If it soaks in, re-treat immediately.
Avoid These Common Waterproofing Mistakes
Even experienced campers make errors that compromise results.
Critical Errors to Avoid
- Using a pressure washer → Damages fabric weave
- Applying in cold weather → Prevents proper absorption
- Over-applying chemicals → Causes stickiness, reduces breathability
- Skipping the test patch → Risk of discoloration or damage
- Treating a wet tent → Coating won’t adhere properly
Maintenance Mistakes:
– Staking down rain flaps during treatment → Traps moisture
– Not closing zippers → Water enters during spraying
– Ignoring seams → Most common leak source
Choose the Right Method for Your Tent Type
Not all tents need the same approach. Match your method to your tent type and use case.
For Factory-Treated Tents (RBM, Davis)
- Best Method: Garden hose + annual re-tightening
- Why: Already waterproof, just enhance natural protection
- Cost: $0
- Time: 20 minutes
For Hot Tents or Cold-Weather Camping
- Best Method: Woods Waterproofing (two-coat)
- Why: Durable, breathable, cold-tested
- Cost: ~$55
- Time: 8+ hours including drying
For UV Protection or Multi-Fabric Use
- Best Method: IOSSO Premium Water Repellent
- Why: UV inhibitor, PFAS-free, multi-threat defense
- Cost: $25–$65
- Time: 1–2 hours plus drying
Store and Maintain Properly After Treatment
Waterproofing isn’t a one-time fix. Long-term care keeps your tent ready for any season.
Post-Treatment Care
-
Test Before Storing
Spray a small area to confirm water beading. -
Dry Completely
Never pack a damp tent. This invites mildew. -
Store Correctly
– In a cool, dry place
– Not compressed for long periods
– Away from direct sunlight -
Inspect Annually
Check for wear, especially at seams and stress points.
Pro Tip: Clean your tent before re-waterproofing. Dirt and grime block treatment absorption.
Frequently Asked Questions About Waterproofing Canvas Tents
Is waterproofing always necessary for a new canvas tent?
Not for factory-treated tents from quality manufacturers like RBM Outdoors and Davis Tent. However, enhancement treatments provide additional protection and are recommended for maximum longevity. Homemade tents or older tents with worn treatments definitely require waterproofing.
Can you over-waterproof a canvas tent?
Yes. Over-application of chemical treatments can reduce breathability, cause condensation issues, leave sticky residue, attract dirt and debris, and compromise fabric integrity. Always apply thin, even coats.
How do you know when waterproofing has worn off?
Key indicators include water soaking into fabric instead of beading, visible wear on high-stress areas, dampness inside during rain, mildew or musty odors, and fabric that feels less stiff than usual.
What’s the best time of year to waterproof a canvas tent?
Late spring or early summer provides warm temperatures (18°C+), sunny conditions for drying, and adequate time before camping season. These conditions promote optimal curing.
Can you use multiple waterproofing methods together?
Generally not recommended. Stick with one method to avoid chemical interactions, inconsistent protection, breathability issues, and residue buildup.
Key Takeaways for Waterproofing Your Canvas Tent
Waterproofing a canvas tent doesn’t have to be expensive or complicated. With the garden hose method, you can enhance factory-treated tents for free in under 20 minutes. For older or heavy-duty use, Woods Waterproofing offers breathable, cold-tested protection at around $55. IOSSO Premium Water Repellent delivers PFAS-free, UV-protected defense for $25–$65 depending on size.
The key is consistency. Annual maintenance prevents leaks, mildew, and premature wear. Focus on seams and stress points, avoid over-treatment, and always prioritize breathability, especially in hot tents. Match your method to your tent type, climate, and camping style.
Ready to get started? Begin by assessing your tent’s current condition. If water still beads on the surface, try the free garden hose method first. If protection has faded or your tent sees heavy use, invest in Woods or IOSSO for long-term peace of mind.