
Your LED headlamp not working leaves you stranded in the dark when you need visibility most. Unlike halogen bulbs, these units rely on complex electronics, strict polarity, and vehicle communication systems that fail silently.
This guide helps you diagnose fuses, wiring, CAN bus errors, and module faults to fix your light fast. You will learn specific tests to rule out simple issues before replacing expensive components.
Verify Fuses and Relays Before Deep Dives

Start your diagnosis by checking the simplest power interruptions: blown fuses and failed relays. These small components protect your entire lighting circuit from electrical surges.
Inspect the Headlight Fuse
Locate your fuse box under the hood or near the driver footwell to find the headlight fuse. Pull the specific fuse labeled for headlights and check if the internal metal strip is broken or blackened.
* Replace any blown fuse with one matching the exact amperage rating.
* Never install a higher-rated fuse as it risks melting wiring or causing fires.
* Test directly even if other lights on the same side still function normally.
Swap the Headlight Relay
Relays act as electrical switches that can fail due to age or moisture exposure inside the box. Find the headlight relay and swap it with an identical one from another system like the horn.
1. Remove the suspect relay from its socket carefully.
2. Insert a known working relay of the same type.
3. Turn on your headlights to see if power returns immediately.
If the lights work with the swapped relay, your original relay is dead and needs replacement. This ten-dollar part often saves hours of complex troubleshooting time.
Inspect Wiring Harnesses and Ground Points
Poor wiring connections or corroded ground wires frequently cause LED headlamp not working scenarios despite good fuses. Physical damage often hides inside bundles near the bumper or frame.
Trace Damaged Wiring Sections
Examine the wiring path from the fuse box to the headlight assembly for signs of pinching or fraying. Look closely at repaired sections covered in black heat-shrink tubing which often hide broken wires.
* Use a multimeter in continuity mode to test suspicious wire segments.
* Listen for a beep to confirm the wire path is unbroken internally.
* Repair any broken wires with soldered splices and fresh heat shrink.
Clean Corroded Ground Connections
LEDs require a solid ground connection to complete their electrical circuit effectively. A loose or rusty ground point will prevent operation even if power reaches the bulb.
1. Locate the ground wire attached to the headlight housing or chassis.
2. Disconnect the wire and inspect the terminal for green corrosion or rust.
3. Scrub the terminal and mounting point with a wire brush until shiny.
4. Reconnect the wire and tighten the bolt securely to ensure contact.
If your marker lights work but the main beam fails, suspect a dedicated ground fault in the LED circuit path.
Confirm Polarity and Connector Orientation
LED technology is polarity sensitive meaning it only works when positive and negative connections align correctly. Reversing the plug prevents illumination and can damage the driver circuit.
Reverse the Plug to Test
Unlike halogen bulbs, LEDs will not light up if the connector orientation is wrong. If your new LED headlamp not working immediately after installation, try flipping the connector.
1. Unplug the LED headlamp connector from the vehicle harness.
2. Rotate the plug 180 degrees and reconnect it firmly.
3. Turn on the headlights to check for immediate illumination.
If the light turns on after flipping, polarity was your issue. Mark the correct orientation with tape to prevent future installation errors.
Resolve CAN Bus and Low-Current Errors
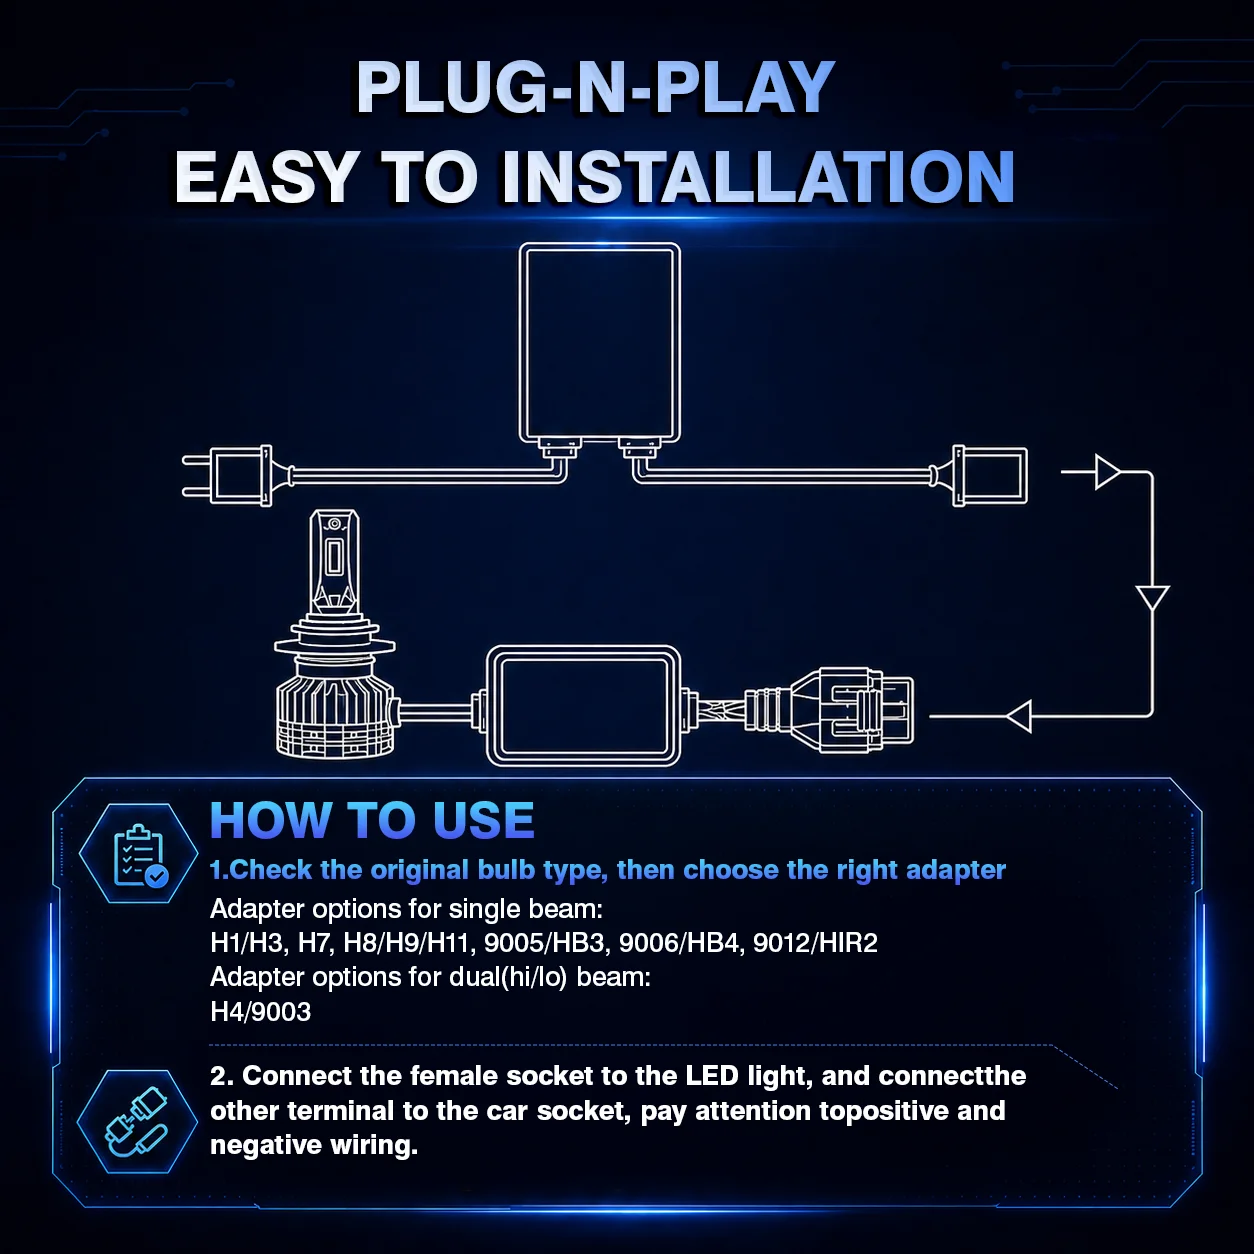
Modern vehicles often shut off LED lights because they draw less power than the system expects. This low current draw tricks the car into thinking the bulb is burnt out.
Understand Bulb-Out Warnings
Your vehicle monitors electrical current and may disable power if it detects a load lower than standard halogen bulbs. This results in flashing lights or dashboard warnings about bulb failure.
* Headlights may flash briefly then turn off completely.
* Dashboard displays show “Check Headlights” or similar error messages.
* No power reaches the bulb despite good fuses and wiring integrity.
Install Load Resistors or Decoders
Fix low-draw issues by adding components that simulate standard bulb current for your vehicle computer. This satisfies the monitoring system and restores full power.
1. Install a load resistor ballast to each headlight circuit to mimic halogen draw.
2. Mount resistors in ventilated areas since they generate significant heat.
3. Use a CAN bus decoder module for sensitive vehicles like Polaris General.
Select LED kits labeled “CAN bus ready” to avoid needing external resistors or decoders entirely.
Test Voltage at the Headlight Socket

Confirm whether electrical power actually reaches the headlight socket before replacing any components. This step isolates upstream issues from bulb failures.
Measure Socket Voltage
Use a multimeter set to DC volts to check for power at the connector terminals. Turn on your headlights and probe the power pin against a known good ground.
* Expect readings around 12.6V with the engine off.
* Readings should rise to 13.7V or higher when the engine runs.
* Zero voltage indicates an upstream issue with fuses or switches.
If voltage is present but the LED remains dark, the bulb or its internal driver has likely failed.
Swap Bulbs to Isolate Failures
LED bulbs do not burn out like filaments but their internal drivers can fail unexpectedly. Swapping bulbs between sides confirms if the bulb itself is the problem.
Perform Side-to-Side Swap
Remove the working bulb from the opposite side and install it in the non-working socket. This simple test determines if the issue follows the bulb or stays with the vehicle.
1. Extract the functional headlight bulb from the working side.
2. Install this bulb into the socket of the non-working side.
3. Activate the headlights to observe the result.
If the new side lights up, your original LED bulb is faulty. If it still fails, the problem lies in wiring, switches, or control modules.
Scan Control Modules for Fault Codes
Modern vehicles use Body Control Modules (BCM) to manage lighting systems and store fault codes. Basic readers often miss these specific lighting errors.
Use Advanced Scan Tools
Connect a bi-directional scan tool like the Autel MX808 to access lighting system data. These tools can command headlights on or off to test module response directly.
* Read stored or pending codes related to headlight communication.
* Monitor live data to see if the module receives “on” commands.
* Perform active tests to force the headlights to activate remotely.
If the module does not respond to commands, it may need reprogramming or replacement by a professional.
Reset the Lighting Control Module
Software glitches can sometimes lock out headlight functions after electrical surges or improper installations. A hard reset clears temporary memory errors.
Execute a Hard Reset Procedure
Disconnecting the battery and draining residual power forces the vehicle computers to reboot completely. This often resolves strange lighting behaviors.
1. Turn off the ignition and disconnect both battery terminals.
2. Touch the positive and negative cable ends together for ten seconds.
3. Wait ten minutes before reconnecting the battery terminals.
Try your headlights after reconnecting to see if the reset restored functionality.
Check Automatic Light Sensors
Faulty light sensors can prevent automatic headlights from activating even when the system is functional. Dirt or damage to the sensor confuses the lighting logic.
Clean or Bypass the Sensor
Locate the light sensor usually found on the dashboard near the windshield. Clean it thoroughly with glass cleaner and a microfiber cloth to remove obstructions.
* Test headlights in manual mode if your vehicle offers this option.
* Cover the sensor with tape to simulate darkness and trigger activation.
* Replace the sensor if manual mode works but auto mode fails.
Replace Housing Only When Necessary
Many LED headlamps are integrated units where the bulb and housing cannot be separated. Avoid costly replacements until you rule out all other causes.
Avoid Premature Housing Replacement
Confirm there is no power, ground, or communication before buying a new assembly. Integrated LED units are expensive and often unnecessary if the issue is external.
* Verify the BCM sends commands but the light does not respond.
* Rule out fuses, relays, wiring, and module faults first.
* Check warranty status with your dealer before purchasing replacements.
Prevent Future LED Headlamp Failures
Protect your investment by sealing connections and choosing quality components designed for your vehicle. Proper maintenance extends the life of your lighting system.
Seal Connectors Against Moisture
Apply dielectric grease to all electrical connectors to prevent corrosion and oxidation. This is especially important in snowy regions or coastal areas with salt air.
Choose Quality LED Upgrades
Invest in LEDs with built-in polarity protection and CAN bus compatibility. Cheap plug-and-play bulbs often lack the necessary components for modern vehicles.
Frequently Asked Questions About LED Headlamp Failures
Why does my LED headlamp flicker then turn off?
Flickering usually indicates a CAN bus conflict where the vehicle thinks the bulb is out. Install a load resistor or CAN bus decoder to simulate standard current draw and stop the shutdown cycle.
Can I use any LED bulb in my car?
No, many vehicles require specific LED bulbs with built-in decoders. Generic bulbs may cause errors or fail to work due to polarity or voltage mismatches with your specific model.
How do I know if my ground wire is bad?
A bad ground prevents LEDs from lighting even with good power. Clean the ground terminal and mounting point with a wire brush, then tighten the connection securely.
Will a blown fuse affect only one headlight?
Yes, many vehicles have separate fuses for left and right headlights. Check the specific fuse for the non-working side even if the other headlight functions normally.
Do I need a special tool to diagnose LED issues?
Basic multimeters work for power checks, but advanced scan tools are needed for module codes. Professional tools can command lights on and read specific lighting fault codes.
Key Takeaways for Fixing LED Headlamp Not Working Issues
Your LED headlamp not working is usually caused by compatibility issues, bad grounds, or module errors rather than simple bulb failure. Start with fuses and relays, then check wiring polarity and ground connections before assuming the worst.
Use load resistors or CAN bus decoders if your vehicle rejects the low current draw of LEDs. Always verify power at the socket and swap bulbs to isolate the true cause of failure.
Take action today by checking your fuse box and testing your ground connections. These simple steps resolve most LED headlight issues without expensive repairs or dealership visits.