
If your headlights flicker or fail completely, the culprit might not be the bulb but the wrong headlamp socket types. This small component connects your wiring harness to the bulb, and a mismatch causes electrical failure or safety hazards.
You will learn to identify H1, H4, H7, and HB series sockets to ensure a perfect fit. This guide covers identification steps, failure signs, and safe replacement procedures for your specific vehicle model.
Identify Common Headlamp Socket Types
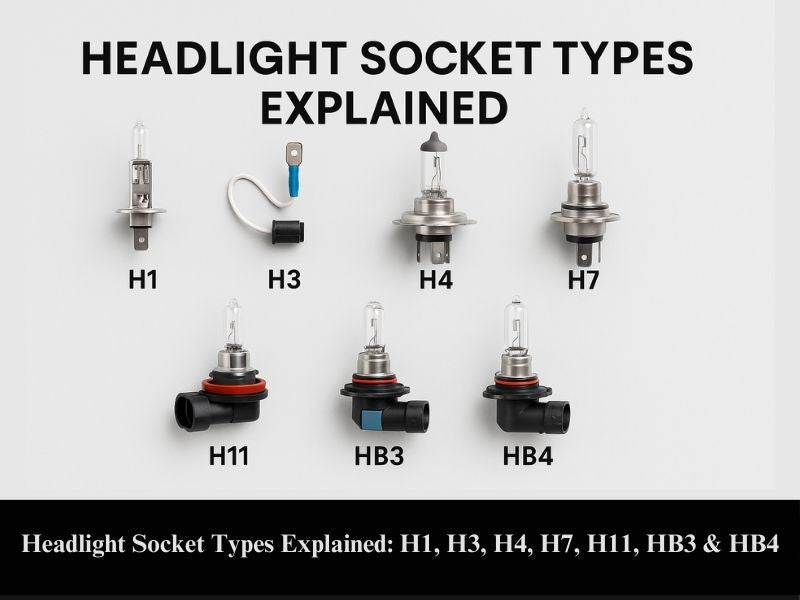
Knowing your specific socket prevents installation errors and wasted money. Manufacturers standardize these parts, yet they remain non-interchangeable due to unique base designs.
H1: Single-Beam High Output
The H1 socket features a compact P14.5s base with a single electrical prong. It delivers a focused beam ideal for high-intensity applications in tight spaces.
* Common uses: High beams and fog lights
* Vehicles: Audi, BMW, Mercedes-Benz
* Key feature: Simple connection with strong beam concentration
Verify if your LED upgrade kit includes an adapter before purchasing. Some H1 LEDs require extra hardware due to large heat sinks.
H3: Wire-Lead Design for Auxiliary Lights
Unlike standard plugs, the H3 uses a PK22s base with built-in wire leads. This design allows flexible installation in custom or tight-fit housings.
* Common uses: Fog lights and off-road driving lights
* Vehicles: SUVs, trucks, and Jeeps
* Key feature: Direct soldered connection for reliability
Replacing an H3 socket often requires splicing wires. Always insulate connections properly to prevent dangerous electrical shorts.
H4: Dual Filament for High and Low Beams
The H4 socket supports both high and low beams using a dual-filament design. It utilizes a P43t base with three prongs for ground and beam switching.
* Common uses: Combined headlight systems
* Vehicles: Motorcycles and older Toyota or Honda models
* Key feature: One bulb performs two functions cost-effectively
Proper alignment is critical for H4 bulbs. Misaligned units can blind oncoming traffic, so check your beam pattern after installation.
H7: Bright Low Beam Standard
Modern European cars frequently use the H7 socket for low beam headlights. It features a PX26d base with two flat prongs for single-filament bulbs.
* Common uses: Low beam headlights
* Vehicles: Volkswagen, BMW, and mid-range sedans
* Key feature: Consistent brightness with plug-and-play installation
Avoid touching the glass bulb with bare hands during installation. Skin oils create hot spots that shorten bulb life significantly.
H11: Versatile for Multiple Lighting Roles
The H11 socket powers various lights beyond just headlights using a 9006-style flat base. Its two-prong design ensures high compatibility across many brands.
* Common uses: Low beams, fog lights, and daytime running lights
* Vehicles: Toyota, Honda, Ford, and Chevrolet
* Key feature: Works well with halogen, LED, and HID upgrades
Ensure your new bulb matches the required wattage draw. Incorrect power usage can trigger false bulb-out warnings on your dashboard.
HB3 and HB4: High and Low Beam Powerhouses
The HB3 (9005) handles high beam intensity with a three-prong base. The HB4 (9006) serves as a standard low beam option for many domestic models.
* Common uses: HB3 for high beams; HB4 for low beams
* Vehicles: Trucks, SUVs, and performance models
* Key feature: Bright illumination with secure connections
Loose HB3 sockets often cause flickering issues. If upgrading to HID, confirm ballast compatibility and use proper wiring harnesses.
Compare Key Differences Between Sockets
Choosing the right component depends on filament type, base design, and intended function. Not all sockets handle the same electrical load or beam patterns.
Filament Type Variations
Single filament sockets power one beam type, either high or low. Dual filament sockets like the H4 support both beams within a single bulb unit.
* Single filament: H1, H3, H7, H11, HB3, HB4
* Dual filament: H4
Dual-filament systems simplify wiring but require precise alignment. Single-filament setups allow for separate control and easier diagnostics.
Base and Prong Configuration
Each socket type has a unique base shape and terminal arrangement. Using the wrong base can damage the socket or prevent proper seating.
| Socket | Base Type | Prongs | Notes |
|---|---|---|---|
| H1 | P14.5s | 1 | Compact, single contact |
| H3 | PK22s | 2 (wires) | No plug, direct wire connection |
| H4 | P43t | 3 | Round base, three contacts |
| H7 | PX26d | 2 | Flat dual prongs, common in Europe |
| H11 | 9006 | 2 | Wide flat base |
| HB3 | 9005 | 3 | Three-prong, high beam |
| HB4 | 9006 | 2 | Same base as H11, different use |
Function by Application
Specific sockets are designed for specific lighting roles. Refer to your vehicle manual as some models use H11 for fog lights and HB4 for low beams.
| Use Case | Recommended Socket(s) |
|---|---|
| High Beam | H1, HB3 (9005) |
| Low Beam | H7, H11, HB4 (9006) |
| Fog Lights | H3, H11, H1 |
| Dual Beam | H4 |
| DRLs | H11 |
LED and HID Upgrade Compatibility
Not all sockets support modern upgrades without modifications. H7, H11, and HB4 are highly compatible with plug-and-play LED kits.
* H4: Requires dual-beam LED or HID kits with separate emitters
* H3: May need custom mounting due to wire leads
* HB3: Ensure heat dissipation and voltage stability with LED
Warning: Aftermarket bulbs with higher wattage can overload stock sockets. Use CANbus-compatible LEDs if your vehicle reports bulb failures.
How to Identify Your Vehicle’s Socket Type
Choosing the wrong socket leads to frustration. Follow these steps to identify the correct headlamp socket types for your car.
Check the Owner’s Manual First
Your vehicle’s owner’s manual lists the exact bulb and socket type for each light position. Look under the “Lighting” or “Maintenance” sections for reliable data.
If you lack the manual, visit the manufacturer’s website. Enter your VIN to get accurate parts data for your specific trim.
Read the Bulb Markings
Remove the existing bulb and check for stamped markings like H7, 9005, or H11. These codes directly correspond to socket types.
* H1, H3, H7, H11: Code matches socket directly
* HB3: Also known as 9005
* HB4: Also known as 9006
Even if the bulb is burned out, the base usually retains the part number stamp.
Use Year, Make, Model Lookup Tools
Websites like OEMAutoLED or RockAuto let you search by vehicle details. These tools show compatible bulbs and sockets instantly.
Enter your year, make, model, and trim if applicable. The results will specify low beam, high beam, and fog light socket types.
Visual Inspection Tips
Inspect the socket physically if you cannot find markings. One prong suggests H1, while three round pins in a triangle indicate H4.
* Flat two-prong plug: Could be H7, H11, or HB4
* Wires attached directly: Probably H3
Compare your findings with online images or physical samples at auto parts stores.
Signs of a Failing Headlamp Socket
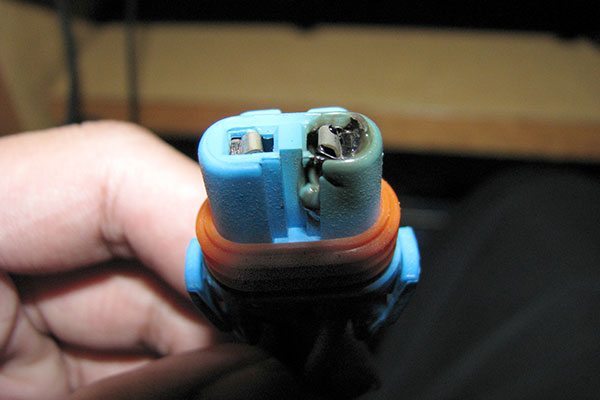
A bad socket causes lighting issues even with a new bulb. Watch for these warning signs to maintain safety.
Flickering Headlights
Intermittent light suggests a loose or corroded connection inside the socket. Wiggling the headlight may trigger flickering, confirming a loose harness clip.
* Bent prongs
* Corroded terminals
* Loose harness clip
Dim or Dead Bulbs
If a new bulb appears dim, test the socket with a multimeter. No voltage means the socket or wiring is faulty.
Pro tip: Swap left and right bulbs. If the problem moves, it is the bulb. If it stays, it is the socket.
Burning Smell or Melted Plastic
Overheating sockets often show discoloration, melting, or blackened contacts. This results from using bulbs with higher wattage than rated.
* Poor electrical contact causing resistance
* Moisture ingress leading to short circuits
Immediate action: Disconnect power and replace the socket to prevent fire risk.
Visible Corrosion or Damage
Moisture in the headlight assembly leads to white powder corrosion on metal contacts. Clean gently with electrical contact cleaner.
If pitting exists on the metal, replace the socket entirely. Corrosion prevents proper electrical flow.
How to Replace a Headlamp Socket Safely
Replacing a damaged socket restores safe lighting. Most replacements take under 30 minutes with basic tools.
Turn Off Power and Disconnect Battery
Always disconnect the negative battery terminal before working on lighting circuits. This prevents shocks, shorts, and accidental airbag deployment.
Work in a well-lit area and wear insulated gloves for protection.
Access the Headlight Assembly
Open the hood and locate the back of the headlight. You may need to remove plastic covers or unscrew mounting bolts.
Refer to your manual as some models require removing the bumper or headlight unit.
Remove the Old Bulb and Socket
- Twist and pull out the old bulb carefully
- Press the release tab on the wiring harness to unplug it
- Unclip or unscrew the socket from the housing
Take note of how it is mounted since some slide in while others screw or snap.
Install the New Socket
- Insert the new socket into the housing
- Secure with clips or screws firmly
- Reconnect the wiring harness until it clicks
Ensure the connection is snug with no wiggling.
Test Before Reassembly
Reconnect the battery and turn on headlights. Verify both high and low beams work without flickering.
Only after successful testing should you reassemble the headlight cover.
When to Call a Professional
Seek help if wiring is frayed or melted beyond the socket. Complex CANbus or adaptive lighting systems also require expert attention.
Electrical issues can escalate quickly, so do not risk further damage.
Choose the Right Socket for Upgrades

Upgrading to LED or HID improves visibility but requires socket compatibility.
H7 and H11: Best for LED Retrofits
These sockets support most plug-and-play LED kits. Look for low power draw and CANbus error-free operation.
Avoid cheap LEDs that overheat and melt the socket housing.
H4: Requires Dual-Beam LED Kits
Since H4 has two filaments, use dual-beam LED bulbs that mimic both low and high beam positions.
Some kits use bi-xenon projectors, which are ideal for older vehicles needing modern performance.
HB3 and HB4: Common in American Vehicles
These 9005 and 9006 sockets are widely supported. Confirm bulb size fits your housing and beam pattern meets DOT standards.
Use DOT-approved bulbs to stay legal and safe on the road.
Prevent Socket Failure with Proper Maintenance

Extend socket life with simple habits and regular checks.
Avoid Touching Bulb Glass
Skin oils create hot spots on halogen bulbs, shortening lifespan. Always handle bulbs by the base or wear gloves.
This reduces heat transfer to the socket and prevents premature failure.
Seal Out Moisture
Ensure headlight covers are tightly sealed to keep water out. Moisture causes corrosion and short circuits inside the assembly.
Replace cracked lenses and deteriorated gaskets promptly.
Use Correct Wattage Bulbs
Exceeding recommended wattage overheats the socket quickly. Stick to OEM specs unless using certified LED equivalents.
Overloading the system causes melting and potential fire hazards.
Frequently Asked Questions About Headlamp Socket Types
Are headlight sockets universal across all vehicles?
No, headlight sockets are not universal. Different vehicles require specific designs like H1, H7, or HB4, so always check compatibility with your car’s make and model.
How do I know if my headlight socket is bad?
Common signs include headlights that do not work after replacing the bulb, dim output, or visible corrosion and melting on the socket itself.
Can I replace a headlight socket myself safely?
Yes, replacing a headlight socket is generally a DIY task. Ensure you use the correct socket type and disconnect the battery before starting work.
Why do headlight sockets fail over time?
Sockets fail due to corrosion, overheating from high-wattage bulbs, wear and tear, or poor electrical contact causing resistance and heat buildup.
What is the difference between H11 and HB4 sockets?
While they look similar, H11 and HB4 serve different roles and have slight base variations. Always verify your vehicle’s requirement before purchase to ensure fit.
Key Takeaways for Selecting Headlamp Socket Types
Understanding headlamp socket types ensures your vehicle maintains reliable and safe lighting. From H1 to HB4, each socket serves a specific role in your visibility system.
By identifying your socket, recognizing failure signs, and replacing it correctly, you avoid costly electrical issues. Whether maintaining stock lights or upgrading to LED, this knowledge puts you in control of your vehicle’s safety.