You lace up your boots, shoulder your pack, and step onto the trail—day hiking offers a powerful escape from daily life. Whether you’re exploring a forested ridge or a desert canyon, a well-prepared hike turns a simple walk into a memorable outdoor experience. But without the right planning and gear, even short trails can become risky. This guide delivers practical day hiking tips backed by expert protocols and real-world experience to keep you safe, comfortable, and confident on every trail.
From choosing the right route to packing smart and navigating safely, these actionable strategies cover everything beginners and seasoned hikers need. You’ll learn how to prevent common mistakes, handle emergencies, and enjoy nature responsibly—all within a single day’s journey.
Choose a Trail That Matches Your Ability
Picking the right trail is the most important decision you’ll make before hitting the path.
Match Distance and Elevation to Your Fitness
Start with hikes under 3 miles and less than 500 feet of elevation gain to build confidence. Steep climbs and long distances can exhaust even fit hikers unaccustomed to uneven terrain. Use apps like AllTrails, Gaia GPS, or Hiking Project to filter trails by difficulty, read recent reviews, and check current conditions.
Loop trails offer variety without backtracking, while out-and-back routes let you turn around early if needed. Point-to-point hikes require shuttle logistics—save those for when you’re more experienced.
Confirm Permits and Check for Closures
Popular destinations like Angel’s Landing or Half Dome require advance permits. Always verify access rules through National Park Service or U.S. Forest Service websites. Trail closures due to fire, snow, or landslides are common—review trip reports or local hiking groups on Facebook and Meetup for up-to-date info.
Understand Seasonal Challenges
Summer hikes in desert areas like Joshua Tree or Zion can exceed 100°F—start by sunrise to avoid heat exhaustion. Spring mountain hikes may involve snowfields or flooded river crossings. Fall and winter bring shorter daylight hours; plan to finish by 2 PM to avoid hiking in the dark.
Prepare Physically and Mentally Before You Go
Smart preparation separates safe hikers from those who get lost or injured.
Assess Your Fitness Honestly
Test your stamina on a short, moderate hike before attempting longer trails. Build endurance with brisk walking, stair climbing, or jogging. Strengthen legs with squats and lunges, and improve balance on uneven ground or a balance board. If you’re unsure, hike with a partner or group.
Plan for an Overnight Stay—Just in Case
Even day hikes can turn into unplanned overnights due to injury or weather. Always carry gear to survive a night outdoors:
– Extra food and water
– Insulating layers (fleece, puffy jacket)
– Emergency shelter (bivy, space blanket)
– Headlamp with spare batteries
– Fire starter and first-aid kit
Set a turn-around time—like 2 PM—to ensure you don’t hike into darkness, especially in winter.
Pack the Ten Essentials Every Time
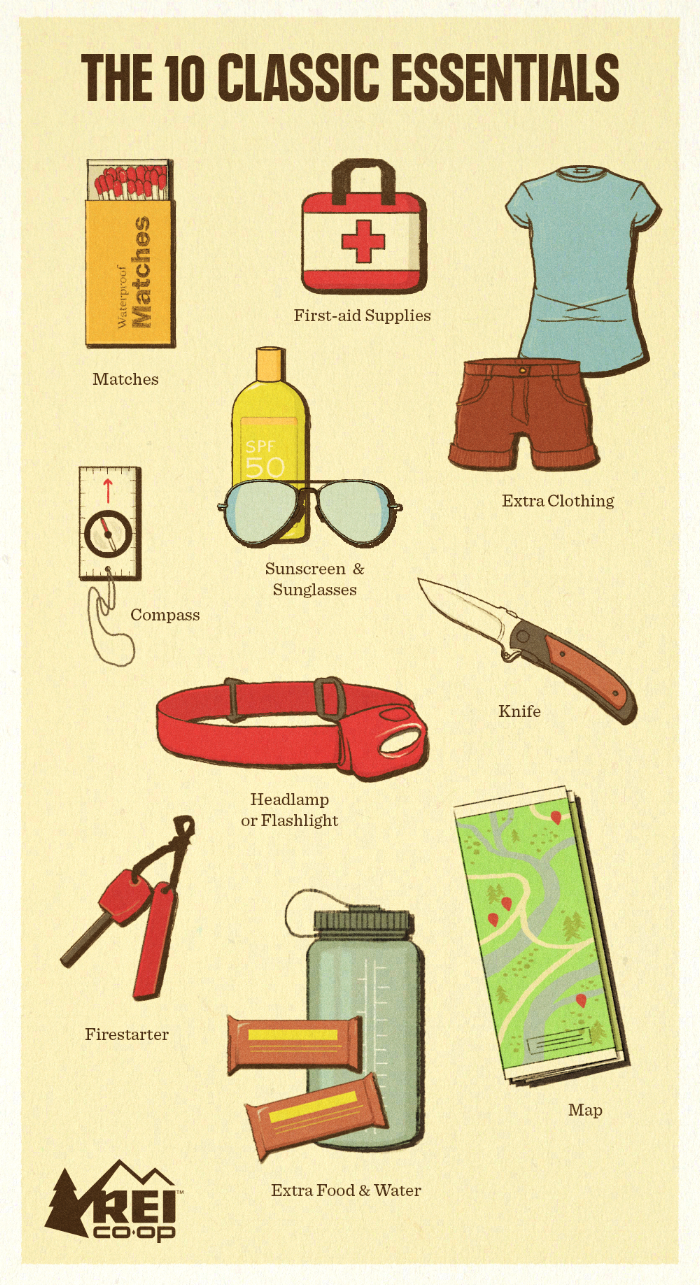
These are non-negotiable items every hiker must carry, no matter how short the trail.
Always Carry Navigation Tools
Bring a map, compass, and smartphone with offline maps (download in advance via AllTrails or Gaia). GPS watches and personal locator beacons (e.g., Garmin inReach) add safety in remote areas. Drop a digital pin at the trailhead and carry a printed backup.
Never Hike Without a Headlamp
Headlamps are essential if you’re delayed. Use them early during low-light conditions. Always pack spare batteries or a rechargeable power bank.
Protect Yourself from the Sun
Carry sunglasses with UV protection, SPF 30+ sunscreen, a wide-brimmed hat, and SPF-rated lip balm. Sunburn happens fast at high elevations and in reflective environments like snow or desert.
Bring a Complete First-Aid Kit
Include:
– Bandages, gauze, antiseptic wipes
– Pain relievers (ibuprofen, acetaminophen)
– Blister care (moleskin, leukotape)
– Tweezers for splinters or ticks
Consider taking a wilderness first-aid (WFA) course from NOLS or REI to handle emergencies.
Pack Extra Food and Water
Bring at least one extra meal’s worth of food—energy bars, trail mix, jerky, or Bobo’s Oat Bars. Hikers burn 400–700 calories per hour; eating small amounts every 30–60 minutes maintains energy.
Carry 1–2 liters of water minimum, more in heat or at altitude. Use a hydration reservoir (e.g., CamelBak) or insulated bottles. Bring a water filter (Sawyer Squeeze), purification tablets (Aquatabs), or UV purifier (SteriPen) for refilling from streams.
Dress in Extra Layers
Avoid cotton—it retains moisture and increases hypothermia risk. Wear moisture-wicking base layers (merino wool or synthetic), an insulating mid-layer (fleece or puffy), and a waterproof outer shell. Pack gloves, a beanie, and rain pants if cold or wet weather is possible.
Carry a Fire Starter and Knife
A lighter, waterproof matches, or fire steel can be lifesaving. A multi-tool or pocket knife helps with repairs, food prep, or emergencies.
Bring Emergency Shelter
A lightweight emergency bivy or space blanket can save your life if stranded. Store it in a waterproof bag.
Dress in Layers to Stay Comfortable

Proper clothing keeps you warm, dry, and blister-free.
Use the 3-Layer System
- Base Layer: Wicks sweat—choose merino wool or synthetic. Avoid cotton.
- Insulating Layer: Traps heat—fleece jacket or down/synthetic puffy.
- Outer Layer: Blocks wind and rain—waterproof, breathable rain jacket.
Add fleece pants or long underwear in cold weather. Remove layers before overheating; add them before getting cold.
Protect Hands, Head, and Feet
- Head: Wide-brimmed hat for sun, beanie for cold, sunglasses with UV protection
- Hands: Lightweight gloves for cool mornings, insulated for winter
- Feet: Hiking boots or trail runners with good traction. Break them in before long hikes.
Wear the Right Socks
Choose merino wool or synthetic blend socks. Add liner socks to reduce friction and prevent blisters. Change socks mid-hike if feet get wet.
Stay Hydrated and Fueled Throughout the Hike
Dehydration and low energy are leading causes of hiking fatigue and poor decisions.
Drink Water Before You’re Thirsty
Thirst lags behind dehydration. Drink 1 liter per hour as a baseline. Increase intake in heat, at altitude, or during intense effort. Use a timer to remind yourself to sip every 15–20 minutes.
Eat Before You’re Hungry
Snack every 30–60 minutes. Combine carbs (energy chews, waffles) with protein/fat (nuts, jerky, peanut butter) for sustained energy. Eat a full meal (sandwich, wrap) at lunch.
Avoid sugary snacks that cause energy crashes. Bring more food than you think you’ll need—extra calories are insurance.
Navigate Confidently with Backup Systems
Getting lost is preventable with the right tools and habits.
Use Both Digital and Physical Maps
Smartphones with offline maps are reliable—download trail data before leaving. Always carry a paper map and compass as backup. Learn basic navigation: how to read topography, orient a map, and follow a bearing.
Mark Key Locations
Drop a digital pin at the trailhead, water sources, and junctions. Carry a printed trail description in a waterproof sleeve.
Carry Emergency Signaling Gear
- Whistle: Three blasts signal distress
- Personal locator beacon (PLB): Sends SOS with GPS coordinates (e.g., Garmin inReach Mini)
- Mirror or strobe light: For attracting attention
Practice Trail Safety at All Times
Stay alert and respond quickly to changing conditions.
Hike at a Sustainable Pace
Walk at a pace where you can breathe easily. Rest before exhaustion sets in. Eat and drink before you feel hungry or thirsty. If breathing hard, slow down or stop.
Recognize Signs of Medical Distress
- Dehydration: Dark urine, headache, dizziness
- Heat exhaustion: Heavy sweating, nausea, weakness
- Hypothermia: Shivering, slurred speech, confusion
- Altitude sickness: Headache, nausea, fatigue (above 8,000 ft)
Stop, rest, hydrate, and reassess. Turn back if symptoms worsen.
If You Get Lost: STOP
- Stop: Don’t panic or wander.
- Think: Recall your last known location.
- Observe: Look for landmarks, trail markers, or water.
- Plan: Use navigation tools or retrace steps.
Stay put if you can’t find the trail—searchers will look near the route.
Respect Nature and Other Hikers
Leave no trace and keep the trail enjoyable for everyone.
Follow the 7 Leave No Trace Principles
- Plan ahead and prepare
- Travel on durable surfaces (rock, gravel, snow)
- Dispose of waste properly:
– Pack out all trash—even fruit peels
– Bury human waste 6–8 inches deep, 200 feet from water
– Pack out toilet paper in a ziplock
– Use a pee rag (e.g., Kula Cloth) to reduce TP - Leave what you find (rocks, plants, artifacts)
- Minimize impact (not applicable for day hikes)
- Respect wildlife
- Be considerate of others
Observe Right of Way Rules
- Uphill hikers have right of way
- Yield to horses and bikes
- Step aside to let others pass
- Keep noise low—use headphones sparingly
Stay on the Trail
Avoid shortcuts and switchbacks—they cause erosion. Stick to durable surfaces to protect vegetation.
Hike Responsibly with Kids and Dogs
Bring others safely into the outdoors.
Hiking with Kids
- Keep children close and engaged: “What birds do you see?”
- Pack extra snacks, water, and layers
- Use a child carrier for infants or tired toddlers
- Choose short, scenic trails with fun features (waterfalls, rock scrambles)
Hiking with Dogs
- Confirm dogs are allowed
- Keep on a leash (even if not required)
- Bring:
- Collapsible water bowl
- Dog treats
- Poop bags
- Avoid hiking with dogs in extreme heat—paws burn on hot trails
Listen to Your Body and Mind
Tune in to physical and mental signals for a safer, more rewarding hike.
Adjust Before Discomfort Sets In
Remove a layer before sweating. Add one before shivering. Air out feet at breaks to prevent hot spots. Speak up if you need a break—group hikes should move at the slowest person’s pace.
Stay Mentally Present
Look up—enjoy views, wildlife, and trees. Use landmarks to build a mental map. Practice mindfulness: breathe deeply, observe surroundings, and connect with nature.
Know Your Limits
Don’t push past fatigue or fear. Turn back if weather worsens, you’re injured, or the trail feels unsafe. Hiking is for enjoyment, not endurance.
Pack Smart and Organize for Efficiency
![]()
A well-organized pack saves time and stress on the trail.
Choose the Right Backpack
Use a 20–35L daypack for full-day hikes. Look for:
– Adjustable shoulder straps and hip belt
– Ventilated back panel
– Hydration sleeve
– Trekking pole attachments
– Rain cover (built-in or packable)
– Multiple compartments
Recommended: Osprey Talon 22 or deuter Trail 28 SL (women’s fit).
Use Trekking Poles
They reduce knee strain on descents, improve balance on rocky terrain, and help with stream crossings. Choose collapsible poles for easy packing.
Organize for Efficiency
- Store snacks, map, sunscreen in hip or top pockets
- Place heavy items (water, food) close to your back
- Use dry bags for electronics and fire starters
- Keep emergency gear accessible
Final Tips for a Great Hike
Success comes from preparation, awareness, and enjoyment.
Start Small and Learn
Begin with short, local hikes. Each trip teaches you about gear, pacing, and your limits. Build confidence gradually.
Keep It Simple
Don’t overpack or overthink. Focus on essentials: water, food, navigation, and layers.
Share Your Plans
Tell 2–3 people your who, what, when, where, and expected return time. Set a check-in call. Sign trailhead registers if available.
Have Fun
The journey matters more than the summit. Take photos, laugh, and savor the moment. Look up, breathe deep, and be present.
With solid day hiking tips in hand, you’re ready to explore safely and joyfully. Plan well, pack the Ten Essentials, respect nature, and listen to your body. Every trail offers a chance to grow, recharge, and connect—with the wild and with yourself.