You’ve just finished a challenging hike—sweaty, satisfied, and proud of your accomplishment. But as you step into the car or settle onto the trailhead bench, a sharp twinge or dull ache flares in your groin. It might have started mid-hike or crept in hours later, but now it’s impossible to ignore. Groin pain after hiking is more common than you think, especially among weekend adventurers, desk workers who hike on weekends, or those tackling steep trails without proper preparation.
This discomfort isn’t just “part of the deal.” It’s your body signaling that something’s off—often a strained adductor muscle, overworked hip flexor, or early sign of overuse. Ignoring it can lead to chronic pain, extended downtime, or even conditions requiring medical intervention. The good news? Most causes of post-hiking groin pain are treatable and, more importantly, preventable. Whether you’re dealing with a pulled muscle, tendon irritation, or something more serious like a hernia or hip impingement, understanding the root cause is the first step to recovery. This guide breaks down the common causes, immediate care steps, rehab strategies, and prevention tips so you can return to the trail stronger, smarter, and pain-free.
Identify the Cause of Your Groin Pain
Groin pain after hiking doesn’t always mean a pulled muscle. The groin is a complex region where muscles, tendons, joints, nerves, and connective tissues converge. Pinpointing the true source of your pain is essential to avoid worsening the injury or delaying recovery.
Common Muscle Injuries
Most cases stem from overuse or strain, especially when hiking uphill, stepping over logs, or navigating rocky, uneven terrain.
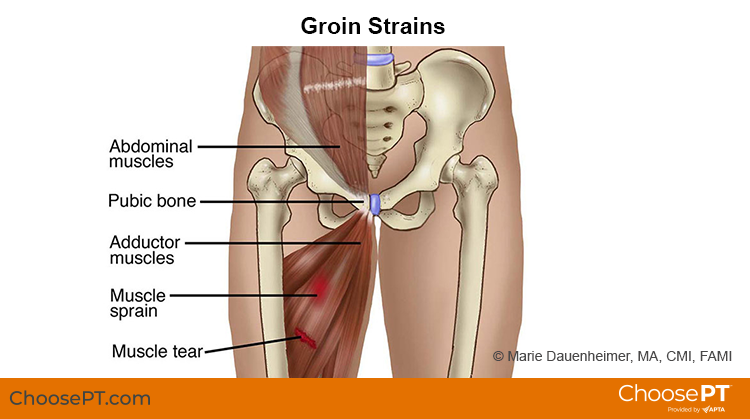
Adductor Strain (Pulled Groin)
The adductor longus, the inner thigh muscle responsible for stabilizing your pelvis during walking and climbing, is the most commonly injured. Repetitive leg spreading—like side-stepping across boulders or hiking on sloped trails—can overstretch or tear this muscle.
Symptoms include:
– Sharp pain in the inner thigh or groin
– Pain when bringing legs together (e.g., stepping across a stream)
– Tenderness along the pubic bone
– Possible bruising or swelling
Strains are graded by severity:
– Grade I: Mild discomfort, no strength loss—recovery in 2–3 weeks
– Grade II: Partial tear, noticeable weakness—3–6 weeks to heal
– Grade III: Complete tear, severe pain, difficulty walking—8+ weeks, possibly requiring surgery
Hip Flexor Strain (Iliopsoas)
Uphill hiking demands constant hip flexion. If you spend most of your week sitting at a desk, your iliopsoas muscles become tight and weak—making them prone to strain when suddenly asked to lift your leg repeatedly on steep trails.
Signs you’ve strained your hip flexor:
– Deep ache or sharp pain in the front of the hip or lower abdomen
– Pain worsens when lifting your knee (e.g., climbing stairs)
– Tenderness near the hip crease
– Pain may radiate down the front of the thigh
Desk workers are especially vulnerable due to prolonged sitting, which shortens the hip flexors and weakens the glutes.
Joint and Tendon Conditions
Not all groin pain is muscular. Some issues stem from joint or tendon overload, often developing gradually with frequent hiking.
Hip Impingement (FAI)
Femoroacetabular impingement (FAI) occurs when the femur abnormally rubs against the hip socket, damaging the labrum—a ring of cartilage that cushions the joint. Uphill hiking, which keeps the hip in a flexed position, can aggravate this condition.
Red flags:
– Deep, aching groin pain
– Clicking, catching, or locking sensation in the hip
– Stiffness after sitting or hiking
– Pain when twisting or pivoting on the trail
FAI comes in two forms:
– Cam impingement: Misshapen femoral head
– Pincer impingement: Overgrown socket rim
Both increase the risk of early hip arthritis if untreated.
Adductor Tendinopathy
Unlike sudden strains, tendinopathy develops from repetitive stress—common in hikers who increase mileage too quickly without recovery. The tendon attaching the adductor muscles to the pubic bone becomes inflamed or degenerated.
Symptoms:
– Chronic dull ache in the groin
– Pain increases with activity, improves with rest
– Morning stiffness
– Localized tenderness at the pubic bone
Healing requires load management and progressive strengthening—not just rest.
Hernias and Bone Issues
Some causes of groin pain require urgent medical attention.
Inguinal or Femoral Hernia
A hernia occurs when abdominal tissue pushes through a weak spot in the lower abdominal wall. Carrying a heavy backpack uphill increases intra-abdominal pressure, raising your risk.
Warning signs:
– Groin pain that worsens with lifting, coughing, or exertion
– Visible bulge in the groin (may disappear when lying down)
– Feeling of heaviness or pressure
– In men: testicular pain or swelling
Note: Femoral hernias are rarer but more dangerous—especially in women—and can become life-threatening if strangulated.
Stress Fracture
Repetitive impact from long-distance hiking can cause tiny cracks in the femoral neck or pubic bone. These fractures start subtly but worsen without rest.
Red flags:
– Gradual onset of groin pain during activity
– Pain persists at rest as it progresses
– Tenderness over the hip or groin
– Worse after rapid increases in mileage
Diagnosis often requires an MRI or bone scan, as X-rays may appear normal early on.
Osteitis Pubis
Inflammation of the pubic symphysis—the joint connecting the left and right pubic bones—is common in endurance hikers. Rapid increases in intensity or mileage can trigger it.
Symptoms:
– Central lower abdominal or groin pain
– Worsened by walking, running, or spreading legs
– Tenderness over the pubic bone
– Pain may radiate to inner thighs
It’s often linked to muscle imbalances or altered gait from fatigue.
Immediate Care: First 72 Hours
Act fast to reduce inflammation and prevent long-term damage.
Apply the RICE Protocol
- Rest: Stop hiking and avoid painful movements. Use crutches if walking is difficult.
- Ice: Apply ice (wrapped in a towel) for 15–20 minutes every 2–3 hours for the first 48–72 hours.
- Compression: Wear supportive compression shorts to stabilize the area and reduce swelling.
- Elevation: Lie down with hips slightly elevated on a pillow to encourage fluid drainage.
⚠️ Do NOT use heat yet—it increases blood flow and can worsen swelling in the acute phase.
Use Pain Relief Strategically
- NSAIDs (e.g., ibuprofen): Take for up to 7–10 days to reduce inflammation. Avoid long-term use.
- Topical gels (e.g., Voltaren): Apply directly to the tender area for localized relief.
Important: Don’t use painkillers to mask pain and keep hiking—this increases re-injury risk.
Supportive Measures While Healing
- Sleep with a pillow between your legs if you sleep on your side to reduce strain.
- Avoid sudden movements like standing quickly or getting in/out of a car.
- Gentle range-of-motion exercises (if pain-free):
- Ankle pumps
- Heel slides
- Diaphragmatic breathing
✅ Pro Tip: Don’t stretch aggressively in the first few days. Wait until pain decreases.
Rehab Your Groin: A Progressive Plan
Rushing back leads to re-injury. Follow a structured rehab plan.
Phase 1: Reduce Inflammation (Days 7–14)
Exercises:
– Butterfly stretch: Sit with feet together, press knees down. Hold 30 sec, 2–3 reps.
– Hip adductor stretch: Lie on back, let knees fall outward.
– Straight leg raises: Strengthen quads without straining groin.
– Glute bridges: Activate glutes and core.
🕒 Time commitment: 10–15 minutes, 2x daily.
Phase 2: Restore Mobility (Weeks 2–4)
Add:
– Clamshells: 3 sets of 15 (target gluteus medius)
– Resisted hip flexion: Use resistance band, 3×10 per leg
– Stationary cycling: 10–15 minutes, low resistance
– Gentle walking: Start on flat ground
🔍 Keep your pelvis stable—no rocking during exercises.
Phase 3: Build Strength (Weeks 4–6)
Introduce:
– Bodyweight squats: 3×12
– Forward and lateral lunges: Controlled, pain-free
– Lateral band walks: 3×10 each way
– Plank holds: Start at 20 seconds, build to 60
⚖️ Strengthen both adductors and abductors to prevent imbalances.
Phase 4: Return to Hiking (Week 6+)
Checklist before hiking:
– ✅ No pain at rest or with daily activities
– ✅ Full hip range of motion
– ✅ Can squat and lunge without discomfort
– ✅ Walked 30+ minutes on flat ground pain-free
Start slow:
– First hike: 1–2 miles, flat terrain
– Use trekking poles to reduce hip load
– Warm up with 5 minutes of marching and leg swings
– Monitor for pain—stop if it flares
🧭 Increase distance or elevation by no more than 10% per week.
Prevent Future Groin Pain

Prevention beats rehab every time.
Pre-Hike Preparation
Never hit the trail cold.
Warm-up (5–10 minutes):
– High knees
– Leg swings (forward/back, side-to-side)
– Jumping jacks
– Hip circles
This primes muscles and improves blood flow.
Strengthen Key Muscles Weekly
Weak glutes and core force adductors and hip flexors to overwork.
Do 2–3x per week:
– Clamshells: 3×15
– Glute bridges: 3×15
– Planks: 3×30 sec
– Lateral band walks: 3×10 per side
💡 Desk worker fix: Stretch hip flexors hourly to counteract tightness.
Optimize Gear and Technique
Trekking poles: Reduce hip load by up to 25%.
Footwear: Lighter, flexible boots reduce hip compensation.
Backpack fit: Hip belt should sit on iliac crest, not waist.
Hiking form:
– Engage glutes when climbing—“push” with hips, not “pull” with quads
– Take shorter steps
– Keep core engaged to stabilize pelvis
When to See a Doctor
Seek help if you have:
– Severe pain or can’t walk
– Visible bulge in the groin
– Swelling, bruising, or warmth
– Numbness, tingling, or burning
– Pain with urination or testicular pain
– No improvement after 2–3 weeks
🚨 Seek emergency care for:
– Sudden “pop” with intense pain
– High fever
– Blood in urine
– Suspected testicular torsion
Final Note: Groin pain after hiking isn’t something to push through. It’s a warning sign. Treat it early, rehab it fully, and prevent it with smart preparation. With the right approach, you won’t just return to the trail—you’ll hike stronger, longer, and pain-free.