Choosing the right hiking backpack isn’t just about how many liters it holds—it’s about how well it fits your body. A poorly sized pack can turn a scenic trail into a grueling ordeal, no matter how lightweight your gear. The secret to comfort and performance lies in two critical measurements: torso length and hip circumference. These determine whether the weight rides on your hips—where it belongs—or shifts to your shoulders, causing fatigue and pain. This comprehensive hiking backpack size chart and fitting guide delivers everything you need to find your perfect match, from brand-specific sizing data to step-by-step fitting techniques. Whether you’re planning a weekend backpacking trip or a long-distance thru-hike, this guide ensures you hit the trail with confidence and comfort.
Torso Length: The Real Determinant of Backpack Fit
Your height doesn’t dictate your pack size—your torso length does. Most backpacks are sized by torso measurement because it controls how the load sits on your back. A correct fit ensures the hipbelt anchors on your iliac crest (the top of your hip bones), where up to 90% of the weight should be carried.
Why Torso Length Matters More Than Height
Two people of the same height can have vastly different torso lengths. If your pack’s torso is too long, the hipbelt rides too low, forcing your shoulders to bear the load. If it’s too short, the harness yoke (where the shoulder straps meet) sits too high, restricting movement and causing discomfort. Always size based on actual torso measurement, not assumptions.
How to Accurately Measure Your Torso Length

- Find the C7 Vertebra: Tilt your head forward. The most prominent bump at the base of your neck is C7.
- Locate the Iliac Crest: Place your hands on your hips, thumbs pointing back. The top edge of your pelvic bones is the iliac crest.
- Measure the Spine Curve: Have a friend use a flexible tape to follow the natural curve of your spine from C7 to the iliac crest.
Pro Tip: Wear fitted clothing and stand naturally. Avoid bulky layers that distort the measurement.
Brand-Specific Torso Sizing Charts
Osprey Torso Size Guide
| Size | Torso Length |
|---|---|
| XS | < 15″ |
| S | 15″ – 17″ |
| M | 17″ – 19″ |
| L | 19″ – 21″ |
| Tall | 21″+ |
Osprey’s Anti-Gravity suspension (Atmos/Aura AG) offers dynamic fit adjustments, making it ideal for long-distance comfort.
Hyperlite Mountain Gear Sizing
| Size | Torso Length |
|---|---|
| XS | < 15.0″ |
| S | 15.0″ – 17.0″ |
| M | 17.0″ – 19.0″ |
| L | 19.0″ – 21.0″ |
| Tall | 21.0″+ |
Hyperlite uses a streamlined suspension with no load lifters—precise torso fit is essential. When in doubt, size up.
Gregory Torso Sizing
| Size | Torso Length |
|---|---|
| S | 14″ – 16″ |
| M | 16″ – 18″ |
| L | 18″ – 20″ |
| XL | 20″ – 22″ |
Gregory’s adjustable models offer a ±2″ range, perfect for growing teens or fluctuating body types.
Hipbelt Fit: Where the Weight Should Be Carried
Your hips are built to carry weight—your shoulders are not. A properly fitted hipbelt transfers the load efficiently, preventing strain and improving balance.
How to Measure Hip Circumference Correctly
Wrap a tape measure around your body at the iliac crest—not your waist. Keep it level and snug, wearing hiking pants or similar clothing. This ensures the hipbelt sits securely without pinching or sliding.
Osprey Hipbelt Sizing (Standard)
| Size | Hip Circumference |
|---|---|
| XS/S | 24–25″ |
| S/M | 26–45″ |
| M | 27–48″ |
| M/L | 28–50″ |
| L | 29–55″ |
| O/S | 25–50″ |
Many Osprey models allow hipbelt swapping, ideal for shared use or custom fit.
Extended Fit (EF) Options for Larger Frames
Osprey’s EF line supports larger body types with longer straps and repositioned features.
| EF Size | Hip Circumference |
|---|---|
| S/M EF | 17–20.5″ |
| L/XL EF | 19.5–23″ |
| O/S EF | 40–70″ |
| WXS/S EF | 13.5–17″ |
EF models include extended shoulder and sternum straps for better reach and comfort.
Interchangeable Hipbelts: Xenith/Xena & Aether/Ariel AG
These premium models allow hipbelt swapping for a custom fit.
Men’s Xenith/Aether AG
| Size | Hip Circumference |
|---|---|
| XS | 25–25″ |
| S/M | 36–45″ |
| M | 27–48″ |
| L | 29–55″ |
Women’s Xena/Ariel AG
| Size | Hip Circumference |
|---|---|
| XS | 24–45″ |
| M | 27–48″ |
| L | 29–55″ |
When tightened, the gap between hipbelt pad tips should be 3–6″ for optimal tension.
Shoulder & Sternum Strap Alignment
Even with perfect torso and hip fit, poor harness alignment can ruin comfort.
Shoulder Strap Fit Guidelines
- Should wrap smoothly over shoulders and upper back.
- Padded section should end 1–2 inches below the armpit.
- No gap between strap and shoulder—this reduces pressure points.
- For larger builds, Gregory Plus Size harnesses offer wider padding and improved load lifter access.
Sternum Strap Positioning
- Buckle directly over the heart, 2 inches below the collarbone.
- Should not restrict breathing or distort shoulder strap shape.
- Adjustable sliders allow fine-tuning for movement and pack load.
Extended sternum straps are available in EF and Plus Size models for better reach.
Backpack Volume by Trip Type: Hiking Backpack Size Chart
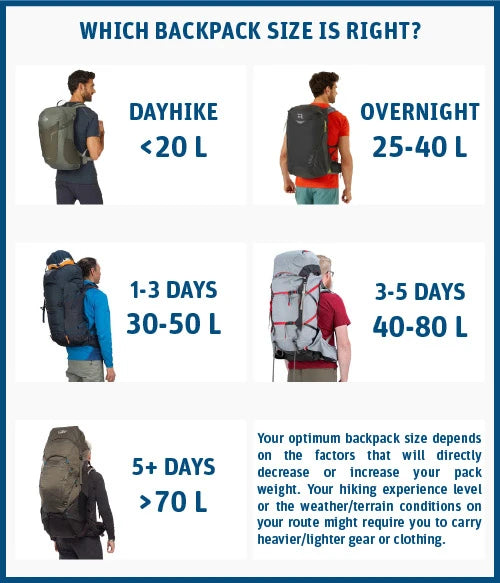
Capacity should match your trip needs—not your ego.
| Volume (L) | Best Use | Trip Duration | Key Features |
|---|---|---|---|
| 0–10L | Trail running, light day hikes | < 1 day | Hydration sleeve, minimal storage |
| 10–20L | Day hikes, bike commuting | 1 day | Water bottle pockets, rain cover |
| 20–30L | Full-day hikes, summit climbs | 1 day | Helmet carry, expandable storage |
| 30–45L | Overnight trips, winter hiking | 1–2 days | Sleeping bag compartment, frame support |
| 45–65L | Multi-day backpacking, thru-hikes | 3–7 days | Multiple access points, gear loops |
| 65L+ | Expeditions, winter mountaineering | 7+ days | External lash points, heavy-duty frame |
Note: Alpkit uses polystyrene balls to measure internal volume—giving a standardized, real-world capacity.
Specialty Pack Fitting Tips
Running & Biking Vestpacks
Sized by chest circumference, not torso length.
Osprey Vestpack Chart
| Model | Gender | Chest Range |
|---|---|---|
| Duro 6 / Duro Pro 7 | Men’s | 34.5–46.5″ |
| Dyna 6 / Dyna Pro 7 | Women’s | 31.5–42.5″ |
| Escapist Velocity 3/6 | Unisex | 26.5–47″ |
Fit Tip: Top of pack should sit just below the base of the neck—higher than hiking packs.
Mountain Bike Packs
- Harness wraps fully around shoulders—no gaps.
- Padding ends 1–2″ below armpits.
- Sternum strap 2″ below collarbone.
- Lumbar packs sit over iliac crest with breathable airmesh.
Trail Running Packs
- Anchors to ribcage, not hips.
- Dual chest straps:
- Top: 1–2″ below collarbone
- Bottom: Low for stability, high for breathing
- Side body straps secure lower pack to ribcage
- Hipbelt is secondary—used for light stabilization
Brand Fit Systems Compared
Osprey: Custom Fit Legacy
- Founded on custom-fit philosophy for mountaineers.
- Fit-on-the-Fly™ hipbelt on Atmos/Aura AG for real-time adjustment.
- Interchangeable hipbelts on Xenith/Xena and Aether/Ariel AG.
- Women’s models feature shorter torsos, curved harnesses, and female-optimized hipbelts.
“Fit should not be compromised for any other considerations.” – Osprey
Gregory: Plus Size Innovation
- First brand to offer dedicated plus-size backpacks (2x–6x).
- Features:
- Extended hipbelt padding (up to 60″ waist)
- Front-facing hipbelt pockets for easy access
- Wider, longer shoulder harness
- Uses same torso sizing as standard models.
If you prefer a higher hipbelt due to body shape, consider downsizing torso by one size.
Hyperlite: Streamlined Suspension
- Unified torso sizing across 40L, 55L, 70L models.
- No load lifters—relies on precise fit for close-to-body carry.
- Sizing up recommended when on the border.
How to Fit a Backpack: Step-by-Step
Load the Pack
Add 10–20 lbs (4–9 kg) of gear to simulate real-world weight.
Position the Pack
- Loosen all straps.
- Place pack on back.
- Center hipbelt over iliac crest—padding should sit halfway above and below hipbone.
Tighten Hipbelt
Use cross-body Ergo-Pull to tighten evenly. Leave 1–3″ of webbing past the buckle.
Adjust Shoulder Straps
Pull down and back to snug the harness to your shoulders. No gaps.
Tighten Load Lifter Straps
Pull straps at the top of the shoulder harness toward your body. Ideal angle: 30° to 60° from vertical.
Check Torso Length
Locate the harness yoke—it should sit 1–2″ below the C7 vertebra.
Verify Harness Fit
- Shoulder pads end 1–2″ below armpits.
- No “topping out” or digging.
- No gaps between harness and back.
Buckle Sternum Strap
Position 2″ below collarbone. Adjust for secure but unrestricted breathing.
Final Stability Check
Walk around, bend over, reach overhead. The pack should move with you—no shifting or pressure points.
Common Sizing Mistakes to Avoid
- Choosing by height alone
- Ignoring hipbelt fit
- Buying too large “to be safe”
- Assuming gender determines fit
- Not testing with weight
- Neglecting adjustability
Travel & Packing Tips
Carry-On Backpack Limits
- Max dimensions: 22″ x 14″ x 9″ (55 x 35 x 22 cm)
- Volume: ~45L
- A 45L backpack fits most airline carry-on rules.
Warning: Budget airlines (Ryanair, Spirit) have stricter limits. Always verify.
Packing Efficiency Tips
- Use compression sacks.
- Place heavy items close to your back and at mid-torso.
- Practice packing at home—walk stairs with the loaded pack.
Custom & Specialty Solutions
- Alpkit offers custom rucksacks made in-house for unique body shapes or medical needs.
- Ideal for MRT (Mountain Rescue Team) or specialized gear.
Final Recommendations
- Measure Before You Buy: Know your torso length and hip circumference.
- Try Before You Commit: Visit a retailer with fitting stations.
- Test with Weight: Always load the pack with 10–20 lbs.
- Prioritize Fit Over Volume: A smaller, well-fitted pack outperforms a large, ill-fitting one.
- Choose Adjustability: Models with adjustable torso and hipbelts offer long-term flexibility.
- Embrace Inclusive Options: Extended Fit and Plus Size lines ensure comfort for all body types.
“Don’t size your pack like your tee shirt, size it like your shoes.” – Gregory Mountain Products
A properly fitted backpack transforms your outdoor experience—reducing fatigue, enhancing mobility, and enabling longer, more enjoyable adventures. Use this hiking backpack size chart and fitting guide to find your perfect match and hit the trail with confidence.