Your hiking backpack is your trail lifeline—carrying food, shelter, and essentials across rugged terrain. But after months of heavy loads, rainstorms, and rocky scrambles, wear and tear are inevitable. Zippers freeze, buckles snap, and fabric rips. Before you toss your trusty companion and buy a replacement, consider this: most backpack damage is repairable.
Hiking backpack repair isn’t just a money-saver—it’s an act of sustainability. Every repaired zipper or patched panel keeps gear out of landfills and extends the life of a pack that fits you perfectly. Whether you’re dealing with a frayed strap mid-hike or a delaminating bottom at home, this guide delivers field-tested fixes for every common backpack failure. You’ll learn how to diagnose issues fast, use the right materials, and decide when to DIY or call in a pro.
Let’s get your pack back on the trail.
Diagnose Common Backpack Failures
Spotting damage early prevents small problems from becoming deal-breakers on the trail. Most hiking backpack issues fall into predictable categories—knowing what you’re dealing with is the first step to fixing it.
Zipper Won’t Slide Smoothly
A sticky or jammed zipper is one of the most frequent complaints. If the slider drags or skips, grit or debris is likely lodged in the teeth. Sand, dirt, or dried mud can lock the mechanism. Before assuming it’s dead, clean and lubricate—this solves the majority of issues.
What to look for: Discoloration along the zipper tape, wobbling slider, or resistance when closing. If the slider won’t engage at all, the teeth may be bent or misaligned.
Zipper Separated From Fabric
When the zipper pulls away from the backpack—especially on pockets or the main compartment—the attachment has failed. Manufacturers often use a combination of stitching and adhesive to secure the zipper tape. A proper repair requires both to restore strength and waterproofing.
Buckle Snaps or Won’t Lock
Plastic buckles on hip belts, sternum straps, or compression cords break from impact or UV exposure. If the male end won’t click into the female side, or the release tab is cracked, it’s time for a replacement.
Pro tip: Carry spare buckles. Universal 25mm or 40mm models fit most packs and weigh almost nothing.
Fabric Tear on Bottom or Side
The pack’s base takes constant abrasion. Small punctures can grow into large rips if not addressed. Look for frayed edges or thinning fabric, especially if you frequently hike on rocky or sharp terrain.
Tension Lock Slips or Breaks
These plastic sliders on shoulder or hip belt straps keep your load secure. If they won’t hold tension, your pack rides poorly. A broken lock means the strap can’t tighten—common after years of use.
Mesh Panel Rips
Ventilation panels or stretch pockets made of mesh tear easily. While not structural, holes reduce storage and comfort. Patching maintains integrity without sacrificing breathability.
Fix Zippers: Clean, Lubricate, Reattach
Zippers are high-use components. Most issues are fixable with simple steps.
Clean a Jammed Zipper Quickly
Dirt is the enemy of smooth operation.
- Open the zipper fully.
- Dip an old toothbrush in warm, soapy water.
- Scrub along the teeth, focusing on the slider area.
- Rinse with a damp cloth.
- Dry completely before use.
Field hack: Use a moist towelette if water isn’t available.
Lubricate for Smooth Operation
After cleaning, lubrication restores glide.
- Apply zipper lubricant (e.g., Gear-Aid or Color Crown) directly into the teeth.
- No specialty product? Use chapped lip balm or Vaseline in a pinch.
- Work the slider up and down 10–15 times to distribute the lubricant.
Pro tip (Osprey): Lubricate the inside of the teeth, not the slider. This prevents grit buildup and extends zipper life.
Reattach a Detached Zipper Tape
When the fabric pulls away, glue is stronger than stitching alone.
- Clean both surfaces with rubbing alcohol.
- Apply flexible, waterproof adhesive (e.g., Gear-Aid Seam-Grip) to the zipper tape—not the backpack fabric.
- Press the tape back into place, aligning it carefully.
- Clamp with clothespins or binder clips.
- Let cure 12–24 hours.
- Reinforce with hand stitching (backstitch with nylon thread) if needed.
Avoid super glue—it becomes brittle and fails under stress.
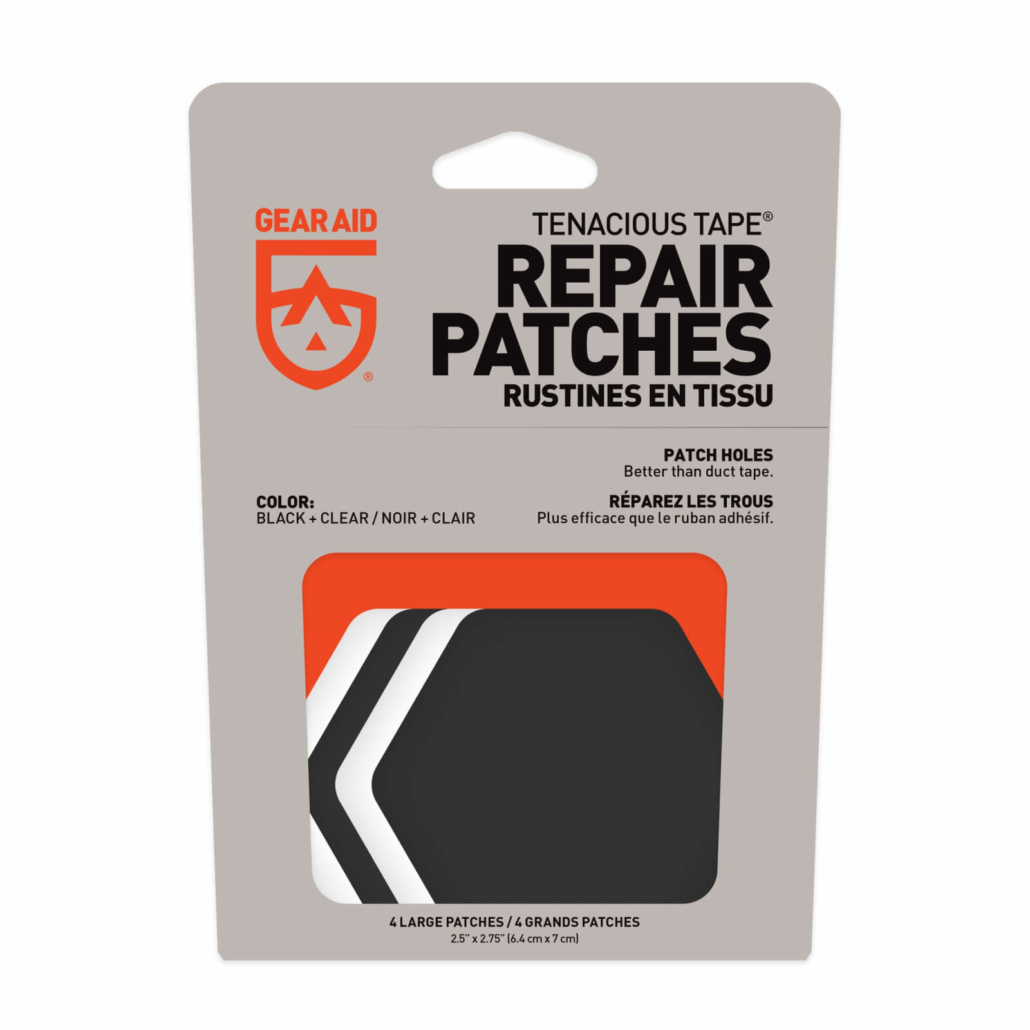
Patch Fabric Tears: Adhesive or Sew
A torn backpack doesn’t mean retirement. Small holes can be sealed fast; large rips need reinforcement.
Apply Adhesive Patches (Field-Friendly)
For quick, no-sew fixes, adhesive patches work on most fabrics.
Best materials:
– Tenacious Tape – Repositionable, durable, leaves no residue.
– Tear Mender – Waterproof, UV-resistant, ideal for nylon.
Steps:
1. Wipe the area with alcohol.
2. Cut patch ½ inch larger than the tear on all sides.
3. Round the corners to prevent peeling.
4. Apply from the center outward, pressing firmly.
5. Burnish edges with a spoon or fingernail.
6. Wait 24 hours before heavy use.
For large tears: Patch both sides for a “bomber” repair.
Sew Permanent Fabric Repairs
For long-term durability, sewing beats adhesive.
- Turn the pack inside out.
- Place a twill tape or fabric patch behind the tear.
- Use waxed nylon thread and a backstitch for strength.
- Seal cut edges with Fray Check.
- For heavy-duty patches, use Cordura or leather.
Thread tip: Use a single strand for thin nylon to avoid puncture damage.
Reinforce High-Wear Areas
Prevent future rips by reinforcing the pack’s bottom and anchor points.
- Cut leather or Cordura to cover the base.
- Use a saddle stitch with waxed thread and leather needle.
- Consider a box-stitch method for maximum durability.
Reddit pro tip: Avoid small patches—they can chafe against clothing.
Replace Broken Buckles & Tension Locks

Plastic components wear out. Replacing them is fast and inexpensive.
Swap Out a Broken Buckle
Most buckles are replaceable in minutes.
Male buckles (woven into webbing):
– Slide off the old one.
– Thread the new buckle onto the strap.
– Done—no sewing needed.
Female buckles (sewn in place):
1. Cut away the old buckle with scissors or pliers.
2. Thread the webbing through the new buckle.
3. Sew with heavy-duty thread using a box stitch or bar tack.
Upgrade tip: Replace plastic with metal buckles for longer life.
Fix a Broken Tension Lock
No tension lock means loose straps.
- Remove the broken piece with pliers.
- Thread the webbing through a new lock.
- If no replacement, use:
– Zip tie: Thread through and tighten.
– Paracord: Wrap and knot securely.
– Mini-carabiner: Slide through webbing—lightweight and strong.
Why carabiners work: They’re already in your pack. No extra weight.
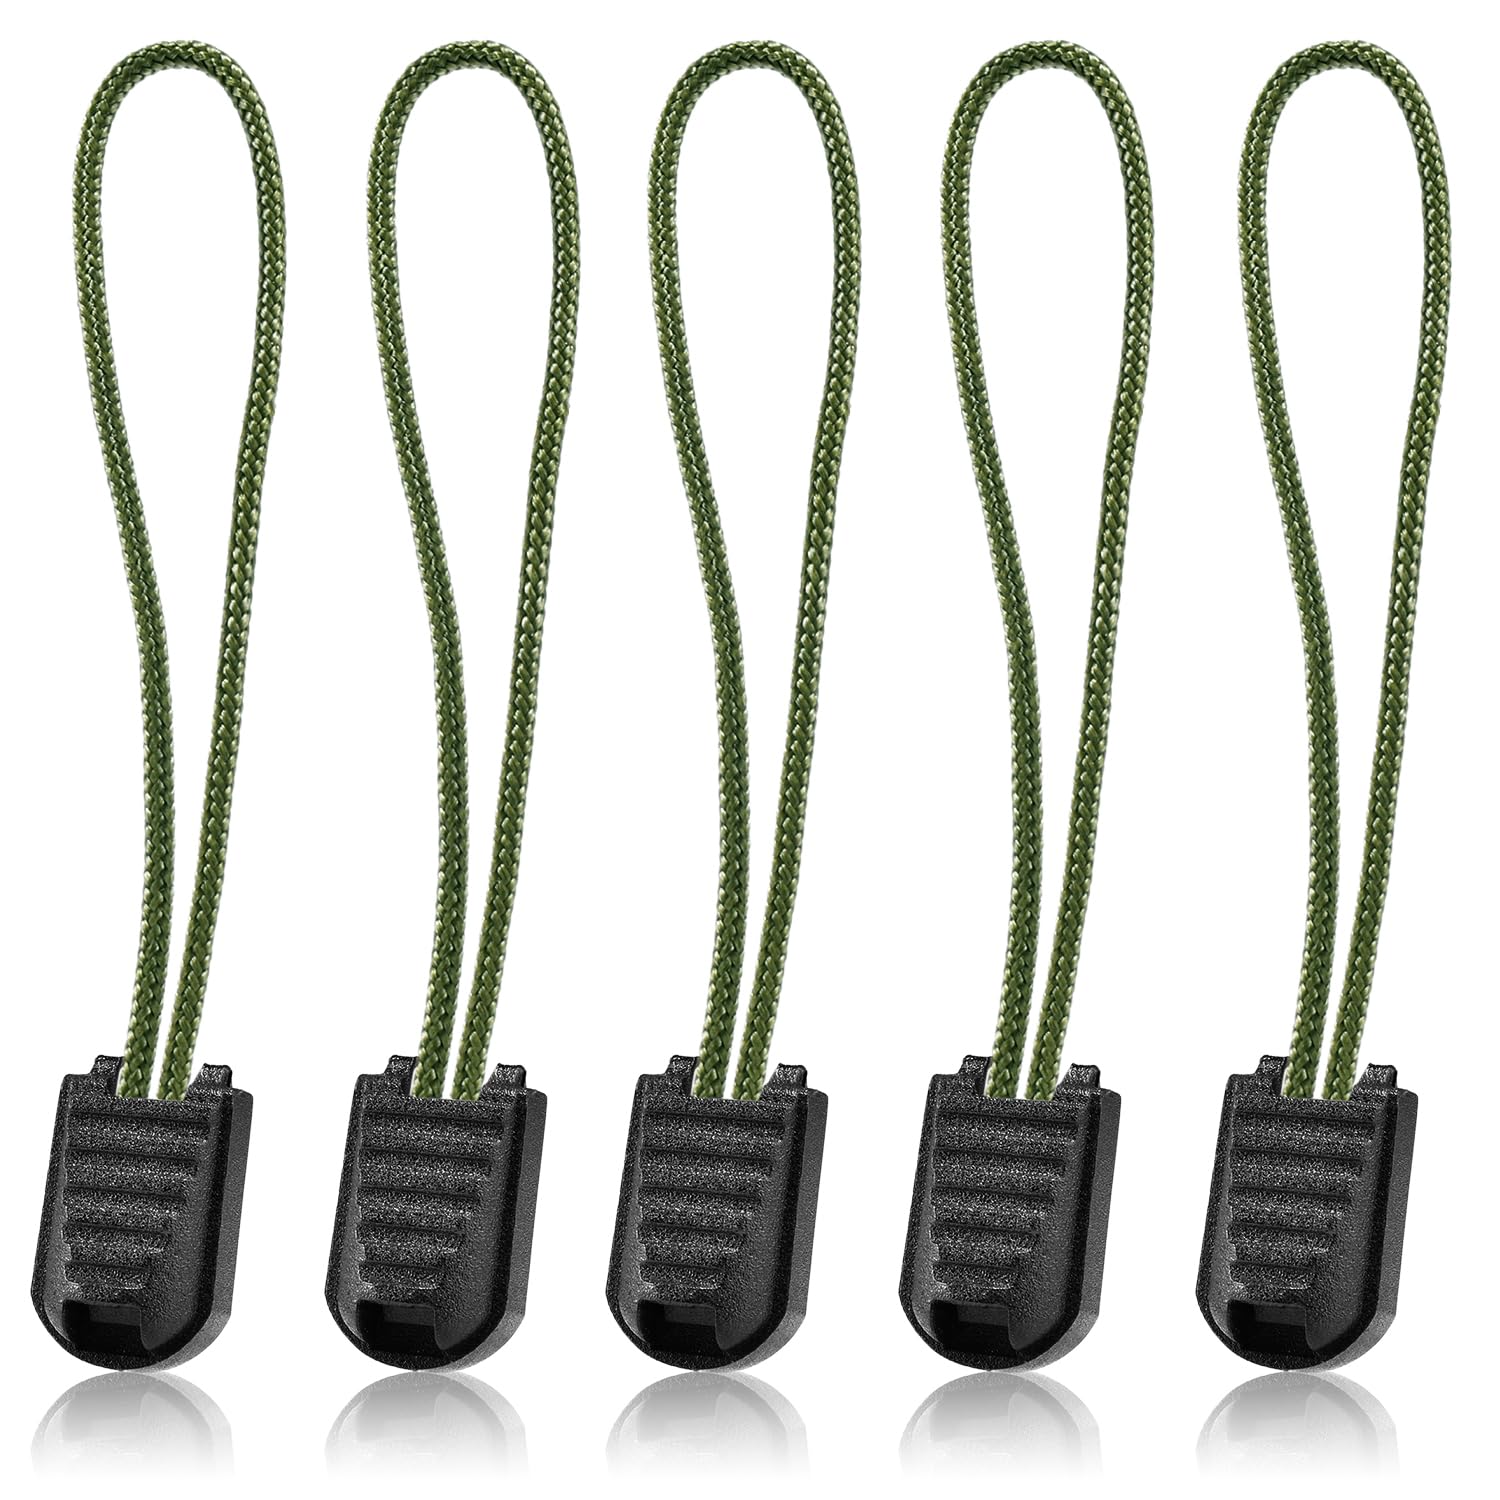
Repair Missing Zipper Pulls & Frayed Webbing
Small parts cause big frustrations. Fix them fast.
Replace a Lost Zipper Pull
No pull? No problem.
Quick fixes:
– Thread paracord, shoelace, or zip tie through the slider.
– Tie a double overhand knot to secure.
– Use a mitten hook or mini-carabiner as a durable pull.
Pro tip: Carry spare pulls in your repair kit.
Fix Frayed Webbing
Webbing anchors straps and holds loads. Fraying weakens it fast.
- Trim loose threads.
- Apply Fray Check or clear nail polish to the end.
- For severe damage, cut off the frayed section.
- Re-thread and re-sew the buckle or anchor point.
Prevention: Avoid dragging your pack—pull it by the handles.
Build a Trail-Ready Repair Kit
Carry these essentials to fix most issues on the go.
Must-Have Repair Items
- Duct tape (wrapped on a water bottle or in strips)
- Tenacious Tape patches
- Paracord (10–15 ft)
- Needle and waxed thread
- Small scissors
- Zip ties
- Alcohol wipes
- Spare buckles or tension locks
- Multi-tool
Pack It Right
- Store in a small waterproof bag.
- Label components for quick access.
- Share items with your hiking group to reduce weight.
Weight-saving hack: Use a condom wrapper to hold needle and thread—it’s waterproof and ultra-light.
Use Professional Repair Services
For structural damage or complex fixes, pros do it better.
Osprey Free Repair Program
Osprey repairs any backpack—for free, no matter the age or owner.
- Send directly to their warranty center.
- They replace zippers, buckles, and fabric.
- Request replacement parts online.
Visit: osprey.com/repair
Rainy Pass Repair (REI Partner)
GORE-TEX® authorized. Repairs all major brands.
- Services: Patching, zipper replacement, seam sealing.
- Drop off at REI or ship directly.
- Website: rainypass.com
- Phone: (888) 747-7867
TentPole Technologies
Specializes in pole and frame repairs.
- Handles backpack frame issues.
- Custom pole fabrication.
- Contact: (360) 260-9527
Find Local Experts
- Shoe repair shops often work on nylon and polyester.
- Look for seamstresses experienced with outdoor gear.
- Ask at REI or outdoor co-ops for referrals.
Check reviews on Google or outdoor forums before shipping.
Prevent Damage With Smart Maintenance
A little care goes a long way.
Clean After Every Hike
- Empty all pockets.
- Wipe down with a damp cloth.
- Use mild soap for stains.
- Never machine wash unless specified.
Never dry in direct sun—UV degrades fabric and stitching.
Store It Right
- Air dry completely before storing.
- Keep in a cool, dry place.
- Store empty and unzipped to reduce stress on zippers.
Inspect Monthly
Check for:
– Loose stitching
– Stiff zippers
– Cracked buckles
– Thin or worn fabric
Fix small issues now—they become big problems later.
Decide: Repair or Replace?
Not every pack can be saved. Know when to move on.
Repair If:
- Single buckle or zipper failure
- Small tear with intact structure
- Cost is under 50% of a new pack
- You’re emotionally attached or it fits perfectly
Replace If:
- Bottom is torn or delaminated
- Frame is broken
- Multiple zippers or buckles failed
- Fabric is brittle or UV-damaged
Rule of thumb: If repairs exceed $100, consider a new pack.
Recycle or Upcycle a Dead Backpack
When repair isn’t possible, don’t trash it.
Recycle Responsibly
- REI offers gear recycling.
- TerraCycle Zero Waste Boxes accept backpacks.
- Goodwill or Salvation Army may reuse or recycle.
Upcycle Ideas
- Turn into a travel duffel
- Make a laptop sleeve or gear organizer
- Use fabric for camp patches or art projects
Schools and artists often welcome donations.
Final Note
Hiking backpack repair keeps your gear on the trail and out of landfills. From lubricating a stiff zipper to replacing a broken buckle, most fixes are simple and affordable. Carry a lightweight repair kit, inspect your pack regularly, and act fast when damage appears.
For serious issues, Osprey and Rainy Pass Repair offer expert service. And when your pack’s journey ends, recycle or upcycle it with purpose.
With these skills, you’re not just a hiker—you’re a gear guardian. Keep adventuring.