
You arrive at your campsite after a long drive, eager to relax—only to find your tent is too small, leaks during a rainstorm, or takes forever to pitch in fading light. Choosing the wrong camping tent turns a dream trip into a soggy nightmare. The right shelter protects you from weather, fits your group comfortably, and sets up without a struggle. Whether you’re a weekend car camper or a thru-hiker tackling long-distance trails, knowing how to choose a camping tent starts with understanding your specific needs: transport method, group size, weather conditions, and setup priorities. This guide walks you through every decision point—from tent shapes and seasonal ratings to ventilation and floor protection—so you can confidently pick a tent that matches your adventure style.
Below, you’ll find practical, field-tested criteria for comparing tents, avoiding common buying mistakes, and selecting features that actually matter for your type of camping.
Match Tent Type to Your Camping Style
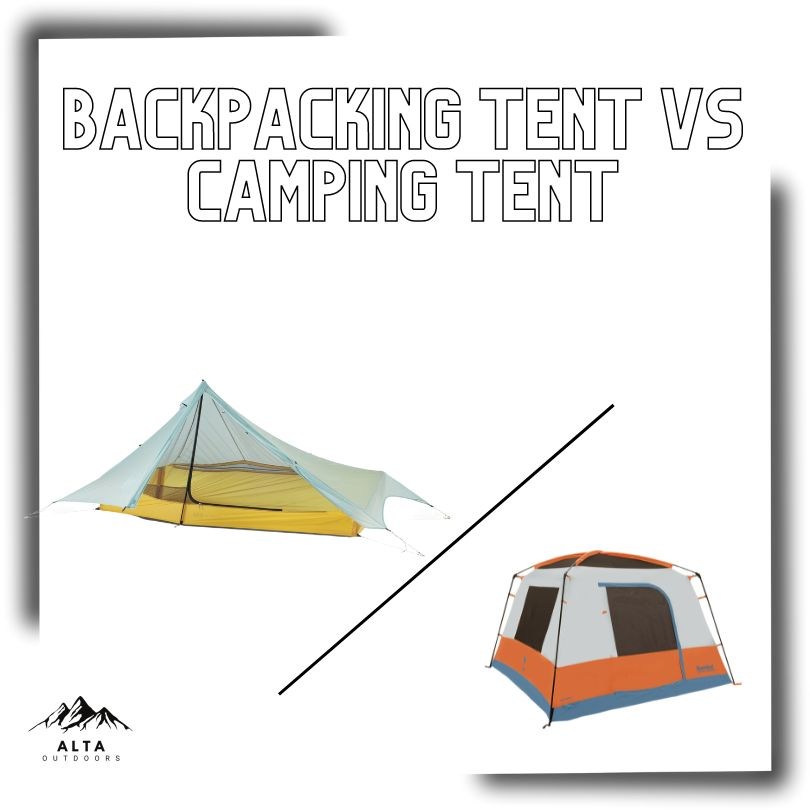
Your transportation method and trip goals determine which tent category makes sense. Choosing between car camping and backpacking designs is the first major decision.
Car Camping: Prioritize Space and Comfort
When you park next to your campsite, weight and packed size become far less important. Focus instead on roominess, durability, and convenience features.
Car camping tents typically weigh between 8 and 20 pounds and pack into large duffel-style bags. They often include extras like room dividers, large windows, multiple doors, and covered vestibules for gear storage. These tents work well for festival camping, family trips, RV overflow situations, and basecamp adventures where comfort matters more than minimal weight.
Backpacking: Focus on Weight and Packability
Every ounce matters when you’re carrying your shelter on your back. Backpacking tents are engineered to be light, compact, and weather-resistant.
A typical 2-person backpacking tent weighs 2 to 5 pounds and packs small enough to fit in a backpack’s sleeping bag compartment. These tents use simpler pole structures and lighter fabrics to cut weight. They suit thru-hikes, overnighters, and any trip where you carry all your gear on your person.
Pro Tip: A 3-pound difference sounds small until you hike 10 miles with it on your back. Choose the lightest option you can afford without sacrificing durability.
Choose the Right Tent Design
Tent shape and pole structure affect stability, interior space, and how quickly you can pitch camp. Understanding design trade-offs helps you avoid surprises in the field.
Dome Tents: Stable and Weather-Ready
Dome tents use curved poles that cross over the top, creating a self-supporting frame. This design offers several practical advantages.
Dome tents provide good headroom, resist wind well, and pitch relatively quickly. Most car camping tents and many backpacking models use this design. Look for clip-on pole attachments rather than sleeves—clips speed up setup considerably.
Pop-Up Tents: Fast Setup, Less Stability
Pop-up tents unfold like a folding chair and stand up in seconds. They work well for specific situations but come with trade-offs.
These tents set up in under a minute, making them beginner-friendly and great for kids or quick stops. However, they’re heavier and bulkier when packed, and they tip easily in wind. Pop-ups also feature vertical walls that maximize interior space. Use them in sheltered, family-friendly campgrounds rather than exposed backcountry sites.
Freestanding vs. Non-Freestanding
This distinction matters most for backpackers but also affects car campers who pitch on hard surfaces.
Freestanding tents hold their shape without stakes or guy lines. You can reposition them after setup, which helps when you’re searching for the best spot. They use a full pole structure, making them slightly heavier but more forgiving for beginners.
Non-freestanding tents rely on stakes and tension to stay upright. They use fewer poles—sometimes just two straight rods—and often accept hiking poles as substitutes to save weight. This makes them the lightest option available. The trade-off is harder pitching on rocky or root-filled ground.
Expert Note: Many ultralight backpackers use trekking poles as part of their shelter system, cutting weight from their pack while simplifying gear.
Size It Right: Don’t Trust the Label

Tent sizes like “2-person” or “4-person” are marketing estimates, not comfort guarantees. Learning how to size up properly prevents cramped nights.
What “2-Person” Really Means
A 2-person tent fits two sleeping pads side by side with no extra room. You won’t have space for gear storage, pets, or sitting up comfortably. Most couples prefer a 3-person backpacking tent for actual comfort.
How to Size Up Smartly
| Group Size | Recommended Tent Size | Why |
|---|---|---|
| Solo camper | 1-person or small 2-person | Lighter, more efficient |
| Two campers | 3-person | Room for gear and movement |
| Family of 4 | 6-person | Space for kids, pets, and storage |
Rule of thumb: Add one person to your group size to account for gear and comfort.
Consider Interior Dimensions
Check floor area in square feet and peak height before buying.
Backpacking tents typically offer 28 to 35 square feet for two people. Car camping tents range from 50 to over 100 square feet for families. Peak height of 40+ inches lets you sit up; 60+ inches lets you stand inside. Look for dual doors and vestibules so you don’t crawl over your partner to exit at night.
Know Your Seasons: 3-Season vs. 4-Season
Not all tents handle winter storms. Choosing the correct season rating keeps you safe and dry in expected conditions.
3-Season Tents: Spring to Fall
Designed for mild to moderate weather, 3-season tents work for most backpacking and car camping trips.
These tents feature mesh panels for airflow, a rainfly for rain protection, and lightweight poles. Avoid using them in snow or high winds—they can collapse under heavy loads.
4-Season Tents: Built for Winter
Made for snow, ice, and extreme cold, 4-season tents feature reinforced poles, thicker fabric, minimal mesh, full-coverage rainflies, and snow flaps on zippers. They handle snow loading well but offer poor ventilation in summer and can get stuffy with condensation. Use them for alpine climbs, winter camping, or exposed ridgelines.
Shoulder Season? Go 3-Season with Upgrades
For late fall or early spring camping, use a 3-season tent with a full-coverage footprint, extra guy lines for wind stability, and double walls with good vents.
Essential Features to Look For

Beyond size and season, smart features make camping easier and more comfortable in real-world conditions.
Vestibules: Gear Storage That Stays Dry
A covered area outside the door keeps boots, packs, and muddy gear out of the sleeping area. Single-door models offer one vestibule for solo or tight sites. Dual-door tents provide two vestibules, which works better for couples or shared gear. A 10 to 15 square foot vestibule fits a backpack and shoes comfortably.
Ventilation: Stop Condensation Before It Starts
Moisture from breathing builds up inside tents, especially in cool weather. Look for mesh ceilings or upper walls, opposite-side doors and windows, and roof vents or adjustable fly. Avoid fully sealed tents—they turn into saunas.
Pro Move: Crack the rainfly at the top to allow airflow while keeping rain out.
Interior Organization
Small touches make a big difference when it’s dark and raining outside. Gear lofts let you hang bulky items like jackets or packs. Light loops allow you to clip in a headlamp for ambient lighting. Pockets store phones, keys, or glasses off the floor.
Zippers and Durability
Cheap zippers fail fast and ruin trips. Look for YKK zippers, which are reliable and widely available. Double sliders open from both ends for better airflow. Reinforced stress points at corners and door seams extend tent life.
Warning: Avoid tents with flimsy, sticky zippers. They jam at the worst possible times.
Protect Your Tent Floor: Use a Footprint

Your tent’s floor is its weakest point. A ground tarp or footprint prevents tears, punctures, and moisture problems.
Why Use a Footprint?
A footprint prevents abrasion from rocks, sticks, and sand. It extends tent life by reducing wear and keeps the floor dry in wet conditions. This matters for both car camping and backpacking, though it’s especially critical for backpacking where lighter tent floors are more delicate.
How to Choose the Right One
Buy a footprint that matches your tent’s floor exactly in shape and size. Never let it extend beyond the tent edges—it traps water underneath. Choose lightweight nylon or polyethylene for durability and packability.
Backpackers: Use a cut-to-size Tyvek or silnylon sheet to save weight.
DIY Option: Make Your Own
Cut a Tyvek home wrap sheet to match your tent’s floor. It weighs less than 6 ounces, costs under $10, and provides waterproof, puncture-resistant protection.
Caution: Sand and grit under the tarp can still damage the floor. Shake it out daily.
Set Up Before You Go
Nothing kills morale like struggling with poles at dusk in the rain. Practicing at home saves frustration later.
Practice at Home
Pitch your tent in the backyard and time yourself. Can you do it in under 5 minutes? Check for missing stakes or broken clips before you need the tent in the field.
Bonus: Teach your kids or camping partner how to help. Setup goes faster with two people who know the steps.
Check Compatibility
Do stakes work in your terrain—sand, rock, or snow? Are guy lines included, or do you need to add reflective ones for night visibility? Does the rainfly attach easily in the dark? Test in wind before your trip. If it flaps wildly in a breeze, it won’t hold up in a storm.
Where to Buy and Test
Don’t buy based on photos alone. Testing in person reveals details you can’t see online.
Try Before You Buy
Visit REI, Moosejaw, or local outdoor stores. Ask staff to set up models in the display area. Sit inside to check headroom, door access, and overall feel.
REI’s “green vest” staff will pitch any tent for you. Use this perk to experience the tent firsthand.
Read Real Reviews
Look for long-term user feedback from people who’ve used the tent for 6+ months. Watch YouTube setup videos to see real-world pitch times and identify any tricky steps. Check for common complaints about leaks, broken poles, and zipper issues before committing.
Final Checklist: 10 Questions to Ask
Before you click “buy,” answer these:
- How will I transport it? (Backpack vs. car trunk)
- How many people? (Size up for comfort)
- What season? (3-season for most, 4-season for winter)
- What weather? (Wind, rain, snow?)
- How heavy is too heavy? (Backpackers: aim under 3 lbs per person)
- Does it fit my sleeping pads? (Check floor dimensions)
- Does it have a vestibule? (For gear storage)
- Is ventilation adequate? (To prevent condensation)
- Do I need a footprint? (Always recommended)
- Can I set it up fast? (Practice at home)
Golden Rule: The best tent is the one you’ll actually use—not the lightest, biggest, or cheapest option available.
Frequently Asked Questions About Choosing a Camping Tent
What size tent do I need for a family of four?
A 6-person tent works best for a family of four. It provides enough space for sleeping pads plus room for gear, clothes, and movement. A 4-person tent fits the family but leaves little space for anything else, which becomes uncomfortable on longer trips.
Are 4-season tents worth it for summer camping?
No, 4-season tents are not ideal for summer. They have minimal mesh and poor ventilation, which causes condensation and stuffiness in warm weather. Save them for winter, alpine climbing, or exposed ridgeline use where snow loading and high winds are concerns.
How important is tent weight for car camping?
Tent weight matters far less for car camping than for backpacking. Since you’re driving to your site, you can comfortably carry 8 to 20 pounds. Focus instead on space, durability, and features like room dividers, multiple doors, and large vestibules.
Can I use a backpacking tent for car camping?
Yes, you can use a backpacking tent for car camping. It will be smaller and lighter, but it still functions fine. The main downside is less interior space for gear storage and movement. If comfort and room matter more than weight savings, a dedicated car camping tent serves you better.
How do I prevent condensation inside my tent?
Prevent condensation by ensuring good ventilation. Choose a tent with mesh ceilings, opposite-side doors, and adjustable vents. Crack the rainfly at the top to let moist breath escape while keeping rain out. Avoid fully sealed tents in mild weather.
What is a tent footprint and do I really need one?
A tent footprint is a ground tarp that goes under your tent floor. You need one because it protects against abrasion from rocks, sticks, and sand, extends tent life, and keeps the floor dry. Match it to your tent’s exact shape—never use one that extends beyond the edges, as it traps water underneath.
Key Takeaways for Choosing Your Next Camping Tent
Choosing a camping tent comes down to matching your adventure style with the right balance of weight, space, and weather protection. Car campers should prioritize comfort, interior room, and convenience features. Backpackers must focus on weight, packability, and durability for long miles on the trail.
Always size up one person beyond your group size to allow room for gear and movement. Match your tent’s season rating to the conditions you’ll face—3-season for most trips, 4-season only for winter or alpine use. Protect your investment with a properly sized footprint, and practice setup at home before your trip.
Your next step: Visit a local outdoor retailer like REI, set up your top two or three options in person, and sit inside each to compare headroom, door access, and overall feel. The tent that fits your body, your group, and your trip style is the one worth taking home.