
A muddy trail run often ends with a frustrating battle when your Leki trekking poles refuse to collapse. Grit, ice, or an over-tightened lock can seize the shafts, leaving you stuck with extended gear.
This guide reveals exactly how to fix Leki trekking poles using safe, proven methods. You will learn to release jammed sections, clean internal mechanisms, and prevent future sticking issues.
Identify Why Your Leki Poles Are Stuck

Diagnosing the root cause prevents accidental damage during repair. Forcing a pole without understanding the blockage can bend shafts or crack locking cams. Most issues stem from four specific environmental or mechanical factors.
Over-Tightened Locking Mechanisms
Hikers often crank twist-locks or Speed Lock levers too hard for extra security. This excessive pressure compresses the inner shaft against the outer wall. The resulting friction makes the pole impossible to slide down until the tension releases.
Dirt and Debris Buildup
Fine sand, mud, and trail grit frequently wedge into the telescoping joints. Once this mixture dries, it acts like cement between the sliding sections. Frequent off-trail use significantly increases the risk of this grime locking your poles.
Moisture and Freezing Conditions
Water trapped inside the joint can freeze solid in cold climates. Even without freezing, prolonged exposure to moisture causes corrosion on aluminum shafts. Composite materials may also swell slightly when wet, creating a tight fit.
Worn Internal Components
Older poles may suffer from degraded rubber seals or worn locking cams. If your pole sticks consistently despite being clean, the internal coating might be failing. This wear prevents smooth sliding and often requires part replacement.
Loosen the Locking Mechanism Correctly
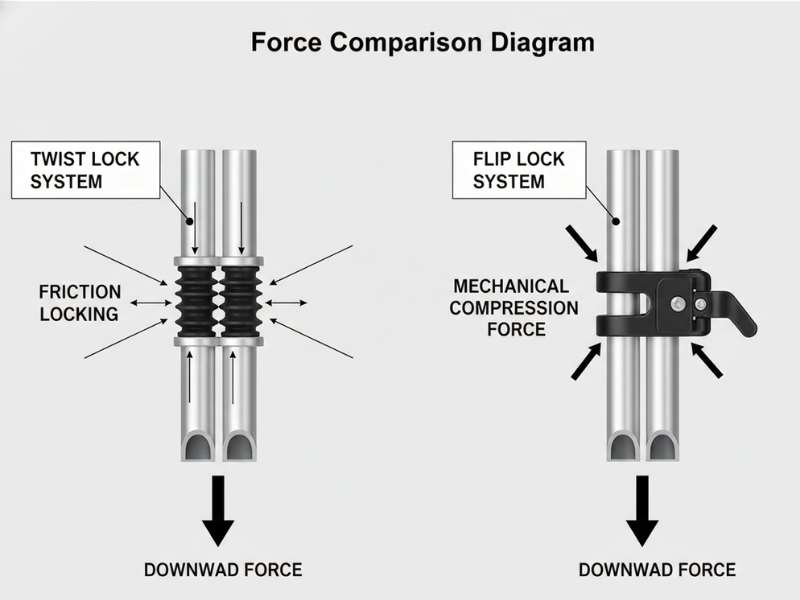
Releasing the lock is your first critical step before attempting to separate sections. Using the wrong technique here can strip the mechanism or bend the lever permanently.
Distinguish Between Twist-Lock and Speed Lock
Leki utilizes two primary systems that require different handling. Twist-lock collars need a counter-clockwise rotation to unlock fully. Speed Lock systems rely on a lever that must flip completely open before you pull.
Apply Even Pressure During Release
Hold the upper shaft firmly with one hand while manipulating the lock with the other. Use a rubber gripper or cloth if the collar feels slippery or seized. Twist or flip slowly to avoid jerking the mechanism under stress.
Pro Tip: Stop immediately if the lever bends. A distorted lever indicates excessive stress that could break the lock entirely.
Apply Gentle Heat to Release Frozen Sections
Controlled heat expands metal slightly and melts ice or stiffened seals. This method is highly effective for poles stuck due to cold weather or dried residue.
Use Lukewarm Water Safely
Run lukewarm tap water over the joint area for 10 to 15 seconds. Focus the stream directly on the overlapping section where the shafts meet. Dry the pole thoroughly with a towel immediately after to prevent rust.
Utilize a Hairdryer on Low Setting
Hold a hairdryer six to eight inches away from the stuck joint. Move the nozzle in a circular motion for 20 to 30 seconds to warm the area evenly. Test the separation every 10 seconds to avoid overheating plastic components.
Warning: Never use heat guns or open flames. Excessive heat can warp rubber seals and degrade carbon fiber shafts permanently.
Tap and Shake to Dislodge Internal Debris
Physical agitation helps break surface tension and loosen packed dirt without chemical aids. This technique works well for grit-based blockages that lubricants cannot reach.
Tap the Bottom Cap Lightly
Hold the pole vertically with the lock fully open. Tap the bottom rubber foot lightly against grass, soft dirt, or the sole of your shoe. Use short, controlled taps rather than slamming the pole hard.
Shake the Pole Firmly
Grasp the upper and lower sections with both hands once unlocked. Shake the pole in a quick back-and-forth motion to free internal resistance. Listen for a slight pop or crack indicating the sections have released.
Visual Cue: Watch for dust or small particles falling from the joint as the debris loosens up.
Lubricate Only When Necessary
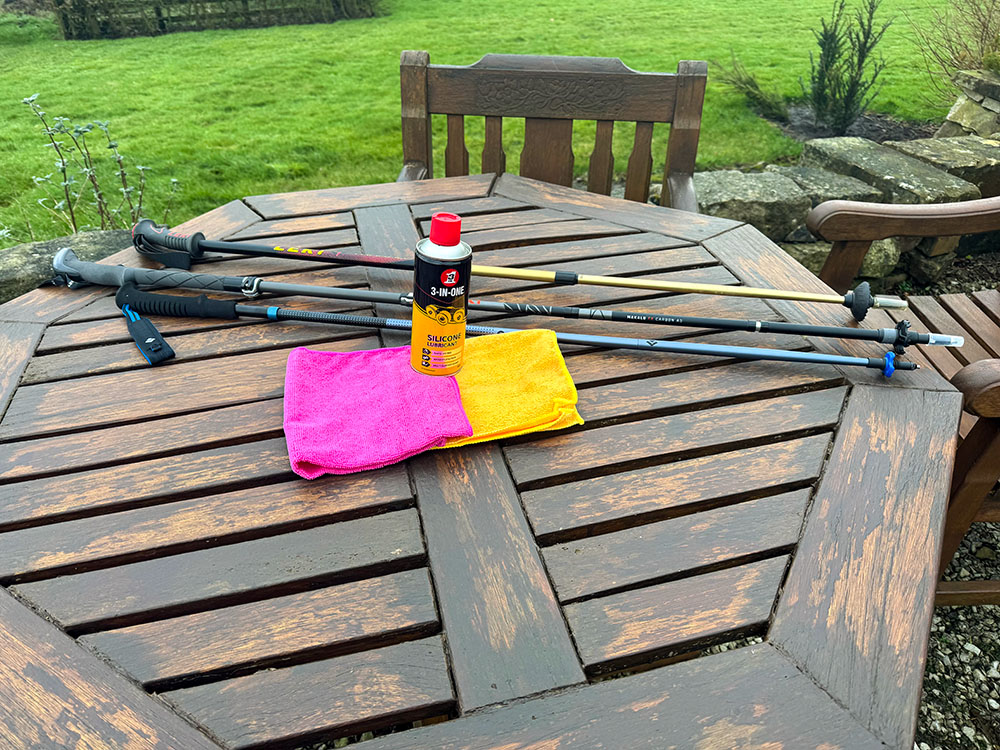
Proper lubrication restores smooth sliding action, but using the wrong product causes more harm. Selecting the correct spray ensures long-term performance without attracting new dirt.
Choose Silicone or Dry Teflon Sprays
Select a silicone-based lubricant or dry Teflon spray for best results. Avoid oil-based products like WD-40 because they attract dirt and gum up the mechanism over time. These dry lubricants leave no sticky residue behind.
Apply Sparingly to Critical Points
Extend the pole fully and wipe the inner shaft clean with a cloth. Spray a light coat on the inner shaft near the locking area only. Work the pole up and down several times to distribute the lubricant evenly.
Expert Note: Lubricate your poles every three to six months or after heavy exposure to mud and water.
Clean Poles After Every Hike
Routine cleaning prevents the majority of sticking issues before they start. A quick two-minute wipe-down saves hours of repair work later in the season.
Wipe Down with a Damp Cloth
Remove mud, sand, and salt immediately after your hike ends. Pay close attention to the joint areas and the locking mechanism where grit accumulates. Use mild soap if needed, but avoid harsh chemicals that damage coatings.
Dry Thoroughly Before Storage
Extend the poles fully and let them air dry for 10 to 15 minutes indoors. Store them unlocked and upright in a dry place to ensure airflow. Never store damp poles inside a sealed gear bag where moisture traps.
Prevent Future Sticking Issues
Adopting smart habits keeps your Leki poles functioning smoothly for years. Prevention is far easier than repairing a seized pole on the trail.
Avoid Over-Tightening the Locks
Tighten the lock only until the pole feels secure during use. Over-tightening compresses the inner shaft and accelerates wear on the components. If you need tools to unlock it later, you have tightened it too much.
Inspect and Maintain Regularly
Check your poles monthly for cracks, frayed cords, or worn rubber seals. Ensure the locking lever moves freely without grinding or sticking. Replace worn parts promptly using official Leki replacement kits.
Store Properly During Off-Season
Keep poles in a cool, dry place away from humidity swings. Avoid storing them in damp garages or hot attics where materials degrade. Hang them vertically or store them uncompressed to maintain shaft integrity.
When to Replace Parts or Contact Support
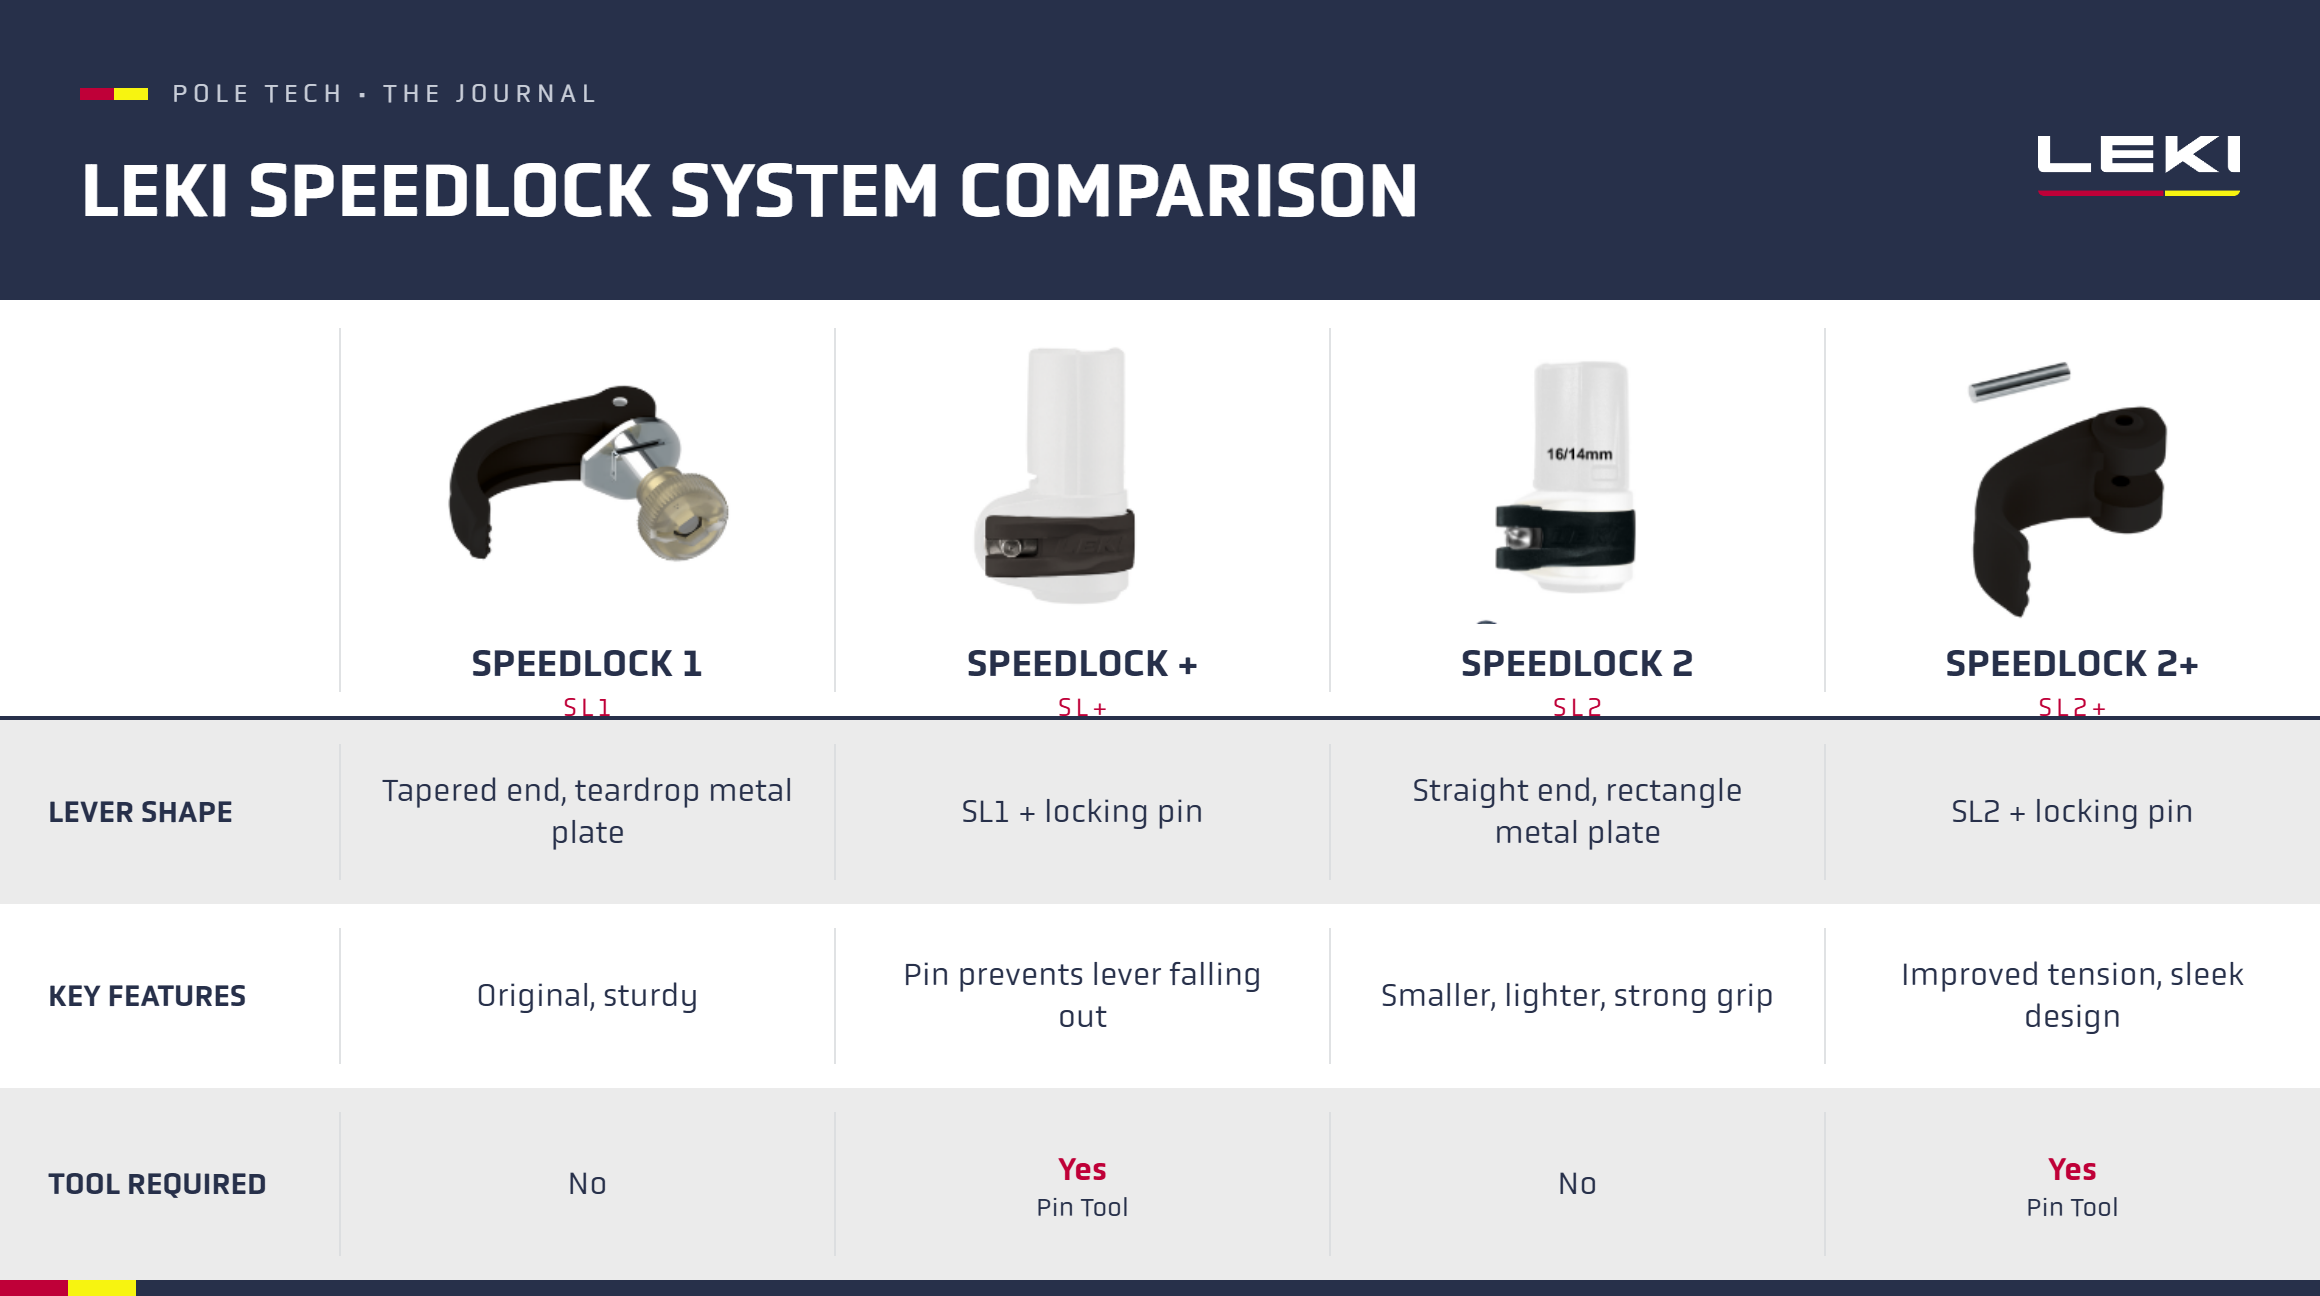
Some mechanical failures require professional attention or new components. Knowing when to stop DIY repairs saves you from causing irreversible damage.
Replace the Lock Mechanism
Order a Speed Lock 2 or 3 replacement kit if cleaning fails. Follow installation videos on the official Leki YouTube channel for guidance. DIY replacement typically takes 10 to 15 minutes with basic tools.
Contact Leki Customer Service
Reach out to support if the inner shaft is bent or cracked internally. Contact them also if the cord is broken inside the shaft. Leki offers a two-year warranty on manufacturing defects for registered products.
Warranty Note: Register your poles online immediately after purchase for faster service claims.
Pro Tips from Experienced Hikers
Seasoned trail runners and backpackers use these field-tested tricks to maintain gear. These small habits make a massive difference in long-term reliability.
Carry a Mini Maintenance Kit
Pack a small bag containing a microfiber cloth and silicone spray. Include a nail clipper to help open stiff levers in the field. A zip-lock bag is useful for storing wet poles separately from dry gear.
Test Poles Before Long Hikes
Extend and collapse each pole two to three times before leaving home. Listen for smooth operation and feel for any resistance. Fix minor issues before they become major problems on the trail.
Avoid Full Compression in Wet Conditions
Leave poles slightly extended if they are wet or muddy. Fully collapsing them traps moisture and increases the risk of corrosion. Wait until you can clean and dry them properly before storing.
Frequently Asked Questions About Leki Pole Repairs
Can I use WD-40 to fix my stuck Leki poles?
No, you should avoid using WD-40 or other oil-based lubricants on trekking poles. These products attract dirt and dust, which eventually creates a gummy residue that worsens sticking. Stick to silicone-based or dry Teflon sprays for safe lubrication.
How do I unfreeze Leki poles stuck due to ice?
Run lukewarm water over the joint for 10 to 15 seconds to melt the ice inside. Alternatively, use a hairdryer on low heat held six inches away from the shaft. Do not use boiling water or open flames as they can damage the pole materials.
Why won’t my Leki twist-lock loosen no matter how hard I turn it?
The lock is likely over-tightened or jammed with dried debris. Try tapping the bottom of the pole gently on soft ground while twisting the collar. If it remains stuck, apply gentle heat with warm water to expand the metal slightly.
How often should I lubricate my trekking poles?
You should lubricate your poles every three to six months depending on usage frequency. Apply lubricant immediately after hiking in muddy or sandy conditions. Regular maintenance prevents grit from building up and seizing the mechanism.
Is it normal for Leki poles to stick after winter hiking?
Yes, cold weather often causes sticking due to freezing moisture or contracted materials. Proper cleaning and drying after winter hikes prevent this issue. Storing poles in a warm, dry place helps avoid ice formation inside the shafts.
Key Takeaways for Fixing Your Leki Trekking Poles
Fixing stuck Leki trekking poles requires patience and the correct technique to avoid permanent damage. By identifying whether dirt, ice, or over-tightening caused the issue, you can apply the right solution safely. Remember to always use silicone-based lubricants and never force a locked mechanism.
Regular cleaning and proper storage are your best defenses against future sticking problems. Implement these maintenance habits today to ensure your poles remain reliable for every adventure. If simple fixes fail, contact Leki support for warranty assistance or replacement parts.