
If you’ve ever finished a downhill hike with throbbing knees or felt unsteady on loose gravel, learning how to use trekking poles for beginners can completely change your outdoor experience. These simple tools shift weight from your legs to your arms, reduce joint stress, and turn a basic walk into a full-body workout that burns up to 20% more calories. Yet most new users struggle with awkward arm swings, wrong pole lengths, and grip fatigue that ruins the experience.
This guide breaks down everything you need to know, from sizing your poles and using the wrist strap, to mastering rhythm and adapting your technique for hills. By the end, you’ll walk with confidence, protect your joints, and hike farther with less effort.
Set the Right Trekking Pole Length
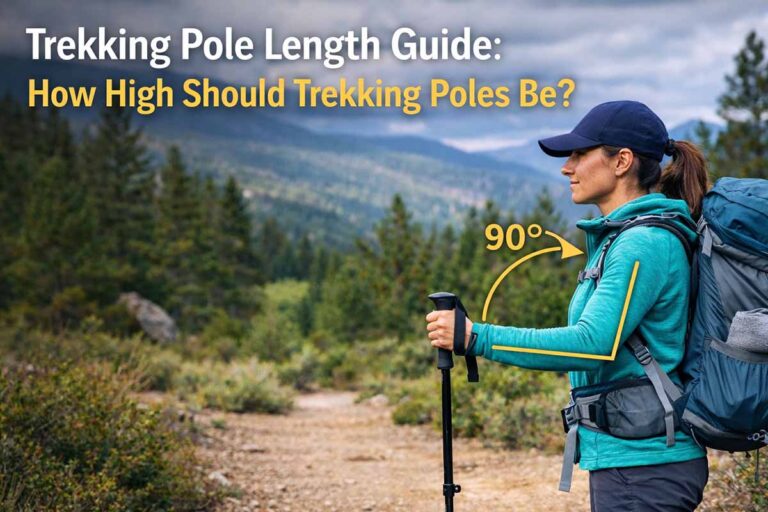
Find Your Ideal Height
Getting pole length wrong is the most common beginner mistake. Too long or too short, and your posture suffers, reducing benefits and increasing fatigue.
To set the correct length:
- Wear your hiking boots or shoes.
- Stand upright with relaxed shoulders and a neutral spine.
- Hold each pole at your side, grip down.
- Adjust until your elbow forms a 90-degree angle when your hand rests on the grip.
- Lock the pole in place at this height.
Most beginners need poles between 110 and 120 cm, depending on body height. Taller hikers over six feet may need 125 cm, while shorter users under 5’4″ often use 105 to 110 cm.
Adjust for Terrain
- Uphill: Shorten poles by 5 to 10 cm for better leverage and posture.
- Downhill: Lengthen poles by 5 to 10 cm to absorb impact and protect your knees.
Adjustable poles with numbered settings let you switch quickly without guessing on the trail.
Master the Grip and Strap Technique
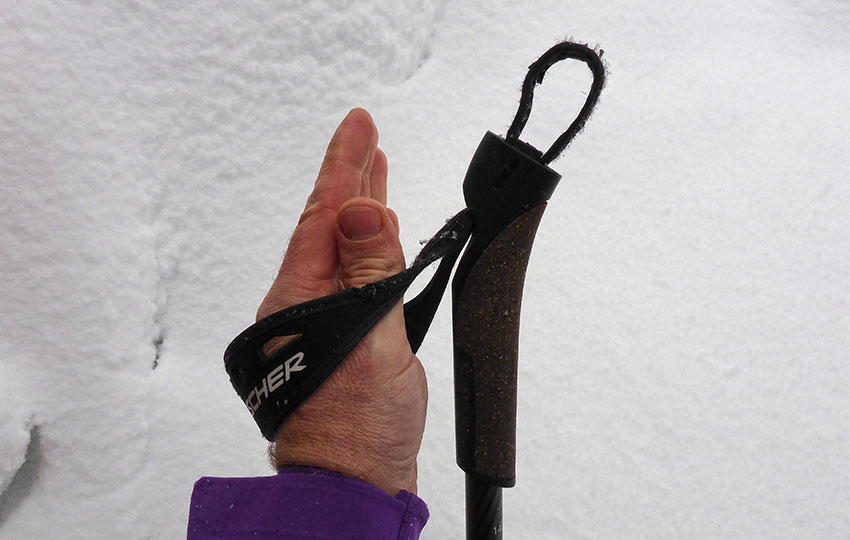
Use the Strap Correctly
The wrist strap isn’t just for safety. It’s a load-bearing tool that reduces arm fatigue and transfers weight from your hand to your forearm.
Follow these steps:
- Pull the strap out from underneath the handle.
- Slide your hand up through the loop from below.
- Grasp the handle so your wrist rests comfortably in the strap, with your thumb and index finger just above the grip.
This technique mimics cross-country skiing and keeps your hand relaxed over long distances. If you grip from the top of the strap instead, the pole stays locked in your hand during a fall, risking impact injury.
Avoid Common Grip Mistakes
- Gripping over the strap (locks the pole during falls)
- White-knuckle squeezing (wastes energy and causes cramps)
- Letting the strap dangle loose (loses support and power)
Keep your hands loose. You don’t need to squeeze. Just push gently with each step.
Walk with Proper Rhythm
Sync Arms and Legs
Trekking poles work best when used with a cross-body pattern:
- Right foot forward, left pole forward
- Left foot forward, right pole forward
This opposite-arm, opposite-leg motion improves balance and engages your core and upper body naturally.
Think of it like using crutches. The poles swing with your stride, not ahead of it. Let them hang loosely and avoid lifting or reaching.
Plant and Push, Don’t Reach
A common error is stretching the pole too far in front. This throws off balance and strains your shoulders.
Instead:
- Plant the pole near your hip, slightly behind your front foot.
- Push down and back as you step forward.
- Let the pole release naturally.
Your arms should swing freely, not forced. The motion feels smooth, not jerky.
Adapt Technique by Terrain
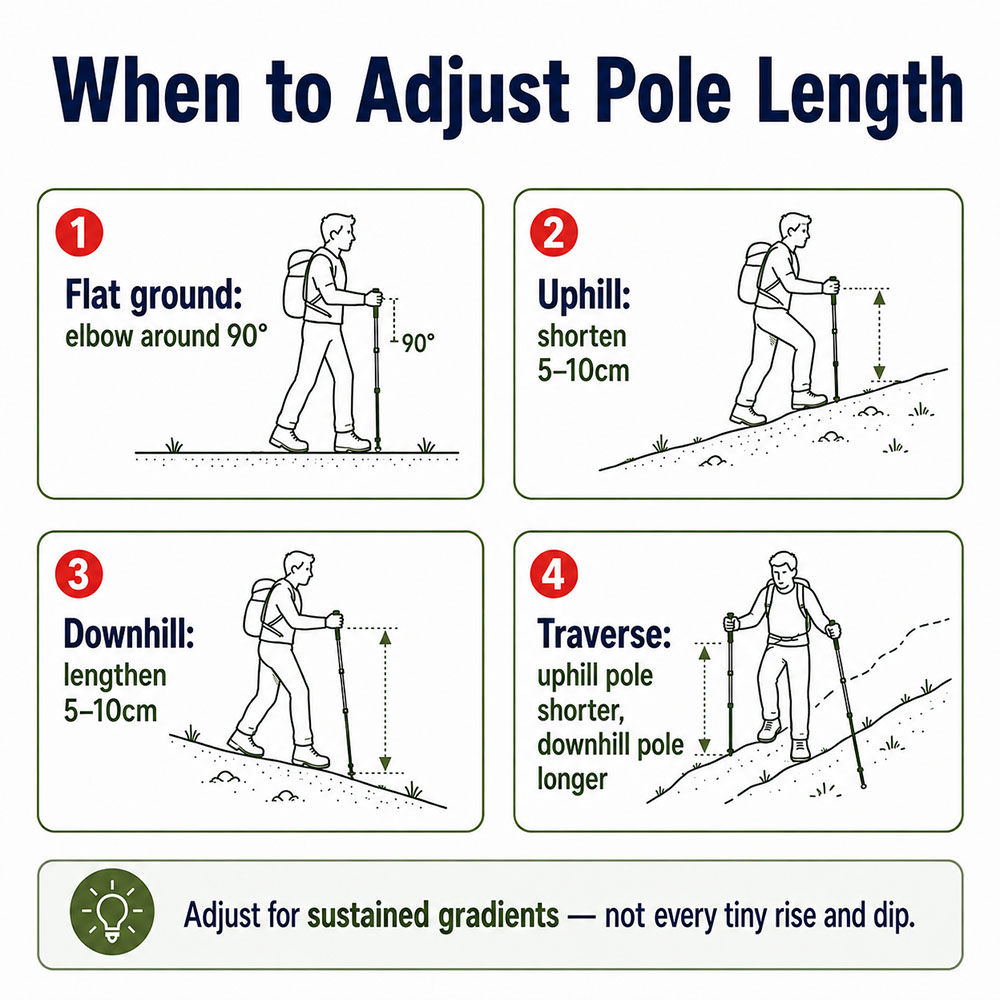
On Flat Ground
- Keep poles angled slightly behind you.
- Maintain steady rhythm with opposite arm and leg.
- Focus on light, consistent pressure rather than overpushing.
This builds endurance and burns more calories with minimal extra effort.
Climbing Uphill
- Shorten poles for better leverage.
- Lean slightly forward from the ankles, not the waist.
- Plant poles ahead and push down to pull yourself up.
This shifts work from your quads to your arms and core, reducing leg burn and letting you climb longer.
Descending Downhill
- Lengthen poles to increase reach and stability.
- Plant poles ahead and slightly to the side.
- Use your hands to palm the top of the grip for better control.
- Shift weight into the poles to reduce knee impact.
This braking effect cuts knee strain by up to 25%, especially on steep or rocky descents.
Practice Like a Pro
Start on Smooth Surfaces
Begin on flat pavement or sidewalk, not trails. Here’s why:
- Smooth ground helps you focus on rhythm.
- Bumpy terrain disrupts timing and builds bad habits.
- You avoid tripping while learning.
Walk 10 to 15 minutes daily, focusing on:
- A 90-degree elbow bend
- Opposite arm and leg motion
- Relaxed grip and strap use
Once the motion feels natural, move to grass, then trails.
Build Muscle Memory
Expect awkwardness in the first few sessions. Your brain is learning a new movement pattern.
Tips to speed progress:
- Walk slowly at first, since speed breaks form.
- Count steps silently: “left pole, right foot… right pole, left foot.”
- Record yourself or practice in front of a mirror.
After 3 to 5 practice walks, the motion becomes automatic.
Choose the Right Poles
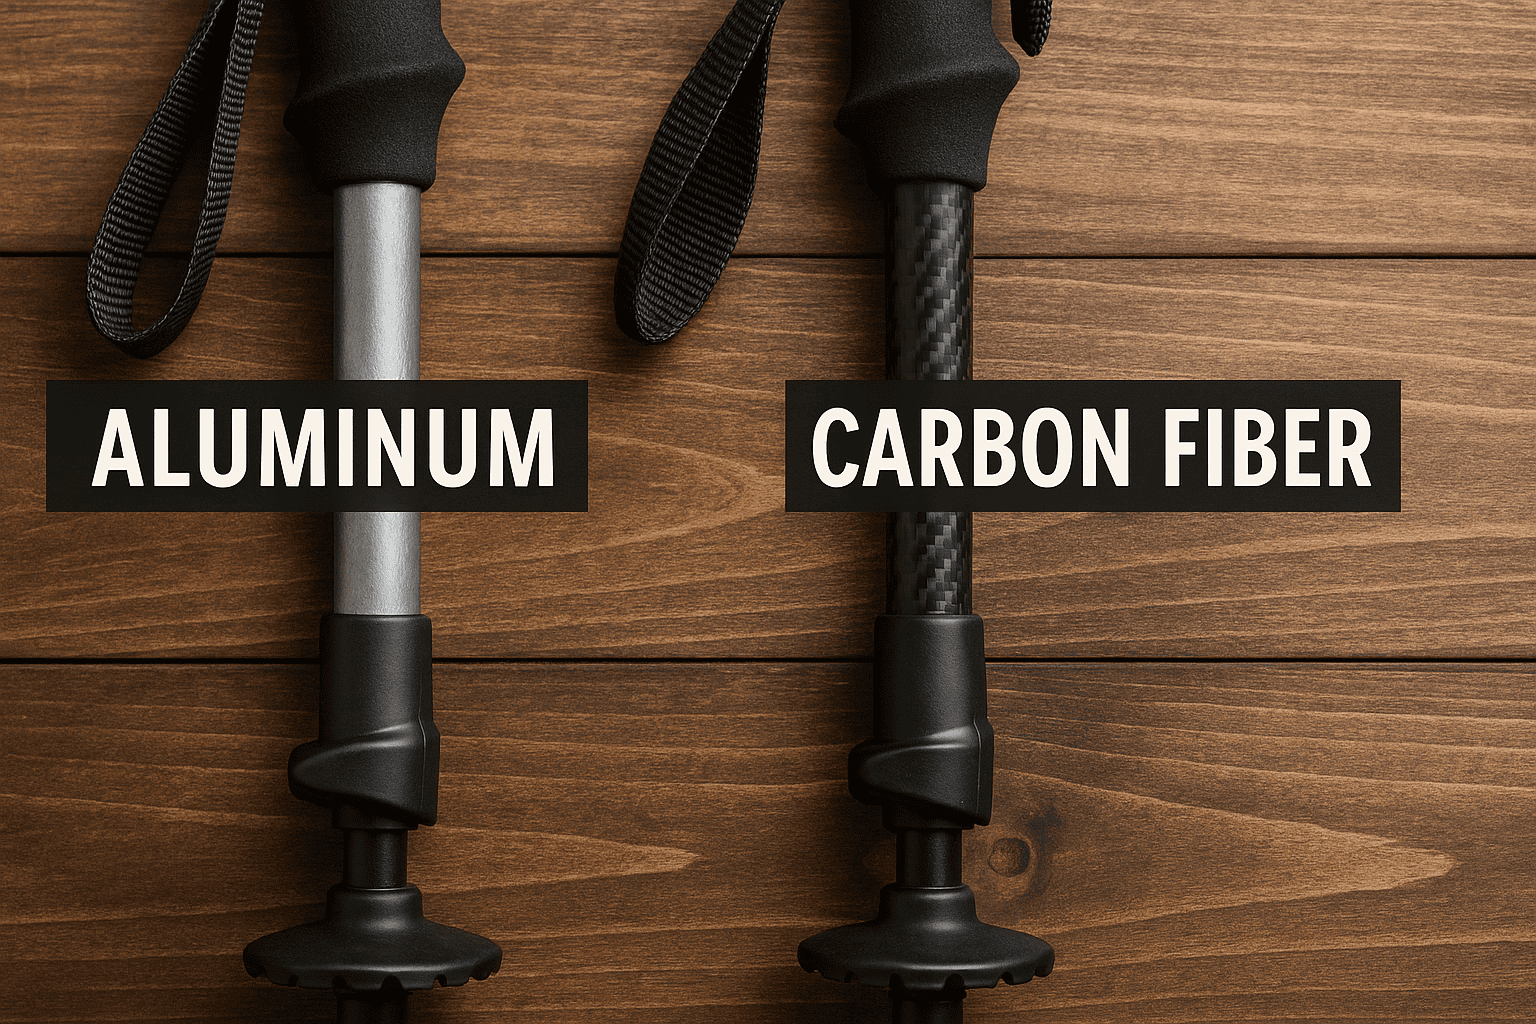
Key Features for Beginners
Not all trekking poles are equal. Start with ones that make learning easier:
- Adjustable length with telescoping or Z-pole design
- Numbered length markers for quick changes
- Cork or foam grips to reduce sweat and vibration
- Shock-absorbing tips for less joint impact on pavement
- Secure locking mechanisms to avoid slips mid-hike
Material: Aluminum vs. Carbon Fiber
| Feature | Aluminum Poles | Carbon Fiber Poles |
|---|---|---|
| Price | $30 to $50 | $80 to $150 |
| Weight | Heavier | Lighter |
| Durability | Dents but rarely breaks | Strong but can snap if bent |
| Best For | Beginners and casual hikers | Frequent hikers and ultralight backpackers |
Start with aluminum poles. They’re affordable, tough, and perfect for learning.
Recommended Brands
- Leki: Known for reliable locks and ergonomic straps.
- Black Diamond: Great for durability and trail performance.
- Komperdell: Excellent adjustability and comfort.
Avoid cheap, no-name poles that often fail at critical moments.
Avoid Common Mistakes
Reaching Too Far
Placing poles too far ahead disrupts your stride and strains your shoulders.
- Do: Plant pole near your hip
- Don’t: Stretch pole in front of your toes
Gripping Too Tightly
A death grip causes forearm fatigue and cramping.
- Do: Keep hands relaxed and use the strap for support
- Don’t: Squeeze the handle with full strength
Ignoring Terrain Adjustments
Using the same pole length uphill and downhill reduces effectiveness.
- Do: Shorten for climbs and lengthen for descents
- Don’t: Leave poles at one fixed length
Using Only One Pole
One pole breaks symmetry and defeats the full-body benefit.
- Do: Always use both poles together
- Don’t: Treat them like a single walking stick
Real Benefits You’ll Notice

Reduced Joint Pain
Trekking poles reduce knee impact by 20 to 25%, especially on descents. For hikers with joint conditions like spinal stenosis, this can mean the difference between pain-free walking and having to stop entirely.
Pushing down on poles transfers load from legs to arms, similar to standing on a scale and pressing down on a broom to shift your weight reading.
Better Posture and Balance
Poles encourage an upright stance, reducing slouching and lower back strain. On uneven trails, they add three points of contact, making slips and falls less likely.
Increased Calorie Burn
By engaging triceps, lats, shoulders, and core, trekking poles turn walking into a full-body workout. Users burn up to 20% more calories without walking faster or farther.
Longer, Easier Hikes
With less leg fatigue and better balance, you’ll hike farther with less effort. Many beginners add one to two extra miles to their walks within weeks of using poles.
Final Tips for Lasting Success
Store and Maintain Properly
- Rinse poles after muddy or salty hikes.
- Check locks and tips before each use.
- Store collapsed to preserve shock absorbers if equipped.
Know When to Use Them
Poles are most helpful on:
- Steep trails
- Loose or slippery terrain
- Long-distance hikes
- Hard surfaces like pavement or packed dirt
They’re less necessary on short, flat walks, but still boost fitness.
Upgrade When Ready
Once you’re comfortable, consider:
- Carbon fiber poles for lighter weight
- Folding Z-poles for easier packing
- Snow baskets for winter hikes
For now, focus on mastering the basics.
Frequently Asked Questions About Trekking Poles for Beginners
What is the correct pole length for beginners?
The correct pole length creates a 90-degree elbow bend when your hand grips the handle and the pole tip rests on the ground. Most beginners need poles between 110 and 120 cm, though taller hikers may need up to 125 cm and shorter users may use 105 to 110 cm.
How do you use trekking pole straps correctly?
Slide your hand up through the strap from below, then grasp the handle so your wrist rests in the strap with your thumb and index finger just above the grip. This allows the strap to bear the load and reduces hand fatigue. Avoid gripping over the top of the strap, which can cause injury during falls.
Should I use one or two trekking poles?
Always use two poles for symmetrical movement and full-body engagement. A single pole breaks balance and limits the calorie-burning and joint-protecting benefits that make trekking poles effective.
Do trekking poles really help your knees?
Yes. Trekking poles reduce knee impact by 20 to 25%, especially on downhill sections. By transferring load from your legs to your arms, they absorb shock that would otherwise stress your joints, making them valuable for hikers with conditions like spinal stenosis.
Where should beginners practice using trekking poles?
Start on flat, smooth surfaces like pavement or sidewalks to focus on rhythm and form. Avoid bumpy or cracked terrain early on, since uneven ground disrupts timing. Once comfortable, progress to grass and then trails.
Are aluminum or carbon fiber poles better for beginners?
Aluminum poles are better for beginners because they’re affordable, durable, and reliable. Carbon fiber poles are lighter and stronger but more expensive and can snap under extreme bending. Start with aluminum and upgrade later if needed.
Key Takeaways for Mastering Trekking Poles
Learning how to use trekking poles for beginners comes down to three essentials: proper sizing, correct strap technique, and a natural cross-body rhythm. Set your poles so your elbow bends at 90 degrees, use the wrist strap to support weight rather than gripping tightly, and sync opposite arm with opposite leg for smooth, efficient movement.
Start practicing on flat pavement for 10 to 15 minutes a day, and adjust pole length for uphill and downhill terrain. Within a few weeks, you’ll notice less knee pain, better posture, and longer, more enjoyable hikes. Grab a pair of adjustable aluminum poles, head to a smooth sidewalk, and take your first steps toward confident, full-body hiking today.