
Building a teepee tent is a simple, rewarding project that creates a cozy play space for kids and a charming accent for any room. If you’re searching for how to make a teepee tent without sewing, this step-by-step guide delivers a sturdy, customizable design using basic materials and tools. Perfect for beginners, busy parents, or crafters on a budget, this no-sew method uses a canvas drop cloth and scrap wood to build a durable frame in just a few hours.
You’ll learn how to assemble the frame, attach the fabric securely, and personalize your teepee with paint and lights. Plus, you’ll get tips to prevent common issues like splaying legs or fabric tearing so your teepee lasts for years.
Prepare the Wood Stakes for a Safe, Sturdy Frame
Before assembling the frame, prepare your wood stakes for safety and stability. Use four 1×2-inch boards; any length works, but 6 to 7 feet is ideal for a child-sized teepee. Sand each board thoroughly with medium-grit sandpaper to remove splinters and rough edges. This step is essential, especially for children’s furniture.
Drill the Top Holes Correctly
Mark a point 8 inches from one end of each board. Drill a 5/16-inch hole centered across the width at this mark. This hole will anchor the rope that ties the frame together at the top. After drilling, sand the area around each hole again to smooth any new rough spots. Clean, splinter-free wood ensures safe handling during play and setup.
Assemble the Frame with Rope
With the stakes prepped, it’s time to connect them into a stable pyramid shape. The rope acts as both a fastener and a structural brace, so use a strong, weather-resistant type like cotton or nylon.
Thread and Tie the First Stake
Start by threading one end of the rope through the hole in the first stake. Pull about 6 to 8 inches through and tie a secure knot to anchor it. This knot will serve as the base for threading the remaining stakes. Make sure it is tight and will not slip during assembly.
Connect All Four Stakes
Feed the free end of the rope through the top holes of the next three stakes in sequence. Keep the rope taut as you go. Once all four stakes are threaded, stand them upright in a teepee formation, fanning them into a balanced pyramid. Adjust the base spacing so the structure stands evenly on the floor.
Wrap and Lock the Top
Begin wrapping the rope tightly around each stake just below the hole, working from the bottom of the knot upward. Wrap 3 to 4 times per stake to lock it in place. After securing each stake individually, wrap the rope around the entire bundle at the peak 5 to 6 times. Finish with a double knot to prevent loosening. This multi-layer wrapping ensures the frame stays rigid during use.
Prevent Splaying with an Optional Bottom Tie
For extra stability, especially if kids will climb or lean on the tent, drill a second hole 4 to 5 inches from the bottom of each stake. After assembly, thread the rope through these lower holes before tying off. This creates a tension ring that stops the legs from spreading apart over time.
Attach the Canvas Drop Cloth

Now that the frame is solid, it’s time to drape and secure the fabric. A 6×9-foot canvas drop cloth is ideal because it is pre-hemmed, seamless, and soft, eliminating the need for sewing. Choose a light or medium weight canvas for easy handling.
Drape the Fabric Evenly
Lift the canvas and drape it over the frame, letting it hang naturally. Position it so the front opening is centered and symmetrical. Pull the top edge taut toward the peak to avoid sagging. The 9-foot length provides enough coverage to reach the floor, while the 6-foot width wraps partially around the sides.
Secure the Top Edge with Staples
At the peak, staple the canvas directly to the rope where it crosses. Use a staple gun to attach one staple on each side of the rope, then add three more evenly spaced along the top 6 to 8 inches. This prevents the fabric from slipping and distributes tension. If you don’t have a staple gun, a hot glue gun with heavy-duty glue sticks can work in a pinch. Just apply glue in small beads and press firmly.
Reinforce the Front Opening
At each side of the front flap, staple the canvas 6 inches from the bottom and again 12 inches above that, about 18 inches total apart. These anchor points prevent tearing when the tent is used daily. Avoid stapling too close to the edge. Leave at least 1 inch of margin for durability.
Finish the Bottom Edge
Tuck the excess canvas at the base into the loop formed by the rope at the bottom, if you added lower holes. This creates a clean, polished look and hides raw edges. It also allows you to slip a blanket or rug underneath for added comfort. For outdoor use, weigh down the base with small sandbags or tie-downs.
Decorate the Teepee for a Personal Touch
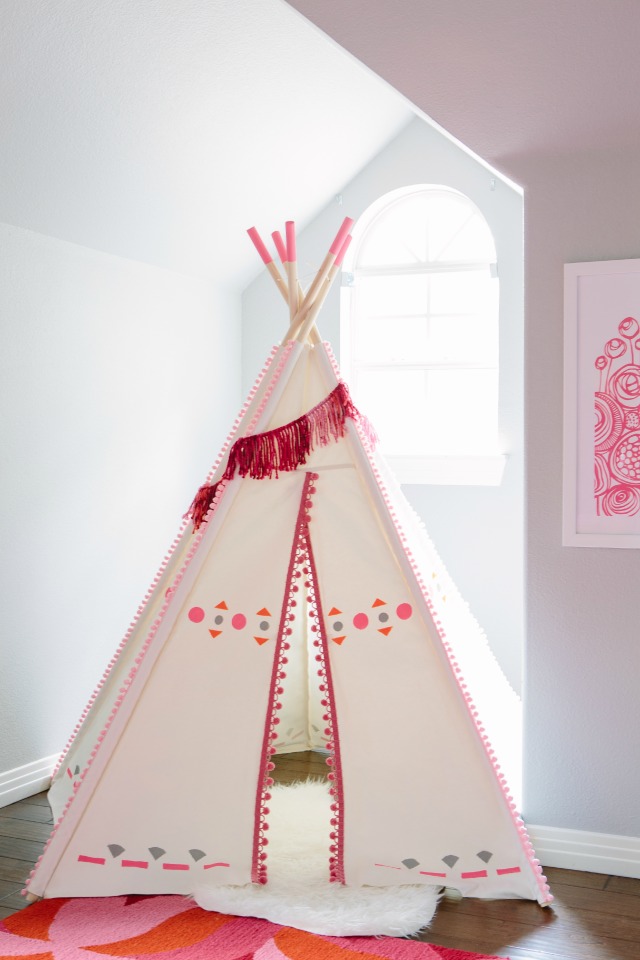
Once assembled, personalize your teepee to match a child’s room or play theme. Since the canvas is paint-ready, customization is easy and fun.
Use Sponge Triangle Stamps
Cut a dish sponge into triangle shapes, about 1.5 to 2 inches wide. Dip one flat side into acrylic paint and dab it onto the canvas in repeating patterns. This creates a tribal or geometric design with texture. Work in sections and let each dry before moving to the next. One hour is usually enough for full drying.
Try Other Design Ideas
- Floral patterns: Use stencils and contrasting paint for a whimsical, feminine look
- Accent colors: Add stripes or borders along the edges
- Fairy lights: Weave battery-operated string lights through the top rope for a magical nighttime glow
- Wall art: Hang small dreamcatchers or fabric banners inside
Ensure Long-Term Durability
A well-built teepee can last for years with proper care. The canvas is both soft and sturdy, designed to handle daily play. If stains occur, the fabric can be spot-cleaned or even bleached lightly without damage. Avoid machine washing, as this can weaken fibers.
Prevent Fabric Tears
Strategic stapling is key. Always pull the canvas taut before fastening, and never skip the mid-height staples on the front opening. If the fabric starts to pull, add a few more staples or reinforce with fabric glue behind the tear point.
Maintain Smooth Wood
Check the stakes periodically for splinters, especially after moving or disassembling. Lightly sand any rough areas that develop. If used outdoors, consider sealing the wood with a non-toxic sealant to protect against moisture.
Disassemble and Store Easily
One of the biggest advantages of this design is portability. To take down the teepee, simply untie the rope knot at the top and slide the stakes apart. Remove the canvas and store it folded in a dry place. The entire kit, including wood, rope, and fabric, can fit in a closet or under a bed. Reassemble it seasonally or when moving rooms.
Reuse Materials for an Eco-Friendly Build
This project is eco-conscious by design. Use leftover wood scraps and repurpose an old drop cloth. If you ever retire the teepee, the canvas can become a furniture cover, art backdrop, or curtain. This maximizes value and reduces waste.
Customize for Any Space
The beauty of this teepee is its adaptability. Scale it up with longer stakes and a larger canvas for outdoor use, or scale it down for toddlers. Use colored canvas for instant style, or leave it natural for a minimalist look. Place it in a nursery, bedroom, or playroom. It works as a reading nook, hideout, or imaginative play zone.
Ideal for Beginners and Busy Parents
No sewing, no power tools beyond a drill, and no prior experience needed. The entire build takes 2 to 3 hours, making it perfect for a weekend project. Busy parents will appreciate the low cost and high impact.
Troubleshoot Common Issues
Even simple builds can hit snags. Here’s how to fix them fast.
Frame Wobbles or Splays
If the legs spread apart, check the rope tension. Retie the top knot and re-wrap each stake tightly. Add the optional bottom holes and thread the rope through them to lock the base. Place the teepee on a non-slip surface like a rug to prevent sliding.
Fabric Sags or Pulls
Sagging means the canvas isn’t taut. Remove a few staples and re-pull the fabric before re-securing. If the top edge droops, add an extra staple at the peak. For recurring pulls, reinforce with fabric glue behind the staple line.
Staples Come Loose
Over time, staples may loosen due to movement. Replace them as needed with fresh ones. For heavier fabric, use wider crown staples or add washers for extra grip.
Frequently Asked Questions About Making a Teepee Tent
What materials do I need to make a teepee tent without sewing?
You need four 1×2-inch wood boards, a 6×9-foot canvas drop cloth, strong rope, staples, medium-grit sandpaper, and a drill with a 5/16-inch bit. A hot glue gun can replace the staple gun if needed.
How long does it take to build a DIY teepee tent?
The entire project takes about 2 to 3 hours from start to finish. This includes preparing the wood, assembling the frame, attaching the canvas, and decorating.
Can I make a teepee tent for outdoor use?
Yes, you can scale up the design with longer stakes and a larger canvas. Weigh down the base with sandbags and consider sealing the wood with a non-toxic sealant to protect against moisture.
How do I prevent the teepee frame from splaying?
Drill a second hole 4 to 5 inches from the bottom of each stake and thread the rope through these lower holes. This creates a tension ring that keeps the legs from spreading during play.
What type of canvas works best for a no-sew teepee?
A 6×9-foot canvas drop cloth works best. It should be seamless, pre-hemmed, and made of light or medium weight canvas for easy handling and durability.
How do I clean a canvas teepee if it gets stained?
Spot-clean the fabric with mild soap and water. For tougher stains, the canvas can be lightly bleached without damage. Avoid machine washing, which can weaken the fibers.
Key Takeaways for Your DIY Teepee Tent
This no-sew teepee tent is more than a craft. It’s a functional, customizable space that sparks imagination and lasts for years. By following these steps, you can create a safe, durable hideout using affordable, reusable materials. For best results, use quality canvas, sand wood thoroughly, and secure all fastenings tightly.
Whether used for play, reading, or decoration, your DIY teepee adds charm and creativity to any room. Now, grab some fairy lights and a good book. Adventure awaits inside.