
Picture this: you’re miles from the trailhead when a sudden storm rolls in. Your pack holds only the basics, no tent, just a tarp. What do you do? You make a tent using a tarp. This simple piece of waterproof fabric, when properly rigged, becomes a reliable shelter that handles wind, rain, and cold. Whether you’re a backpacker, survivalist, or weekend camper, learning how to make a tent using a tarp is a fundamental outdoor skill.
A tarp shelter is lightweight, versatile, and fast to set up, sometimes in under a minute. With a few stakes, a pole or trekking poles, and some cordage, you can create dozens of shelter configurations. From a fully enclosed tipi to a minimalist lean-to, each design serves a specific need. This guide breaks down the most effective methods, tools, and pro tips so you can confidently build a durable, weatherproof shelter anywhere, without a tent.
Choose the Right Tarp and Gear
Pick the Best Tarp Size and Shape
For most solo or duo camping setups, a 10×10 foot (3×3 meter) square tarp is ideal. Its symmetry allows for multiple configurations, especially freestanding designs like the tipi. Rectangular tarps work for lean-tos and A-frames but limit flexibility. Look for tarps with reinforced stitching at corners and center loops, plus 16 or more attachment points around the edges. These loops let you fine-tune tension and adapt to terrain.
Use Trekking Poles or Natural Sticks
You don’t need expensive gear. A single 5-foot trekking pole or sturdy stick supports a tipi shelter. For A-frames or ridge lines, two poles or trees work well. Trekking poles are ideal because they double as hiking aids and shelter supports. If using a natural stick, round the top end and wrap it in cloth or a sock to prevent puncturing the tarp.
Gather Essential Accessories
You will need:
– 6 to 8 stakes (aluminum or titanium for backpacking)
– Paracord or reflective guy lines (30 to 50 feet total)
– Optional: fabric sleeves, duct tape, an extra tarp for a rain fly layer
Stakes anchor corners and edges. Guy lines stabilize ridgelines. In soft ground, use deadman anchors (buried sticks) or rock weights if stakes fail.
Select the Best Campsite
Find Flat, Slightly Sloped Ground
Choose a flat, dry area with natural drainage. A slight downhill slope helps rainwater run away. Avoid low spots where water pools. Clear rocks, sticks, and sharp vegetation to protect both you and the tarp.
Use Natural Windbreaks
Position your shelter behind trees, boulders, or terrain ridges to block wind. Avoid setting up under dead branches or near loose rocks. If no natural cover exists, orient the shelter’s closed end into the wind.
Check Tree and Anchor Availability
Some designs need two trees 8 to 10 feet apart (A-frame, lean-to). Others, like the tipi, require no trees at all. Know your design’s needs before committing to a spot. If trees are scarce, use poles, rocks, or snow anchors.
Build a Fully Enclosed Tipi Shelter
Lay the Tarp Flat and Identify Loops
Start with the tarp on the ground. Identify the four corners and center loops on each side. A true square tarp ensures even tension. Place stakes at the two back corners and back center loop to anchor the base.
Pull Front Corners to Form a Triangle
Take the front right corner and pull it straight toward the back center stake. Stake it down. This creates a taut triangle, the foundation of the roof. Repeat with the front center loop, aligning it with the back center to form a straight ridge.
Insert the Center Pole to Raise the Peak
Slide a 5-foot pole or stick under the tarp through the center. Lift it vertically until the peak rises. Rest the base on the ground. Wrap the top in cloth or a fabric sleeve to avoid tearing. The pole holds the structure upright without trees.
Secure the Door and Seal Gaps
Bring the front left corner over to the front stake and drape it down to form a flap door. From inside, pull it closed for privacy and weather protection. Leave small gaps at the base for airflow, or seal them with dirt, leaves, or fabric in cold or wet conditions.
Pro Tip: In snow, pack snow around the base for insulation. In wind, add extra guy lines from side loops to stakes.
Set Up a Quick Lean-To Shelter
Tie a Ridge Line Between Two Trees
Find two trees 8 to 10 feet apart. Tie a strong cord 4 to 5 feet high between them. This is your ridge line. Ensure it is tight to prevent sagging under rain.
Drape the Tarp and Stake the Corners
Throw the tarp over the line so the middle rests on the cord. Pull the two bottom corners away from the shelter and stake them firmly. Angle the tarp at 45 to 60 degrees for optimal rain runoff.
Add Upright Sticks for Headroom
For extra height, place two sticks under the front corners. This lifts the entrance and improves visibility. Use Y-shaped branches to hold the tarp securely.
Best for: Fast sun or rain shelter. Takes under 5 minutes. Ideal for beginners.
Create a One-Tree Plough-Point Shelter
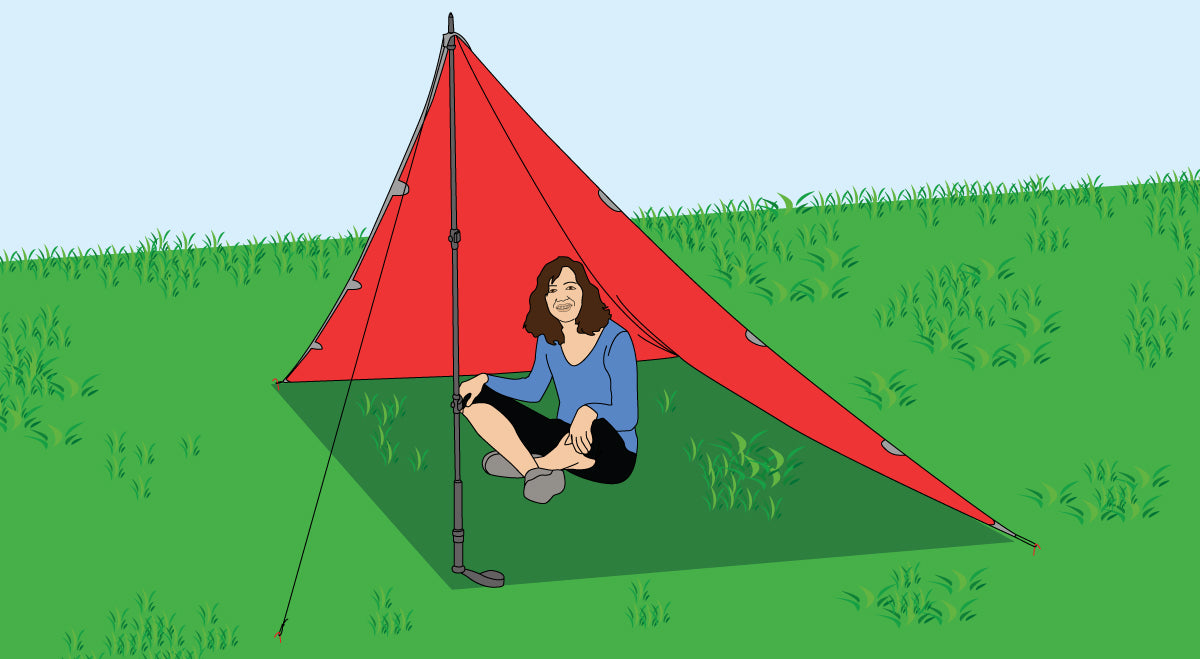
Stake the Far Tip and Attach a Ridge Line
Lay the tarp in a diamond shape, with one tip pointing toward a tree. Stake the far tip into the ground. Tie a guy line to the tree at 45 degrees, about 5 feet high.
Attach the Top Corners to the Ridge Line
Pull the two side corners up to the ridge line. Use guy lines or clips to secure them. The tarp now forms a steep, triangular roof.
Stake the Remaining Corners
Pull the two bottom corners outward and stake them. This creates a wind-resistant, rain-shedding wedge with good overhead coverage.
Advantage: Needs only one tree. Great for solo hikers.
Use the 20-Second Emergency Setup
Anchor the Corners with Stakes or Rocks
Lay the tarp flat. Stake all four corners quickly using stakes, heavy rocks, or logs. This creates a groundsheet and base.
Hang the Tarp on a Pre-Set Ridge Line
Tie a cord between two trees at 6 to 7 feet high. Drape the tarp’s top edge over it. Adjust so the tarp slopes forward for drainage.
Pull the Front Down and Stake It
Grab the bottom edge and pull it forward. Stake it down to form a lean-to. In seconds, you have a wind- and rain-deflecting shelter.
Perfect for: Sudden storms, survival scenarios, or when energy is low.
Compare Top Shelter Designs

Tipi vs. Lean-To vs. Plough-Point
| Design | Best For | Setup Time | Gear Needed | Protection Level |
|---|---|---|---|---|
| Tipi (10×10 tarp) | Full weather protection, freestanding | 5 to 7 min | 1 pole, 6 to 8 stakes | 360° |
| Lean-To | Fast shelter, one side open | 3 to 5 min | 2 trees, 4 stakes | One side |
| Plough-Point | One-tree setup, rain runoff | 4 to 6 min | 1 tree, 4 stakes | Two sides |
The tipi offers the most protection. The lean-to is fastest. The plough-point balances speed and coverage with minimal anchors.
Fix Common Tarp Shelter Problems

Prevent Sagging and Water Pooling
Sagging leads to water pooling, which can collapse your shelter. Fix it by tightening guy lines and ensuring the ridge line is taut. Slope the tarp at least 20 to 30 degrees so rain runs off. Dig diversion trenches if needed.
Stop Wind Flapping and Fabric Damage
Flapping wears out fabric and disrupts sleep. Add extra stakes to all available loops. Use guy lines on side corners to increase tension. In high winds, lower the profile or switch to a half-cone or C-fly wedge design.
Avoid Pole-Induced Tarp Tears
Unprotected pole tips puncture tarps. Always pad the top with a sock, duct tape, or commercial cap. Round the stick’s tip with a knife before use. Inspect the tarp regularly for small tears and patch them immediately.
Maintain and Store Your Tarp
Dry and Clean After Every Use
Never pack a wet tarp. Hang it to dry completely before storing. Clean with mild soap and water if dirty. Avoid harsh detergents that degrade coatings.
Repair Tears Promptly
Use a repair kit with patches and adhesive. For field fixes, duct tape works temporarily. Seal holes before they grow. Reinforce worn loops with tenacious tape or fabric glue.
Store Loosely in a Dry Place
Do not compress the tarp long-term. Store it loosely in a mesh sack or hang it up. Keep it away from direct sunlight and moisture to prevent mold and UV damage.
Frequently Asked Questions About Tarp Shelters
What size tarp do I need for a two-person shelter?
A 10×10 foot square tarp works well for solo or duo camping. It allows for multiple configurations, including the fully enclosed tipi. For group shelters or larger setups, consider a tarp measuring 360 x 280 cm (about 11.8 x 9.2 feet).
Can I set up a tarp shelter without trees?
Yes. The tipi shelter uses a single 5-foot pole and requires no trees at all. It is fully freestanding and provides 360-degree protection. The plough-point design needs only one tree, while the Holden tent requires just one pole and four stakes.
How do I keep my tarp from sagging in the rain?
Keep guy lines tight and ensure the ridge line is taut. Angle the tarp at least 20 to 30 degrees so water runs off instead of pooling. Avoid low spots where water collects, and dig trenches if the ground lacks natural slope.
What is the fastest tarp shelter to set up?
The streamlined emergency setup can be deployed in under 20 seconds using a pre-set ridge line between two trees. For a standalone setup without trees, the basic lean-to takes 3 to 5 minutes and requires only stakes and a cord.
How do I prevent my tarp from tearing at the pole contact point?
Always pad the top of any pole or stick with a sock, cloth, or fabric sleeve. Round off sharp tips with a knife before use. Inspect the tarp after every setup and patch small tears immediately with repair tape or adhesive patches.
Do I need special stakes for tarp shelters?
Standard aluminum or titanium stakes work well for most ground conditions. For hard ground, use metal stakes. In soft soil or sand, use deadman anchors (buried sticks) or snow stakes in snow conditions. Always carry at least 6 to 8 stakes for flexibility.
Key Takeaways for Tarp Shelter Mastery
Learning how to make a tent using a tarp is more than a camping trick; it is a survival essential. Start with the basic lean-to to build confidence, then progress to the plough-point for one-tree setups. The tipi shelter stands out as the best all-around design: freestanding, fully enclosed, and quick to build with minimal materials.
Practice your setups at home before hitting the trail. Time yourself, learn your knots, and memorize which design fits which condition. With repetition, you will be able to rig a reliable shelter in minutes, no matter the weather.
Your next step: gather your tarp, stakes, and cordage, then practice the basic lean-to in your backyard this weekend. Once you master it, move on to the tipi. The skills you build now could be the ones that save your night in the wild.