
A torn tent mesh can turn a dream trip into a bug-filled nightmare in seconds. Whether a branch snagged your bug screen or a headlamp melted through the fabric overnight, learning how to repair tent mesh is a skill that pays for itself. Most fixes take under 30 minutes and cost less than $15, using tools you probably already own.
This guide walks you through five proven repair methods backed by real camper experiences. You will learn how to choose the right technique for your damage, avoid common failures, and make repairs that last for years.
Spot the Damage Before You Patch
Identify What You Are Dealing With
Different damage types call for different fixes. Hold a flashlight behind the mesh and inspect both sides to catch small issues before they spread.
- Punctures: Sharp sticks, gear zippers, or tent pole ends
- Tears and rips: Stretching, pets, or accidental pulls
- Melt-throughs: Bright headlamps or candles burning the mesh
- Snags: Branches or Velcro catching during setup
- Animal damage: Birds like Kea in alpine areas, or dogs
Decide If Repair Makes Sense
Ask yourself these questions before grabbing your patch kit:
- Is the tear near a seam or high-stress area?
- Is the surrounding mesh brittle, faded, or frayed?
- How many damaged spots exist on the tent?
A 2-inch tear in an open panel away from seams is almost always worth fixing. If you see multiple large rips or the entire mesh feels crunchy and brittle, replacement may be smarter.
Choose the Right Repair Method
Compare Your Repair Choices
| Method | Best For | Difficulty | Durability |
|---|---|---|---|
| MSR self-adhesive patches | Holes, burns, large tears | Easy | Years |
| Tenacious Tape mesh patches | Small tears, screen doors | Easy | Months and beyond |
| General repair tape | Rips in open panels | Easy | Weather-resistant |
| Sewing plus silicone | High-stress or pet-prone areas | Moderate | Stronger than original |
| Cuben Tape | Field fixes, no-sew repairs | Easy | Long-lasting |
Your choice depends on tools available, trip timing, and how much stress the repair will face.
Fix Holes With MSR Self-Adhesive Patches
Prepare the Damaged Area
- Trim all melted or frayed edges with scissors
- Cut the hole into a clean circle to reduce stress points
- Do not worry if the hole grows slightly larger
Rounded shapes hold far better than jagged or square cuts.
Clean Before You Stick
- Wipe both sides of the mesh with rubbing alcohol and a cloth
- Let it air dry for 1 to 2 minutes
Skipping this step is the fastest way to ruin a patch. Even invisible oils from your fingers weaken adhesion.
Patch Large Holes From the Outside
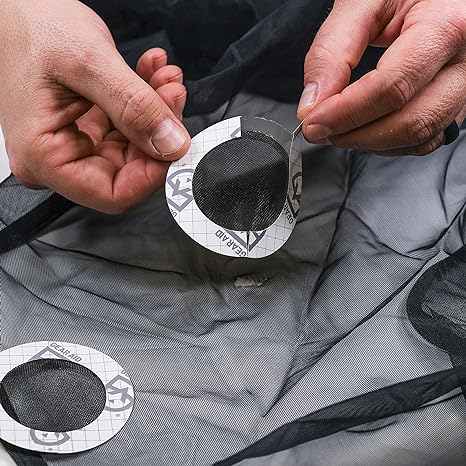
- Peel the backing slowly from a 3-inch MSR patch
- Start at one edge, press onto the mesh, and smooth as you go
- Rub in a circular motion with your fingernail for full contact
Seal the Backside
The adhesive will show through inside the tent:
- Apply a second patch to the inside, covering the sticky area
- Smooth carefully to push out air bubbles
- Rub thoroughly to lock in the bond
This double-sided approach prevents dust buildup and keeps the interior clean.
Patch Small Tears With Tenacious Tape

Why This Works in the Field
Tenacious Tape offers 3-inch mesh rounds with peel-and-stick simplicity:
- No tools required
- Clear PVC adhesive with mesh overlay
- Maintains airflow after application
Apply in Seconds
- Position the patch over the tear
- Peel and stick, starting from one edge
- Smooth air bubbles with your finger
Ideal Uses
- Tent screen doors
- Backpack mesh pockets
- No-see-um netting on bug shelters
This option is perfect for backpackers who need lightweight, reliable trail fixes.
Use General Repair Tape for Open Panels
Cut the Right Size Patch
- Measure the tear
- Cut a patch 1 inch larger on all sides (a 2-inch tear needs a 4-inch square)
- Round all corners to prevent peeling
Use high-adhesion, waterproof tape designed for tents or ripstop nylon.
Apply From the Inside
- Flip the tent inside out
- Place the patch over the tear from the interior side
- Smooth it down evenly
Inside application keeps the exterior snag-free and preserves airflow.
Press and Cure
- Press firmly with your hand or a clean roller
- Focus extra attention on the edges
- Wait 15 to 30 minutes before exposing to wind or moisture
Sew and Reinforce With Silicone
Basic Sewing Repair
For precise control or valuable gear:
- Thread a fine needle with nylon or polyester thread
- Stitch the tear closed using a whipstitch or backstitch
- Keep stitches tight and close together
Sewing restores structural integrity better than tape alone.
Strengthen With Silicone Sealant
Sewn mesh can still pull apart at the repair site. To prevent this:
- Apply Silnet or clear silicone over the stitches
- Cover about ¼ inch of mesh on both sides of the seam
- Repeat on the inside and outside
- Let dry completely for several hours
The result is a repair that is stronger than the original mesh.
Try Cuben Tape for No-Sew Fixes
Strong Alternative to Sewing
Cuben Tape is ultralight, durable, and ideal for field repairs:
- One camper used it after a Kea bird ripped a tent in New Zealand
- The repair held strong with no signs of lifting after extended use
- No sewing or glue required
Apply Like Duct Tape
- Cut a piece slightly larger than the tear
- Peel and stick over the damaged area
- Smooth thoroughly, especially at the edges
Great for hikers who avoid carrying needles or liquid adhesives.
Avoid Common Repair Failures
Fix Poor Adhesion
Problem: Patch peels off within hours
Cause: Dirty or damp surface
Solution: Clean with rubbing alcohol and let dry fully before applying
Stop Patches Peeling at the Corners
Problem: Edges lift after a few uses
Cause: Sharp corners create stress points
Solution: Always round patch corners before application
Prevent Mesh Separation After Sewing
Problem: Netting pulls apart around stitches
Cause: Missing reinforcement
Solution: Seal stitches with silicone on both sides
Pick the Best Patch for Your Needs
MSR Repair Mesh Kit
- Cost: $7 official, $14 on Amazon
- Patches: 4 per kit, 3-inch diameter
- Best for: Large holes and melt-throughs
- Durability: Lasts years, resists cracking
Tenacious Tape Mesh Patches
- Cost: $8.95
- Patches: 2 per kit, 3-inch rounds
- Best for: Small rips and screen doors
- Portability: Ultralight, no tools needed
Cuben Tape
- Durability: Long-lasting and weather-resistant
- Best for: Field repairs and no-sew users
- Pro tip: Carry a small strip in your emergency kit
Follow Best Practices for Lasting Results
- Always clean the surface with rubbing alcohol before any adhesive application
- Trim and round edges to cut away frayed threads
- Overlap generously so patches extend at least 1 inch beyond damage
- Apply on both sides when using adhesive patches
- Let it cure for 15 to 30 minutes before use
Repair Common Camping Scenarios
Melt-Through From a Headlamp
- Fix: MSR self-adhesive patches on both sides
- Time: Under 10 minutes for a full seal
2-Inch Tear in a Side Panel
- Fix: General repair tape applied from inside
- Tip: Cut a 4-inch square and round the corners
Pet-Caused Small Rips
- Fix: Sew and reinforce with silicone
- Why: Strongest long-term solution for repeated stress
Animal Damage From Kea or Birds
- Fix: Cuben Tape
- Why: Fast, durable, and needs no tools
Know When Replacement Makes More Sense
Repair is not always the answer. Consider a new tent if:
- Mesh is brittle or heavily discolored
- Multiple large tears sit near seams
- The frame or rainfly is also damaged
- Repair costs exceed 50 percent of a new tent’s price
For isolated damage, repair is almost always faster and cheaper.
Pack a Mesh Repair Kit
Essential Items to Carry
- MSR Repair Mesh Kit or Tenacious Tape
- Small scissors
- Rubbing alcohol wipes
- Fine needle and polyester thread
- Small tube of silicone sealant
- Cuben Tape strip as backup
Store everything in a ziplock bag inside your tent stuff sack.
Why It Is Worth It
- A $7 kit can save a $200 tent
- Prevents ruined trips from small accidents
- Takes less space than a toothbrush
Frequently Asked Questions About Tent Mesh Repair
Can I repair tent mesh without sewing?
Yes. Self-adhesive patches like MSR or Tenacious Tape work well for most holes and tears. Cuben Tape also offers a strong no-sew option for field repairs.
How long do mesh patches last?
MSR patches can hold up for years without peeling or cracking. General repair tape typically lasts many months, even through washing and drying cycles.
What is the best tape for tent mesh repair?
For large holes, MSR self-adhesive patches are the top choice. For small rips and screen doors, Tenacious Tape mesh patches offer a quick, tool-free fix.
Should I patch from the inside or outside of the tent?
It depends on the method. MSR patches go on the outside first, with a second patch sealing the inside. General repair tape works best applied from the inside to keep the exterior snag-free.
How do I fix a hole melted by a headlamp?
Trim the melted edges into a clean shape, clean with rubbing alcohol, and apply MSR patches to both sides of the mesh. The full repair takes under 10 minutes.
When should I replace a tent instead of repairing the mesh?
Replace the tent if the mesh is brittle, if multiple large tears exist near seams, or if repair costs exceed half the price of a new tent.
Key Takeaways for Repairing Tent Mesh
A torn tent mesh does not have to end your trip. With the right supplies and a few minutes of work, most damage is fixable on-site or at home. Always clean the surface before patching, round your patch corners, and apply adhesive patches to both sides for the strongest seal. Keep a small repair kit in your gear so you are ready the moment trouble strikes.
Pack a $7 MSR kit before your next trip and you will never lose a tent to a stick, a spark, or a curious pet again.