
Struggling with steep climbs or sore knees often means you need to learn how to use Leki trekking poles correctly for maximum efficiency. These German-engineered tools shift weight to your upper body, but only if you assemble and adjust them properly.
This guide details exact steps for ELD folding systems, Flick Lock telescopic models, and terrain-specific length adjustments. You will master strap placement, the Shark Trigger mechanism, and maintenance routines to ensure safety on every hike.
Assemble Your Leki Poles Correctly Before Hiking

Proper assembly prevents equipment failure and ensures your safety on the trail. Leki offers two main systems: the Elastic Locking Device (ELD) for folding poles and the Flick Lock for telescopic models.
Deploy ELD Folding Poles Safely
The ELD system found on Ultratrail and Vario series poles requires a specific straight pulling motion.
- Hold the lower segment firmly with one hand.
- Pull the upper sections upward in a perfectly straight line.
- Listen for a distinct click that confirms the internal cord is locked.
- Visually inspect joints to ensure no sections feel loose before hiking.
Critical Safety Note: Never bend carbon fiber poles sideways during assembly as they can snap under lateral stress. Always pull straight up to engage the lock mechanism safely.
Engage Telescopic Flick Lock Mechanisms
Telescopic models like the Leki Vario use a silver tab system to secure shaft length and tension.
- Hold the pole vertically with the tip pointing toward the ground.
- G jiggle the pole up and down to help internal segments align naturally.
- Grip the handle and lower shaft, then pull firmly in opposite directions.
- Confirm the lock by checking that the silver tab rises slightly.
If the pole resists extension, do not force it. Let gravity assist the alignment process before applying firm tension to lock the sections together securely.
Disassemble Poles for Compact Storage
Break down your gear correctly after every hike to maintain internal mechanisms.
- Press the ELD lever until you hear a release click for folding models.
- Push the silver tab inward to release tension on telescopic shafts.
- Fold sections together neatly and store them in a protective case.
- Keep storage areas dry to prevent corrosion on metal locking parts.
Adjust Pole Length for Your Height and Terrain

Incorrect pole length causes wrist strain and reduces propulsion power significantly. You must size your poles precisely for your body and the specific gradient you are hiking.
Find Your Ideal Flat Ground Length
Start with a baseline measurement on level ground before tackling hills.
- Stand upright with the pole tip placed just in front of your foot.
- Adjust the shaft until your elbow forms a precise 90-degree angle.
- Ensure your forearm remains parallel to the ground in this position.
- Use the centimeter markings on the shaft to record your standard length.
A hiker who is 130 cm tall typically requires a pole length of 130 cm. Match your specific height to these measurements for optimal ergonomic benefit.
Modify Length for Uphill Climbs
Shortening your poles allows you to maintain proper biomechanics while leaning forward.
- Flip the Speed Lock lever up to release the shaft tension.
- Shorten the pole by 5 to 10 cm depending on the steepness.
- Lock the lever down firmly before applying weight to the pole.
- Keep your arm angle at 90 degrees while leaning into the climb.
This adjustment engages your triceps and shoulders to drive your body upward efficiently.
Extend Poles for Downhill Control
Lengthening your poles on descents shifts your center of gravity backward effectively.
- Extend the poles to their maximum or near-maximum length.
- Plant both poles in front of you to create a stable braking platform.
- Step through the poles to transfer impact from knees to arms.
- Maintain a straight arm position to absorb shock effectively.
Studies show this technique reduces downhill knee load by up to 25 percent during long descents.
Use the Correct Strap Technique for Power

Leki straps transfer force through your arms rather than your hands to prevent fatigue. Proper usage is essential for long-distance comfort and carpal tunnel prevention.
Wear Straps the Right Way
Incorrect strap placement leads to poor power transfer and hand cramping quickly.
- Slide your hand up through the strap from underneath the loop.
- Let the strap rest securely between your thumb and index finger.
- Rotate your hand down to grip the handle loosely without squeezing.
- Pull down on the strap to propel yourself forward instead of gripping.
This method allows you to relax your grip while maintaining full control over the pole.
Adjust Strap Fit for Hand Size
Leki straps feature adjustable loops to accommodate various hand sizes comfortably.
- Pull up on the center strap loop to loosen the fit.
- Pull down on the lower strap near the shaft to tighten it.
- Ensure the strap sits snugly against your wrist without cutting circulation.
- Test the fit by pulling down hard to verify secure force transfer.
These adjustments make Leki poles suitable for users with both small and large hands.
Master the Shark Trigger System
High-performance Ultratrail models use a glove-integrated loop called the Shark Trigger.
- Attach the glove loop to the pole connector until it clicks firmly.
- Hike without gripping the handle by pulling down with your arm.
- Press the trigger release to disengage quickly during transitions.
- Apply a drop of 3-in-1 oil to the connector occasionally for smooth operation.
This system eliminates the need to grip the handle entirely during intense climbing sections.
Adapt Technique to the Terrain You Hike
Your planting rhythm and pole position must change based on the trail gradient. Mastering these variations improves efficiency and reduces overall fatigue.
Hike Flat Trails Efficiently
Maintain a natural walking rhythm when traversing level ground sections.
- Keep pole tips slightly ahead of your feet at all times.
- Use contralateral movement by moving left pole with right foot.
- Focus your eyes forward using peripheral vision for pole placement.
- Maintain the standard 90-degree elbow angle for consistent pacing.
This rhythm helps maintain cadence and reduces leg fatigue over long distances.
Power Up Steep Inclines
Aggressive climbing requires specific planting techniques to maximize upward drive.
- Shorten poles to ensure optimal arm angle when leaning forward.
- Plant the tip just behind your heel for maximum pushing power.
- Drive through your arms by engaging shoulders and triceps fully.
- Use double poling on very steep sections to surge upward effectively.
Double poling can cut perceived effort by 20 percent on sustained steep climbs.
Control Downhill Descent
Use your poles as a braking system to protect your lower body joints.
- Extend poles to maximum length to create a stable front brace.
- Plant both poles simultaneously before stepping forward through them.
- Let your arms absorb the impact force instead of your knees.
- Maintain a wide stance for added stability on technical terrain.
This technique is crucial for preserving leg strength during ultra-endurance events.
Deploy and Stow Poles While Running
Trail runners need quick access to poles for steep sections without losing momentum. Proper quiver management ensures smooth transitions.
Set Up Your Quiver Correctly
Mount your storage system vertically to prevent interference with gear pockets.
- Ensure drainage holes are clear to avoid water buildup inside.
- Check that the interior surface is smooth for snag-free insertion.
- Position the quiver so poles do not overlap with main vest pockets.
- Test deployment speed before starting your run to verify access.
A well-mounted quiver saves valuable time during race transitions.
Execute Fast Deployment Techniques
Practice your deployment sequence until it becomes second nature automatically.
- Unlock the trigger mechanism on your vest quiver quickly.
- Pull poles out together and release any retaining clips.
- Click the Shark Trigger or grip securely to engage the pole.
- Adjust length immediately for the upcoming climb or descent.
Smooth deployment saves energy and keeps your heart rate stable during efforts.
Stow Poles Efficiently After Use
Secure your poles quickly when transitioning back to running without poles.
- Disengage from gloves or release your grip on the handle.
- Press the release tab and fold telescopic sections upward tightly.
- Align poles straight with the quiver opening to avoid jamming.
- Push down firmly until the quiver trigger locks them in place.
Stow poles before flat sections to avoid unnecessary weight while running.
Maintain Poles for Longevity and Performance
Regular maintenance extends the life of your equipment and ensures reliable performance. Leki offers a lifetime warranty on defects, but proper care is your responsibility.
Clean After Every Hike
Remove dirt and debris to prevent corrosion and mechanical failure.
- Rinse shafts with water to remove mud, grit, and salt residue.
- Dry all locks and hinges thoroughly to prevent rust formation.
- Wipe straps with a damp cloth to remove sweat and dirt buildup.
- Inspect tips for embedded stones that could damage the carbide.
Never submerge poles completely as water can damage internal elastic cords.
Lubricate Moving Parts
Keep mechanical systems functioning smoothly with occasional lubrication.
- Apply a drop of 3-in-1 oil to the Shark Trigger connector.
- Lubricate the Flick Lock silver tab and internal spring mechanism.
- Focus on cold weather preparation to prevent stiff operation.
- Wipe away excess oil to avoid attracting more dirt and grit.
Proper lubrication ensures smooth deployment even in freezing conditions.
Ins Regularly for Wear and Damage
Check critical components before every major hike or race event.
- Verify the Flick Lock tab rises when locked securely.
- Examine the ELD elastic cord for fraying or loss of tension.
- Replace carbide tips if they appear smooth or bent.
- Ensure baskets are secure and free from cracks or deformation.
A pole that clicks but wobbles indicates a damaged cord and should not be used.
Use Baskets and Tips Properly
Small components like baskets and tips significantly impact traction and stability. Choosing the right configuration for your terrain is essential.
Choose the Right Basket Size
Baskets prevent sinking in soft ground but hinder performance on hard trails.
- Use large snow baskets for snow, mud, or sandy conditions.
- Remove baskets on hard rock or dry paths to improve grip.
- Swap baskets before hitting snowy trails to ensure immediate traction.
- Check that baskets are seated tightly against the tip collar.
Leaving baskets on hard trails traps debris and reduces tip contact with the ground.
Rely on Carbide Steel Tips
Carbide tips provide superior durability and traction on varied surfaces.
- Trust carbide steel to resist wear on rocky and gravel trails.
- Expect superior grip on wet roots and slick stone surfaces.
- Replace tips immediately when they become smooth or rounded.
- Unscrew old tips by hand and screw on new ones without tools.
A smooth tip creates a slipping hazard, so inspect them regularly for wear.
Know When and How to Replace Parts
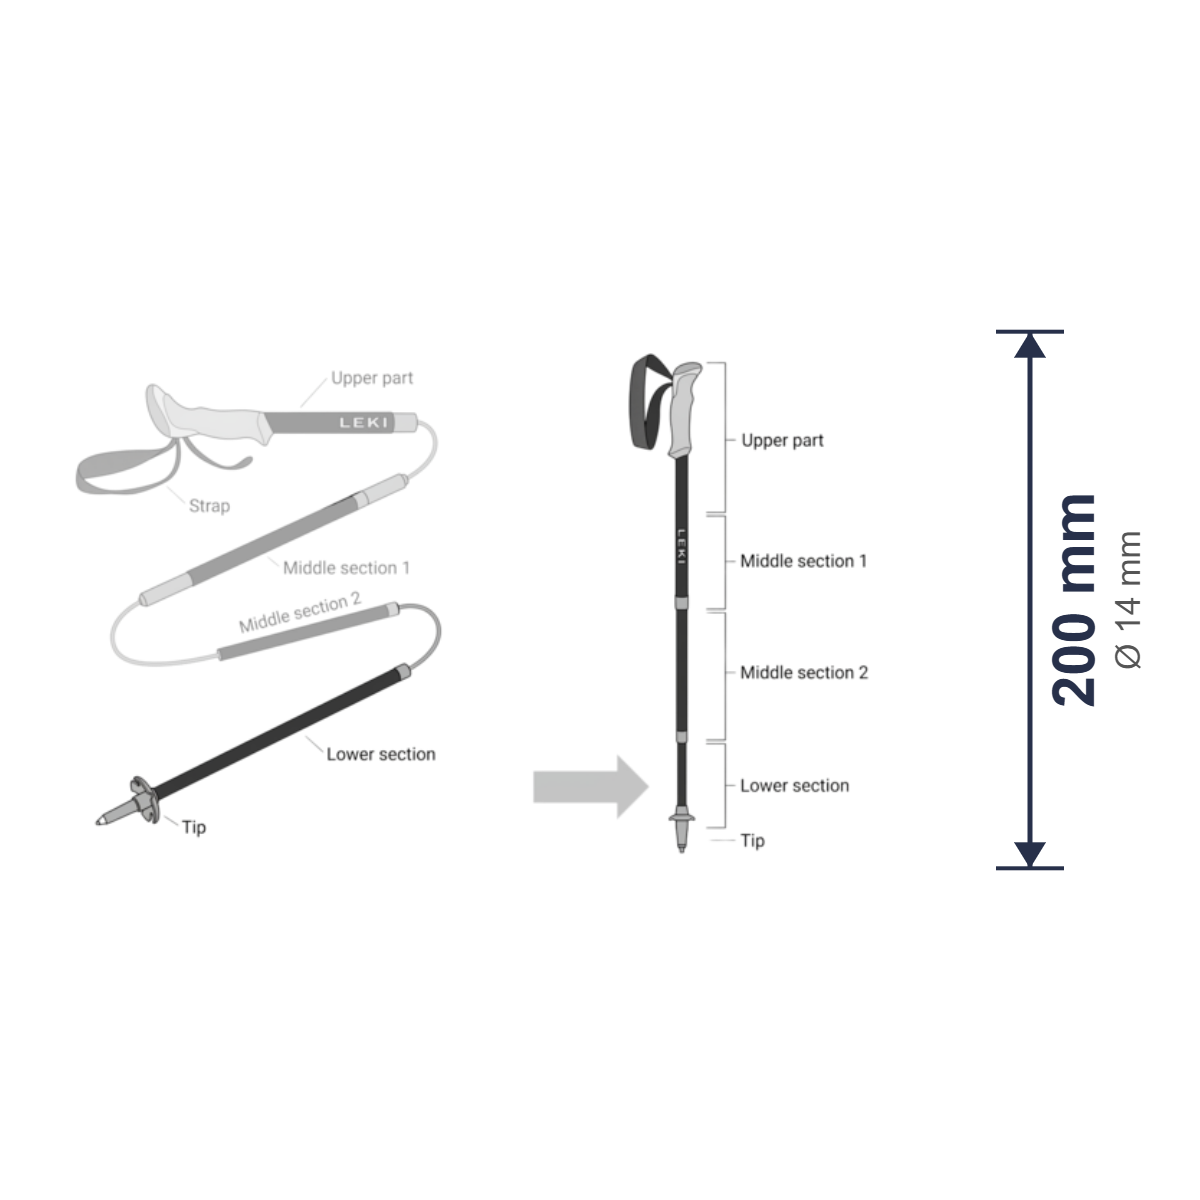
Components wear out over time, but Leki designs poles for easy part replacement. Knowing when to swap parts keeps your gear safe and functional.
Replace Common Worn Components
Monitor these parts closely as they experience the most friction and stress.
- Replace tips every 500 to 1,000 miles depending on terrain roughness.
- Swap baskets if they become cracked, deformed, or loose.
- Change straps if the webbing frays or stitching begins to fail.
- Install new elastic cords if the ELD system loses tension.
Order replacement parts directly from Leki USA or authorized dealers for compatibility.
Claim the Lifetime Warranty
Leki provides a lifetime warranty covering manufacturing defects in workmanship.
- Eligible issues include broken Flick Locks or failed ELD mechanisms.
- Damage from misuse like lateral bending is not covered by warranty.
- Send defective poles to Leki USA in Buffalo, New York with proof of purchase.
- Register your poles online initially for faster service processing.
This warranty ensures your investment remains protected against factory errors.
Use Poles Beyond Hiking
Leki poles serve multiple functions in the backcountry beyond simple stability. Understanding these uses adds value to your gear selection.
Build an Emergency Shelter
Poles can replace tent poles or support tarps in survival situations.
- Use two poles to create a rigid frame for a tarp shelter.
- Secure the structure with guylines and natural anchors like rocks.
- Leverage the straight shaft design for maximum structural integrity.
- Combine with backpack contents to create a stable emergency bivouac.
This skill is invaluable if your primary tent poles break or go missing.
Deter Wildlife Encounters
Poles create a visual barrier and noise maker for wildlife interactions.
- Raise poles vertically to appear larger to bears or aggressive dogs.
- Tap the ground rhythmically to assert your presence non-lethally.
- Use the length to maintain distance from curious animals.
- Avoid striking animals unless absolutely necessary for defense.
The visual presence of extended poles often discourages potential threats effectively.
Final Tips for Using Leki Trekking Poles Effectively
Mastering how to use Leki trekking poles transforms your hiking experience through better efficiency and joint protection. Start by assembling your poles correctly using the straight pull method for ELD models or the jiggle technique for telescopic versions. Adjust your length dynamically, shortening for climbs and extending for descents to maintain that critical 90-degree elbow angle.
Practice your strap technique until pulling down on the strap becomes second nature, allowing your arms to do the work while your hands stay relaxed. Regular maintenance including cleaning, drying, and occasional lubrication ensures your poles last for thousands of miles. With proper care and technique, these tools will enhance your power and balance on every trail you explore.
Frequently Asked Questions About Leki Trekking Poles
How do I know if my Leki pole is locked correctly?
Listen for a distinct click sound and check that the silver tab rises on Flick Lock models. For ELD folding poles, ensure sections feel rigid with no lateral movement before hiking.
Can I use Leki poles in winter conditions?
Yes, but you must apply 3-in-1 oil to mechanisms to prevent freezing and use large snow baskets for traction. Avoid bending carbon poles sideways as cold temperatures make them more brittle.
What is the correct elbow angle for pole length?
Your elbow should form a precise 90-degree angle with your forearm parallel to the ground when standing on flat terrain. Adjust shorter for uphill and longer for downhill sections.
How often should I replace carbide tips?
Replace tips every 500 to 1,000 miles or when they appear smooth and rounded. Worn tips create slipping hazards on wet rocks and roots.
Are Leki poles covered by a lifetime warranty?
Yes, Leki offers a lifetime warranty on manufacturing defects but not damage from misuse like lateral bending. Send defective poles to their Buffalo, New York facility with proof of purchase.
How do I clean my Leki poles after muddy hikes?
Rinse shafts with water, dry all locks thoroughly, and wipe straps with a damp cloth. Never submerge poles completely as water damages internal elastic cords.
Key Takeaways for Mastering Leki Pole Usage
Proper setup and technique are the foundation of effective pole usage. Always assemble folding poles with a straight pull to engage the ELD click, and verify telescopic locks by checking the silver tab position. Never adjust height locks before main sections are fully secured to prevent collapse.
Dynamic length adjustment maximizes efficiency on varied terrain. Shorten poles for uphill climbs to maintain leverage and extend them fully for downhill descents to protect your knees. Consistent maintenance including cleaning, drying, and lubricating moving parts ensures your poles perform reliably for years of adventure.