
Hiking on steep or uneven trails becomes much easier when you know how to use Black Diamond trekking poles correctly. These tools provide essential stability and reduce joint strain, yet many hikers miss out on their full benefits due to improper setup.
This guide explains exactly how to adjust pole length, deploy locking mechanisms, and master wrist strap techniques for maximum efficiency. You will learn specific methods for uphill and downhill terrain while ensuring your gear lasts for years of reliable service.
Adjust Pole Length for Terrain and Comfort
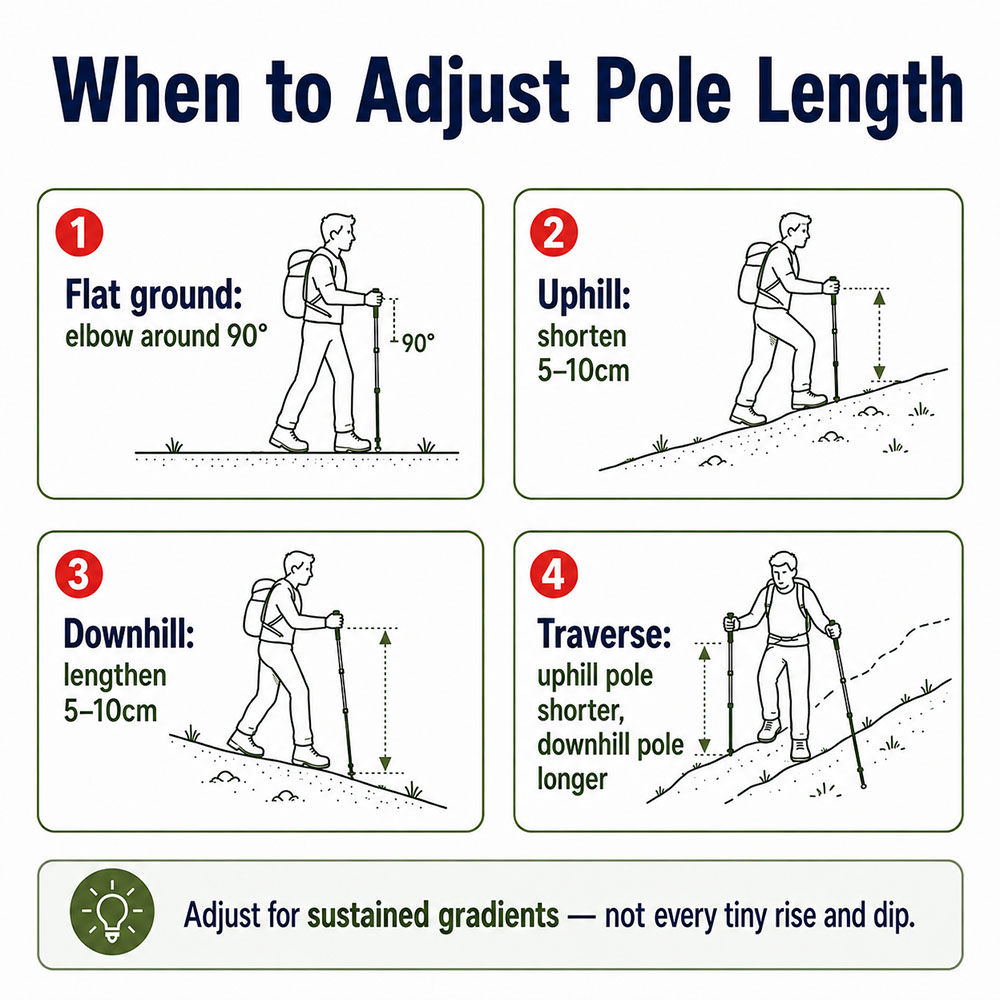
Setting the correct pole length is the most critical step for preventing shoulder strain and maintaining balance on the trail. An incorrect length forces your body to work harder, reducing your overall hiking efficiency and increasing fatigue.
Find Your Ideal Hiking Length on Flat Ground
Your elbow should bend at a 90-degree angle when the pole tip touches the ground and your hand grips the handle. To achieve this setting, stand in your hiking boots on a hard, flat surface and hold the poles as if you are walking. Adjust the shaft until your forearm sits parallel to the ground. Most Black Diamond models utilize a FlickLock or Z-Pole system that allows for quick, tool-free adjustments to reach this perfect angle.
Shorten Poles for Uphill Climbs
You should shorten your poles by 5 to 10 centimeters when ascending steep trails to maintain a natural pushing position. This adjustment prevents the poles from hitting your legs and helps drive your body upward with each plant. Shorter poles significantly reduce strain on your quadriceps and knees during long climbs. If you use Z-Poles, collapse them slightly before starting the climb while standing still to avoid missteps.
Lengthen Poles for Downhill Sections
Extend your poles by 5 to 10 centimeters for descents to improve stability and absorb shock. Longer poles place the tip farther ahead of you, which can reduce knee impact by up to 30 percent on rocky trails. This extra length is crucial for maintaining balance on slippery or loose surfaces. Watch for overtightening FlickLocks, ensuring the lever closes fully without pinching the inner shaft.
Deploy and Stow Poles Efficiently
Knowing how to quickly deploy and collapse your poles saves valuable time at trailheads and during terrain transitions. Efficient handling ensures you have support exactly when you need it without fumbling with mechanisms.
Unlock and Extend FlickLock Poles
- Flip open the FlickLock lever on each section of the pole.
- Pull the lower segment until it stops, listening for an audible click.
- Close the lever tightly until it locks securely in place.
- Test the connection by tugging the sections to ensure no movement occurs.
Repeat this process for both upper and lower shafts if your specific model features two adjustment points.
Collapse and Lock Z-Poles
Z-Poles are designed to be foldable and compact for easy storage in a backpack. To stow them, press the small button located on the central collar of the pole. Twist and slide the sections together smoothly until they align. Let the pole snap into its folded position naturally. Secure the bundle with the attached elastic shock cord and storage clip. Never force collapsed poles if they stick, as this can damage the internal cord.
Use Wrist Straps for Maximum Support
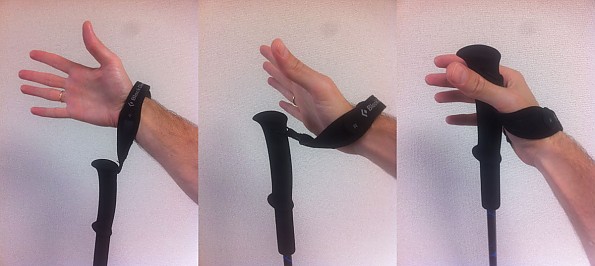
Many hikers make the mistake of gripping the handle tightly instead of utilizing the wrist strap system designed for support. Proper strap usage transfers weight from your hands to your wrists, drastically reducing hand fatigue on long hikes.
Insert Hand From Below the Strap
Open the strap loop and slide your hand up from underneath so the strap crosses your palm diagonally. Grip the handle while letting the strap rest securely between your thumb and index finger. This position allows you to push down on the strap during each stride rather than squeezing the grip. Engaging your arms through the strap creates a more efficient walking rhythm.
Adjust Strap Tension Correctly
Pull the tail end of the strap to tighten it until it feels snug but not constricting around your wrist. You should be able to slip a single finger between the strap and your skin comfortably. Tightening straps too much can cause circulation issues or painful chafing during extended use. Proper tension ensures the pole stays attached to your hand if you let go momentarily.
Choose and Swap Basket Types
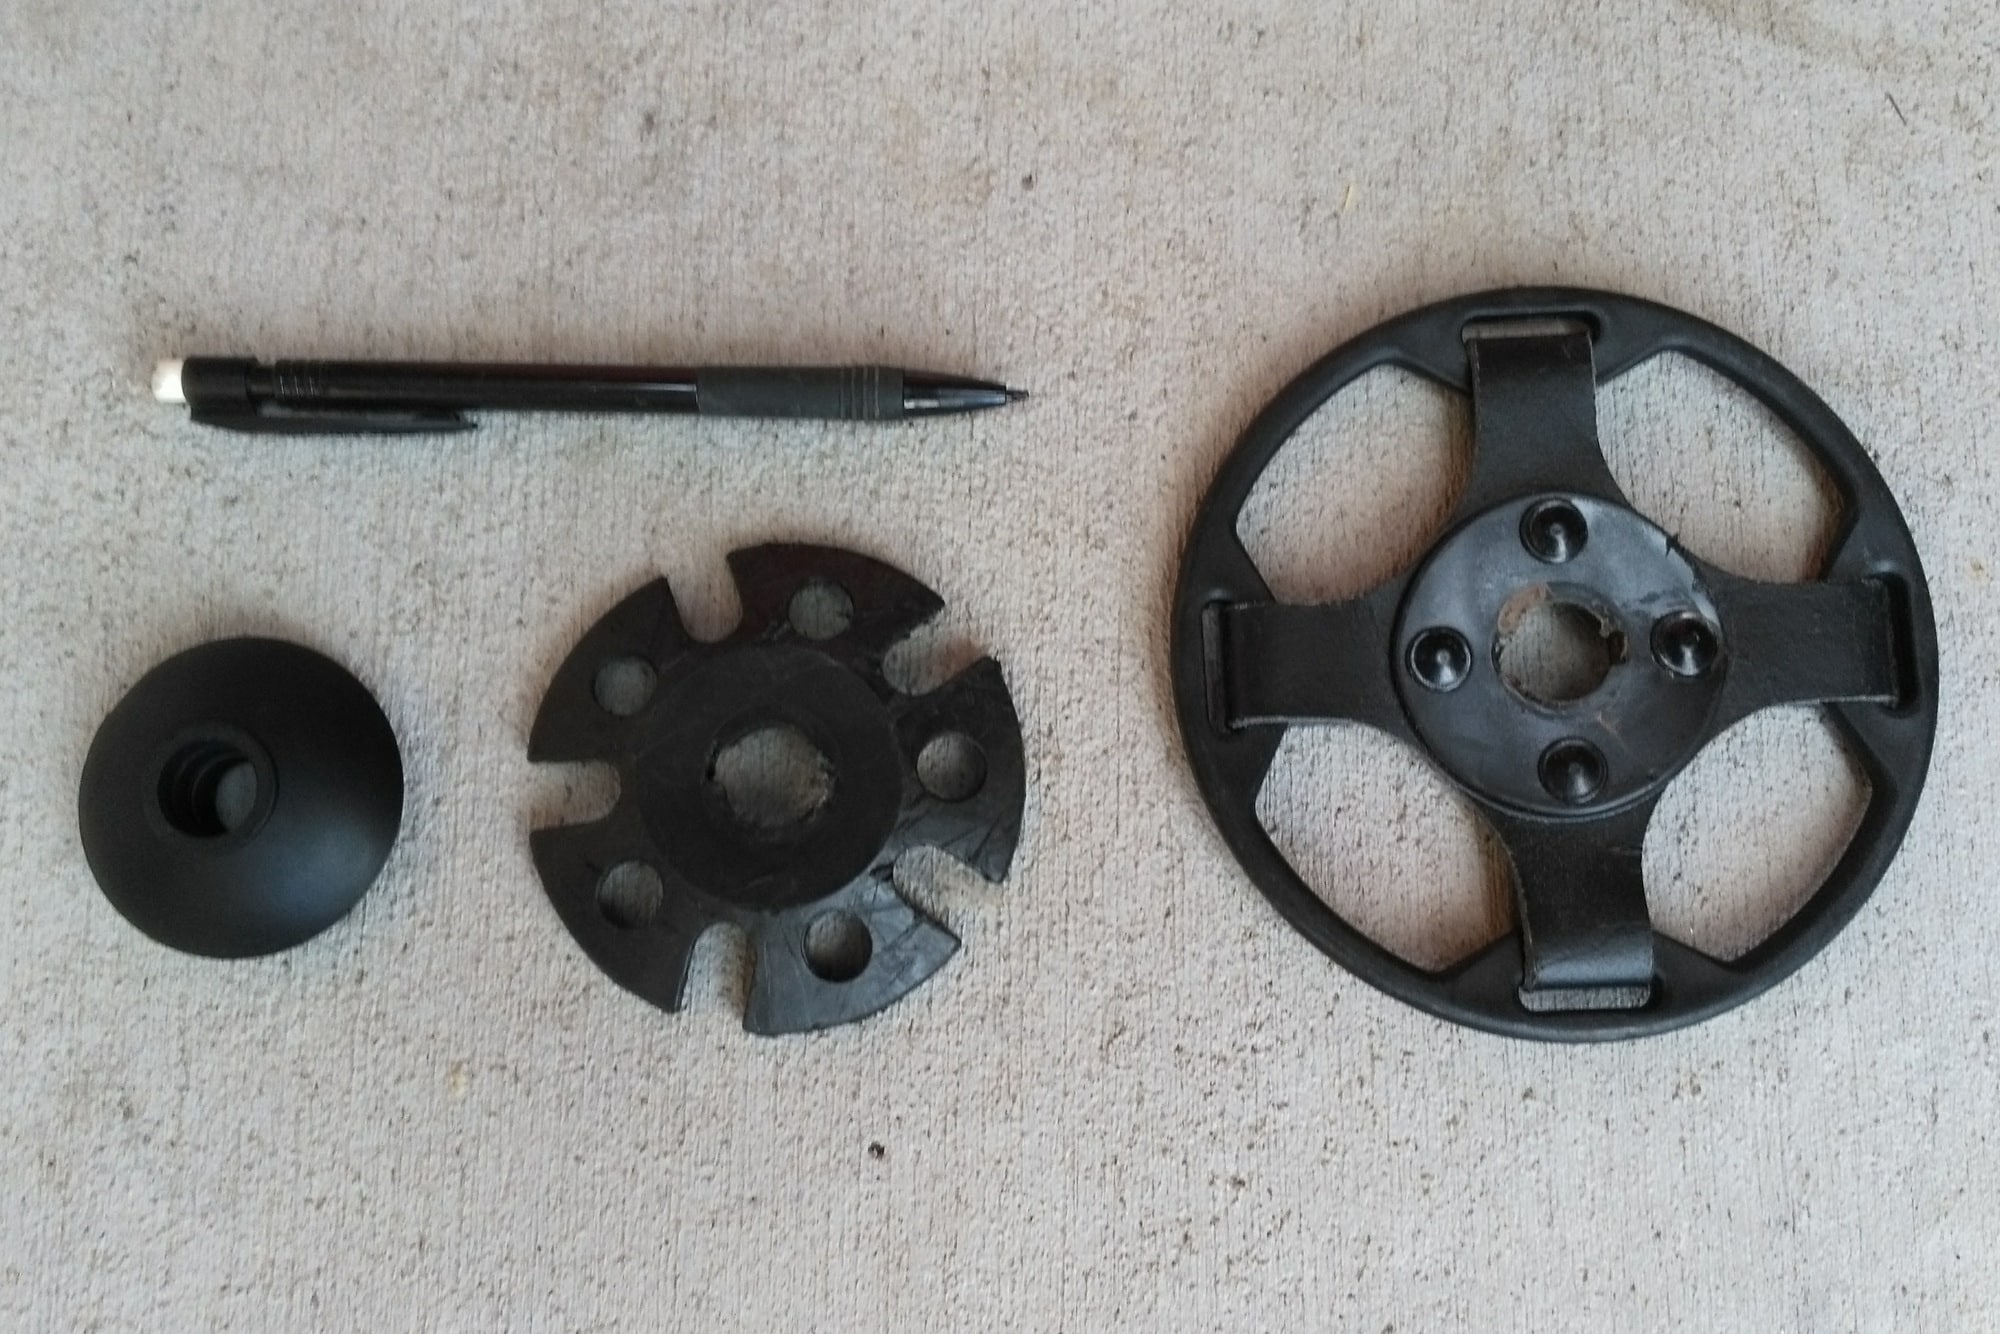
Baskets prevent your poles from sinking too deep into soft terrain, and Black Diamond poles come with removable options for different conditions. Selecting the right basket type ensures consistent traction regardless of the surface you traverse.
Use Summer Baskets on Trails
Smaller hiking baskets are standard on most models and work perfectly for dirt, rock, and packed trails. These lightweight baskets are unobtrusive and prevent the pole from catching on roots or rocks. They provide just enough surface area to stop the tip from slipping into small cracks in the trail.
Switch to Winter Baskets in Snow
Larger snow baskets are essential for hiking in deep or powdery conditions where standard baskets would disappear. These wider accessories spread the weight of your push over a larger surface area to keep the pole on top of the snow. Install them before entering deep snowfields to prevent the pole from sinking up to the grip.
Install or Remove Baskets Safely
- Pull the rubber grip upward if your model allows access to the shaft underneath.
- Slide the existing basket off or press the new one firmly onto the shaft.
- Ensure the new basket clicks into place with a distinct snap.
- Verify the basket sits flush against the shaft before hiking.
Some models have fixed grips where baskets are replaced by unscrewing the tip and shaft cap entirely.
Maintain Pole Performance
Regular maintenance keeps your Black Diamond poles reliable and extends their lifespan significantly. Dirt, sand, and moisture can degrade locking mechanisms if left uncleaned after hikes.
Clean After Muddy or Sandy Hikes
Rinse your poles with lukewarm water after every exposure to mud, sand, or salt water. Focus your cleaning effort on joints and locks where grit can cause premature wear. Do not soak FlickLocks or submerge Z-Pole joints for long periods as this can damage internal lubricants.
Inspect Locking Mechanisms Monthly
Check your FlickLocks regularly for signs of wear or slippage to ensure safety on the trail. Adjust the pole and lock it, then apply downward pressure to test its holding power. If the section slips, tighten the barrel nut at the base of the lock using a 3mm hex key. For Z-Poles, ensure the twist-lock collar clicks securely and shows no visible cracks.
Replace Worn Tips and Baskets
Carry a spare carbide tip with you because tips wear down over time and reduce traction on rock and ice. When the tip becomes flat or breaks, simply unscrew it and replace it with a new one. Worn baskets should also be swapped out to maintain proper flotation in soft ground.
Master Hiking Techniques
Proper technique maximizes propulsion and balance, turning your poles into powerful tools for momentum. Using poles is not just about stability but also about creating a rhythmic and efficient walking pattern.
Use Opposite Arm and Leg Timing
Plant the right pole when stepping with your left foot and vice versa to create a balanced cross-step pattern. This rhythm improves momentum and reduces overall fatigue compared to moving same-side limbs together. On flat terrain, use short and quick pole plants that match your natural stride. On loose rock, plant poles firmly before shifting your full weight onto them.
Lean Into Steep Ascents
Shorten your poles, plant both ahead of you, and push down hard while driving your legs upward. Shift your weight forward slightly and let the poles take some of your body weight to relieve your legs. Use both poles together in a double pole plant on very steep sections for extra lift and stability.
Control Descents With Wide Stance
Plant your poles slightly wider than shoulder-width on steep drops to create a stable triangle of support. Bend your elbows to absorb shock with each step rather than locking your arms straight. Avoid leaning back excessively, as this increases strain on your knees and reduces control.
Store Poles Properly Off-Trail
How you store your poles matters significantly for their long-term functionality and structural integrity. Improper storage can damage locks, bend shafts, or degrade straps over time.
Loosen FlickLocks Before Packing
Never store poles fully extended with the locks tightened, as this keeps unnecessary tension on the mechanism. Unlock each section and collapse the pole to its shortest length before putting it away. Store them in a dry place, ideally hanging up or laid flat to prevent warping.
Remove Moisture and Dirt
Wipe down your poles after each hike and let them air dry completely before storing them away. Pay special attention to the tips and internal shafts where moisture often hides. Avoid leaving poles in hot cars because heat can warp plastic components and degrade rubber grips.
Frequently Asked Questions About Black Diamond Trekking Poles
How do I know if my Black Diamond pole length is correct?
Your elbow should form a 90-degree angle when the pole tip is on the ground and you are holding the grip. Stand on flat ground in your hiking boots to check this alignment before every hike. Adjust the shaft until your forearm is parallel to the horizon for optimal power transfer.
Can I use Black Diamond poles in winter conditions?
Yes, but you must swap the standard small baskets for larger winter snow baskets sold separately. These larger baskets prevent the pole from sinking deep into soft snow and provide necessary stability. Always check that the baskets are securely clicked into place before relying on them in deep snow.
What should I do if my FlickLock keeps slipping?
Clean any dirt or grit from the shaft and inside the lock mechanism first. If it still slips, use a 3mm hex key to tighten the barrel nut located at the base of the lock. Ensure you are closing the lever fully until it feels tight against the shaft.
How do I clean my trekking poles after a muddy hike?
Rinse the poles with lukewarm water and focus on flushing grit out of the locking mechanisms. Wipe them down with a soft cloth and let them air dry completely before storing. Do not submerge the locks or joints in water for extended periods.
Are Black Diamond Z-Poles easy to repair in the field?
Z-Poles use an internal shock cord system that can be difficult to repair without specific tools or replacement parts. It is best to avoid forcing sections if they stick and to keep them clean to prevent jamming. Carry a multi-tool with a hex key for basic tightening adjustments on the trail.
Key Takeaways for Using Black Diamond Trekking Poles
Mastering how to use Black Diamond trekking poles involves proper length adjustment, correct wrist strap usage, and regular maintenance. By shortening poles for climbs and lengthening them for descents, you protect your joints and improve hiking efficiency. Regular cleaning and proper storage ensure your gear remains reliable for countless miles on the trail.
Start your next hike by adjusting your poles to the 90-degree elbow rule and practicing the opposite arm and leg rhythm. These small changes will immediately enhance your stability and reduce fatigue on both uphills and downhills.