
Carrying loose trekking poles ruins your balance and creates a safety hazard if sharp tips point toward your neck. Learning how to use trekking pole loops on backpack systems correctly ensures your gear stays secure while keeping your hands free for scrambling or eating snacks.
This guide explains factory installation methods and DIY bungee solutions so you can stow poles instantly without removing your pack. You will discover specific techniques to prevent ground snagging and maintain perfect tension on rugged trails.
Master Built-In Pole Loop Systems

Many modern hiking packs feature dedicated retention points designed specifically for pole storage. These systems use a combination of fabric loops and elastic straps to hold poles firmly against the pack exterior.
Thread Handles Through Bottom Retention Loop
Start by locating the small reinforced fabric loop at the base of your backpack exterior. Slide the handles of both trekking poles through this single loop to create a secure anchor point. Ensure the sharp tips face downward and away from your body to prevent injury if you stumble.
- Look for a double-stitched loop near the bottom panel of your pack.
- Insert both pole handles simultaneously to keep them aligned.
- Verify that tips point down to avoid snagging branches above you.
Pro Tip: If your pack has two separate bottom loops, thread one handle through each side to reduce lateral sway during fast movements.
Lock Shafts Under Webbing Clamp
Find the horizontal webbing strap or plastic clip positioned just above the bottom loop. Press the pole shafts underneath this clamp to lock them in a vertical position against the pack frame. This step prevents the poles from sliding outward when you navigate steep inclines or dense brush.
- Push shafts firmly under the strap until they sit flat against the fabric.
- Ensure no part of the shaft angles away from the pack surface.
- Check that the clamp covers enough of the shaft to prevent slipping.
Tension Elastic Side Strap for Stability
Locate the elastic bungee cord on the side panel of your backpack. Pull this strap over the pole shafts and hook it onto the designated metal or plastic toggle near the top of the pack. Tighten the cord until the poles feel rigid and do not bounce when you jump slightly.
- Pull the elastic strap taut before engaging the hook.
- Listen for a snug fit where the poles do not rattle.
- Perform a quick tug test to confirm the tension holds firm.
Install DIY Bungee Systems on Any Pack
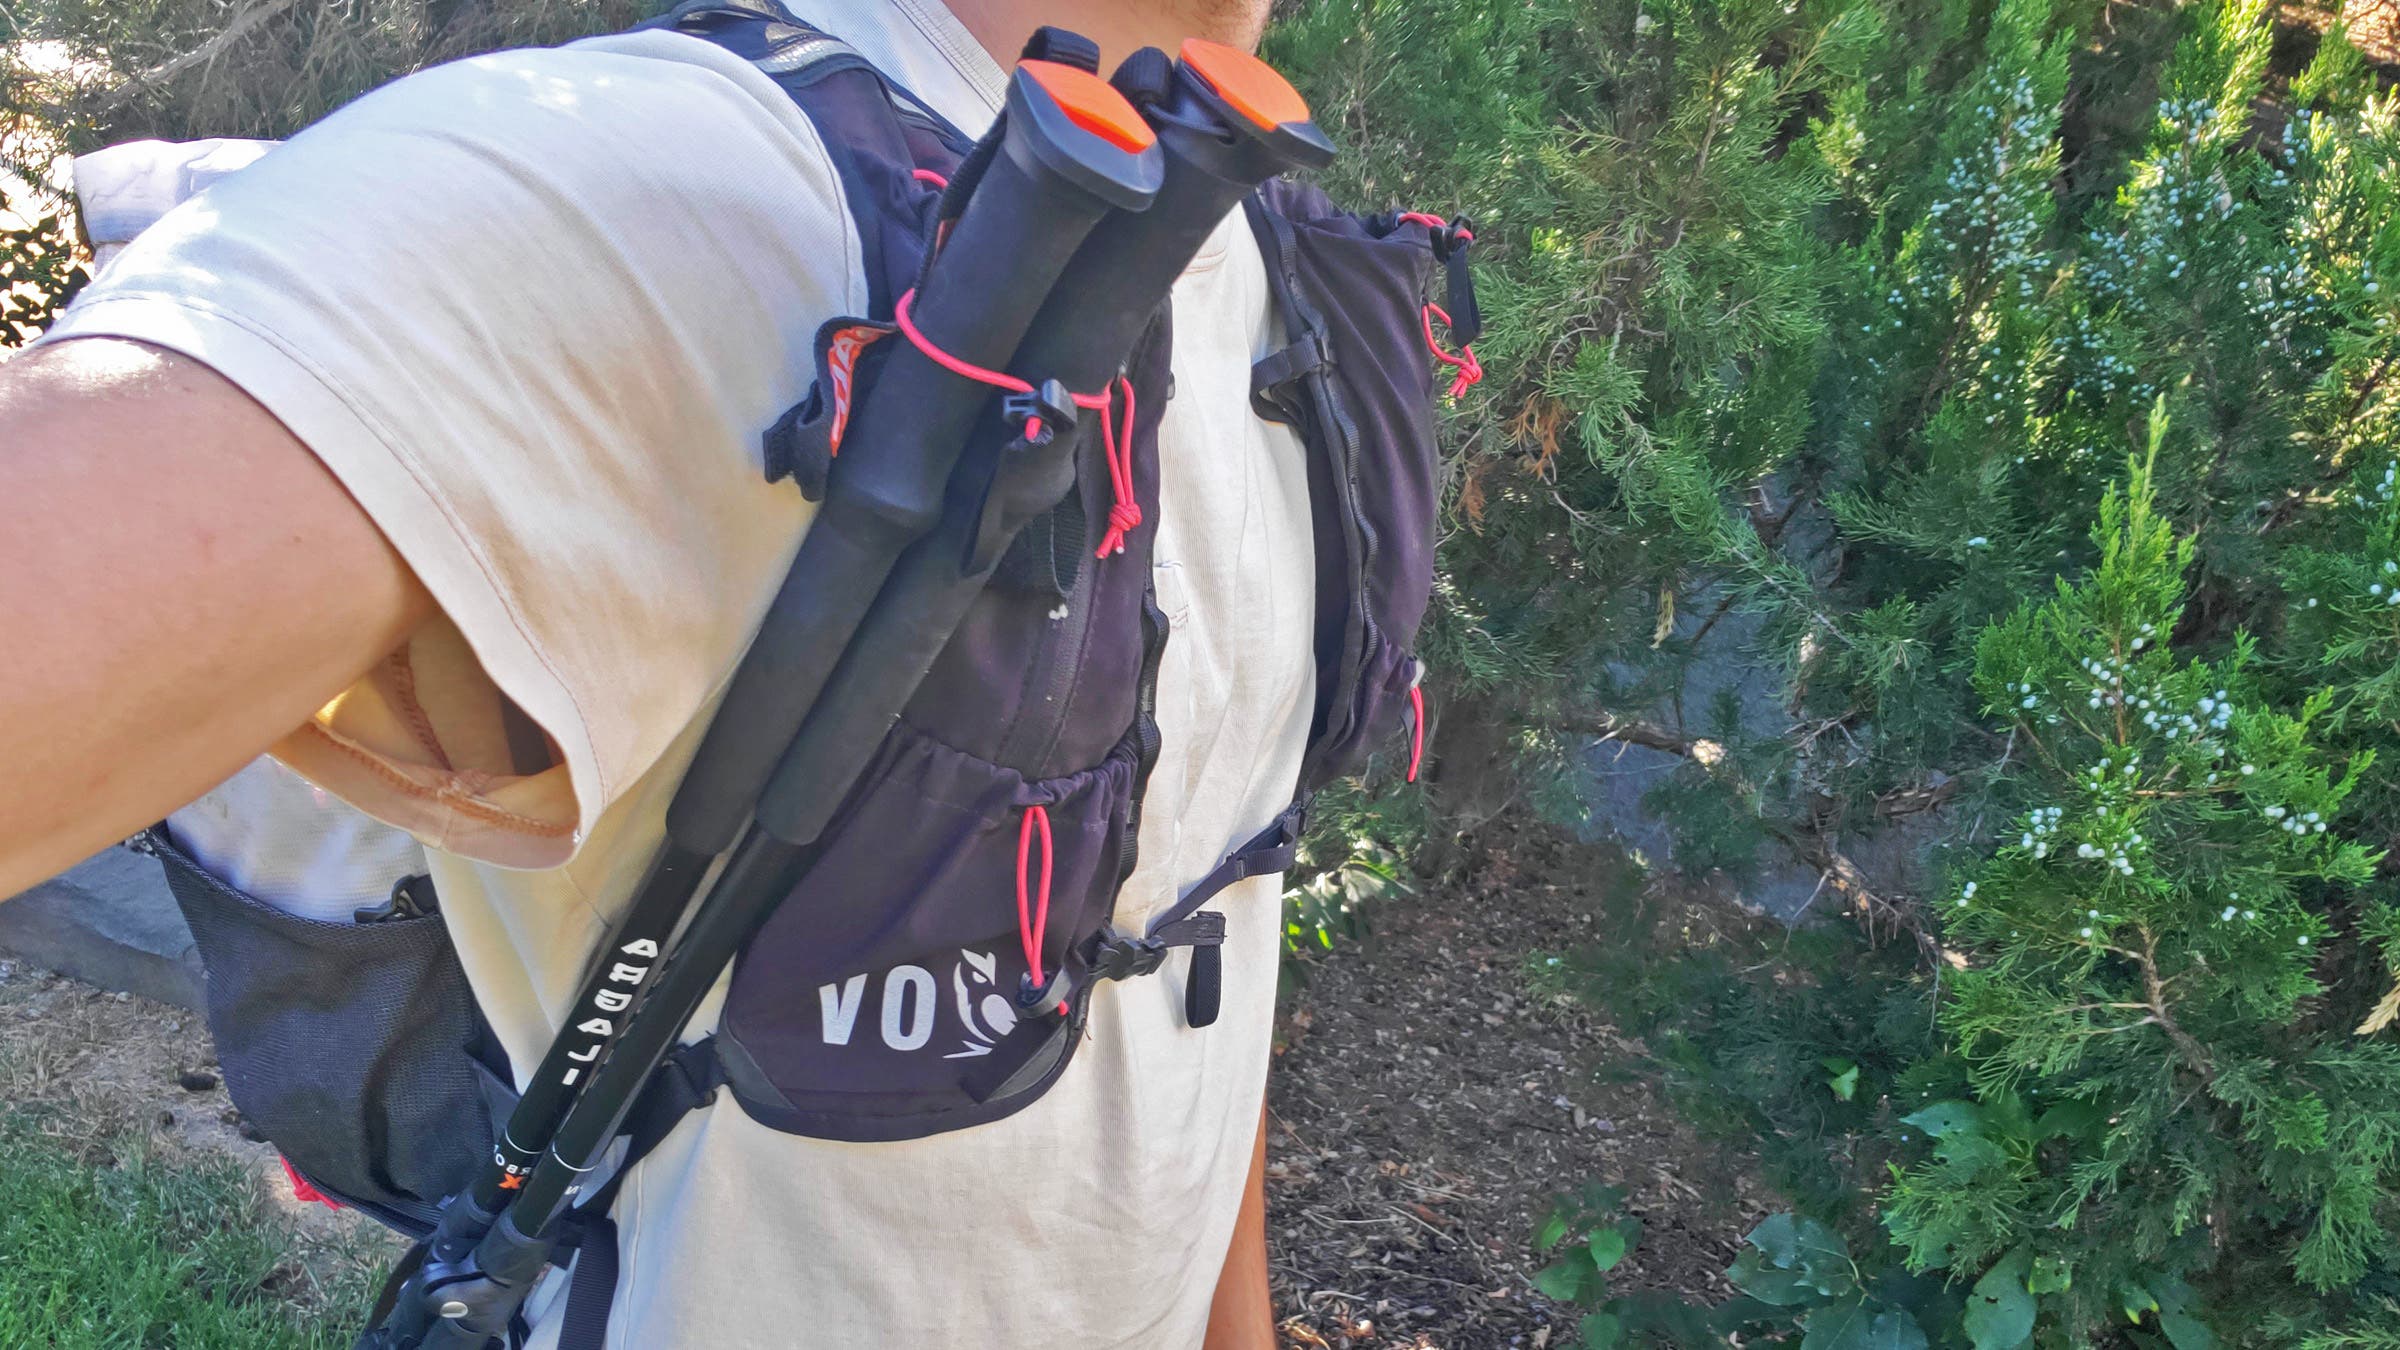
Your backpack might lack factory loops, especially if it is an ultralight model or a simple daypack. You can create a highly effective retention system using basic materials like bungee cord and cord locks for under ten dollars.
Anchor Top and Bottom Bungee Cords
Attach two separate lengths of bungee cord to your shoulder strap area using existing daisy chains or buckles. Place one anchor near the chest strap connection and the second near the top of the main compartment to form a vertical channel.
- Secure the top cord near the upper shoulder strap attachment point.
- Anchor the bottom cord close to where the shoulder strap meets the pack body.
- Use cord locks on both ends to allow for easy tension adjustments.
Material Note: Bungee cord is superior to paracord here because its natural stretch maintains constant pressure on the poles.
Thread Poles Through Dual Bungee Loops
Slide the shaft of each trekking pole through the lower bungee loop first, then guide the handle up through the top loop. Tighten the cord locks on both bungees to create a tensioned column that holds the poles upright and parallel to your pack frame.
- Push the pole shaft through the bottom bungee loop.
- Guide the handle upward through the top bungee loop.
- Slide cord locks to tighten the bungee against the pole shaft.
Add Hip Belt Loop to Prevent Swing
Attach a short webbing loop or cord to your hip belt to stop the pole handles from swinging freely. Feed the handles into this lower anchor after securing the shafts in the shoulder bungees to eliminate the pendulum effect entirely.
- Tie a loop to a D-ring on your hip belt if no gear loop exists.
- Insert both pole handles into this hip-level anchor point.
- Adjust the length so handles sit comfortably without pulling the belt.
Prevent Ground Snagging Hazards
Vertical pole storage creates a risk of the tips catching on rocks or roots when you set your pack down. Ignoring this can bend your poles or tear the attachment loops on your backpack.
Loosen Cords Before Setting Pack Down
Release the tension on your top bungee cord or unclip the elastic strap before placing your backpack on the ground. This allows the poles to tilt inward slightly so the tips do not lever against the earth and damage the system.
- Slide cord locks open to release bungee tension.
- Unhook elastic side straps before resting the pack.
- Place the pack gently to avoid sudden impact on pole tips.
Warning: Never drop a pack with tight vertical poles onto uneven ground as this can rip attachment points.
Re-Tension System After Pickup
Straighten your poles and re-engage the tensioning mechanism immediately after picking up your pack. Tighten all cord locks or re-hook elastic straps to ensure the poles are secure before you start walking again.
- Align poles vertically against the pack frame.
- Tighten cord locks to restore full tension.
- Give the pack a shake to verify stability.
Optimize Pole Access Speed
The best storage method allows you to deploy your poles instantly without stopping or removing your backpack. Practice your technique so you can react quickly to changing terrain conditions.
Practice One-Hand Release Technique
Train yourself to loosen the top retention mechanism with one hand while keeping the pack on your shoulders. Slide the pole handle out of the top loop and pull the shaft free from the bottom anchor in one smooth motion.
- Keep one hand on the shoulder strap for balance.
- Use your thumb to slide the cord lock open quickly.
- Pull the pole free and grip it before releasing the second pole.
Time Goal: Aim to deploy both poles in under five seconds through regular practice.
Keep Tips Clear of Other Straps
Route your poles so the tips do not get tangled in hydration hoses, ice axe loops, or compression straps. Adjust the angle of your bungee cords if necessary to create a clear path for extraction.
- Check that pole tips do not cross over water reservoir tubes.
- Ensure compression straps do not pin the poles in place.
- Reposition anchors if extraction feels sticky or slow.
Compare Storage Methods for Safety
Not all carrying methods offer the same level of security or safety for you and your gear. Understanding the differences helps you choose the right approach for your specific backpack and hiking style.
Why Loops Beat Side Pockets
Storing poles in mesh side pockets is dangerous because the sharp tips often point inward toward your head and neck. Loop systems keep tips directed downward and outward, significantly reducing the risk of injury during a fall.
| Feature | Side Pockets | Loop Systems |
|---|---|---|
| Safety | Low risk of neck injury | High safety with tips away |
| Access | Requires pack removal | Instant access while wearing |
| Stability | Poles fall out easily | Secure tensioned hold |
Evaluate DIY Versus Built-In Options
Factory-built loops offer convenience but are limited to specific backpack models. DIY bungee systems provide universal compatibility and often superior tension control for a fraction of the cost of a new pack.
- Built-In: Best for users who want a clean, integrated look without setup.
- DIY Bungee: Best for ultralight hikers or those with older packs lacking features.
- Cost: DIY solutions cost under $10 while new packs cost hundreds.
Maintain Your Pole Retention System
Regular maintenance ensures your pole storage remains reliable trip after trip. Neglecting worn cords or loose locks can lead to gear loss on the trail.
Inspect Bungee and Cord Locks Monthly
Check your bungee cords for signs of fraying, UV damage, or loss of elasticity. Test cord locks to ensure they grip the cord tightly and do not slip under tension.
- Look for faded or brittle spots on shock cords.
- Replace cord locks that fail to hold tension.
- Carry a small repair kit with spare cord and locks.
Adjust Tension After Initial Use
New bungee cords often stretch during the first few hikes, requiring you to re-tighten the system. Monitor your poles for any shifting or sliding and adjust the cord locks accordingly.
- Tighten cords if poles wobble while walking.
- Re-anchor loose ends if the system feels sloppy.
- Check tension after every major trip.
Choose Setup Based on Terrain

Match your pole storage configuration to the specific demands of your hiking environment. Different trails require different levels of security and accessibility.
Use Full Bungee Plus Hip Loop for Technical Terrain
Rocky scrambles and steep alpine routes demand maximum stability from your gear. The combination of dual bungee anchors and a hip belt loop provides the security needed for aggressive movement.
- Engage all three anchor points for maximum hold.
- Pre-loosen cords slightly when approaching technical sections.
- Verify hip loop placement before starting steep climbs.
Use Minimalist Bungee for Smooth Trails
Flat or well-maintained trails allow for a simpler setup with just top and bottom bungee cords. This reduces weight and bulk while still keeping poles secure during casual walking.
- Remove the hip loop if balance is not a concern.
- Use lighter weight cord for minimal bulk.
- Focus on speed and simplicity for day hikes.
Frequently Asked Questions About Trekking Pole Loops
Can I attach trekking poles to any backpack?
Yes, you can attach poles to any backpack using a DIY bungee system even if it lacks built-in loops. You only need two pieces of shock cord and access to shoulder strap attachment points.
How do I stop my poles from swinging while hiking?
Attach a loop to your hip belt and insert the pole handles into it to stop swinging. This lower anchor point eliminates the pendulum effect caused by loose handles.
Is it safe to store poles in side mesh pockets?
No, storing poles in side pockets is unsafe because sharp tips often point toward your head and neck. Loop systems are designed to direct tips downward and away from your body.
What materials work best for DIY pole loops?
Bungee cord or shock cord is the best material because it maintains constant tension on the poles. Paracord works as an alternative but requires frequent manual tightening.
How do I prevent pole tips from catching on the ground?
Loosen your top retention cord before setting your pack down to let the poles tilt inward. This prevents the tips from leveraging against rocks and damaging your gear.
Key Takeaways for Using Trekking Pole Loops on Backpack
Mastering how to use trekking pole loops on backpack systems transforms a potential hazard into a seamless part of your hiking workflow. Whether you utilize factory-built features or install a simple DIY bungee setup, the goal remains secure, accessible, and safe pole storage.
Always ensure pole tips face away from your body and maintain proper tension to prevent swinging or loss. Start by inspecting your current pack for loops today, or gather some bungee cord to build your own custom system before your next adventure.