
Hitting a slippery rock or sinking into deep mud often happens because you do not know how to use trekking pole tips effectively. The small metal point at the end of your pole is your primary connection to the ground and dictates your stability on rugged trails.
This guide explains exactly how to use trekking pole tips to prevent falls and reduce fatigue. You will learn when to swap accessories, how to adjust your planting angle, and the best ways to maintain your gear for long-term durability.
Choose the Right Tip for Your Terrain
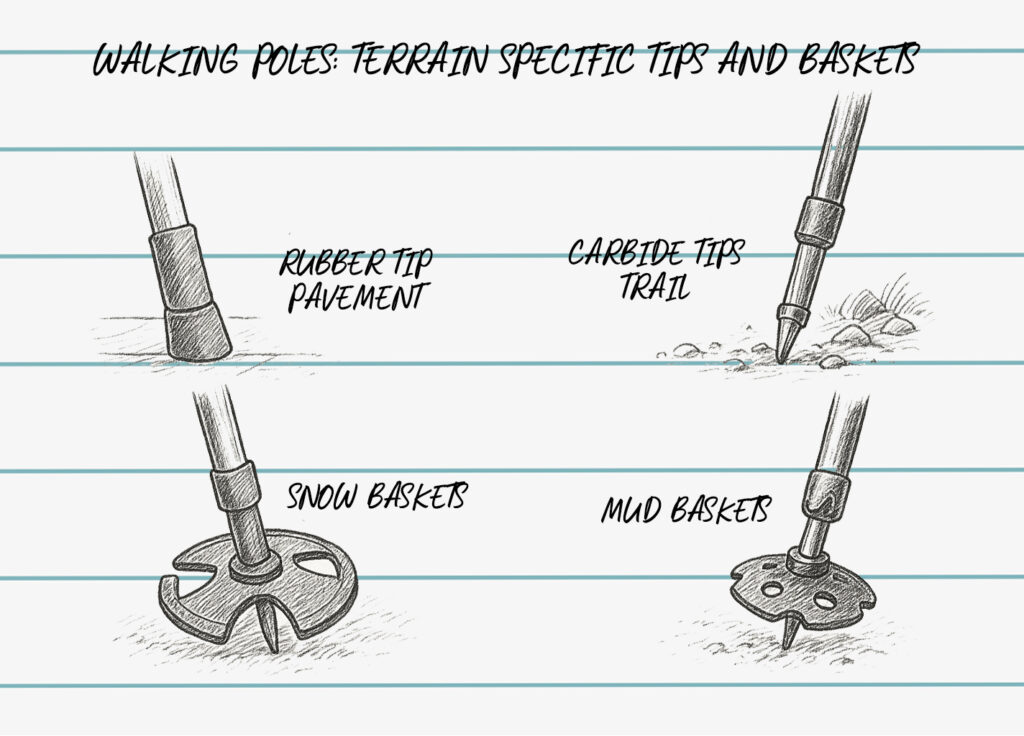
Your trekking pole works best when the tip matches the specific ground conditions beneath your feet. Using a standard metal spike on every surface causes rapid wear and reduces traction when you need it most.
Deploy Carbide Tips on Hard Surfaces
Carbide tips are harder than steel and resist wear on rock, pavement, and packed dirt. They bite into hard terrain better than standard steel, giving you secure placement with each step. Use them on trails with exposed bedrock, gravel switchbacks, or urban approaches to mountain trails.
Pro Tip: Carbide wears down slowly but can chip if struck sideways on boulders. Always plant your pole straight down for maximum durability.
Switch to Rubber Tips on Pavement
Pavement and smooth rock can damage carbide tips and make poles slippery. Rubber tips, often called pucks or bushings, protect the metal spike while providing grip on hard, flat surfaces. They also reduce noise and vibration during long stretches on roads or paved paths.
- Install rubber tips before starting paved sections
- Carry them in a pocket since they are lightweight and easy to lose
- Never hike on loose terrain with rubber tips as they reduce penetration and stability
Install Trail Baskets for Soft Ground
While not part of the tip itself, attaching small trail baskets just above the tip prevents deep sinking in mud, sand, or wet leaves. They work like mini snowshoes by spreading the load so your pole does not disappear into soft soil.
- Use on muddy trails, riverbanks, or forest duff
- Remove when on rock or hardpack to avoid snagging
- Pair with a carbide tip for best performance
Maintain Sharp and Functional Tips
A worn or damaged tip compromises your balance and increases fatigue during your hike. Regular maintenance keeps your poles performing like new and prevents sudden failures on the trail.
Inspect Tips Before Every Hike
Take 60 seconds before each outing to examine both tips carefully. Look for bending, chipping, or excessive flattening on the metal point. Ensure the tip is tightly screwed into the shaft and check for cracks in rubber tips or baskets.
If a carbide tip is visibly worn flat, it will not grip rock effectively and should be replaced immediately.
Clean Tips After Muddy or Sandy Hikes
Dirt and grit accelerate wear on your equipment significantly. After hiking through mud or sand, rinse the lower shaft and tip with water. Use a soft brush to remove packed debris and dry thoroughly before storage.
Avoid high-pressure hoses because they can force water into internal mechanisms and cause damage.
Replace Worn or Damaged Tips
Most trekking pole brands sell replacement tips for their specific models. When replacing a tip, match the model number to ensure compatibility. Use a wrench if needed, but avoid overtightening the connection.
Warning: Never hike with a loose or partially detached tip. This creates instability and can damage the pole shaft.
Adjust Technique Based on Tip Type
Your grip and planting motion should change depending on which tip you are using. Many hikers use the same jab-and-pull motion regardless of surface, leading to inefficient energy use and poor stability.
Plant Carbide Tips at a 45-Degree Angle
For maximum propulsion on hard terrain, hold the pole slightly behind your body. Plant the tip at a 45-degree angle pointing backward. Push down and back to drive yourself forward efficiently.
This technique mimics Nordic walking and improves uphill efficiency significantly.
Use Vertical Placement on Loose Ground
When hiking on scree, mud, or wet leaves, keep the pole vertical at 90 degrees to the ground. Plant the tip straight down for deeper anchoring. Lean gently into the pole to test stability before transferring your full weight.
This prevents the pole from sliding sideways under pressure and causing a fall.
Lift, Don’t Drag, on Smooth Surfaces
On pavement or compacted trail, lift the pole cleanly after each step. Avoid dragging the tip, which wears down carbide fast. Shorten your stride slightly to reduce impact on your joints.
Dragging also creates noise and can startle wildlife or other hikers on the path.
Upgrade to Removable Tip Systems

Many modern poles feature interchangeable tips that let you adapt quickly to changing conditions. These systems often include screw-on carbide tips, rubber caps, and even winter baskets.
Benefits of Interchangeable Tips
- Switch between rubber and metal in seconds
- Extend the life of your poles significantly
- Adapt to mixed-terrain hikes without carrying extras
Popular systems include LEKI’s Speed Tip Exchange and Black Diamond’s Quick Lock Tip.
How to Change Tips in the Field
- Unscrew the old tip by hand, using gloves if it is cold outside
- Screw on the new tip firmly without needing tools
- Test stability with light pressure before full use
Keep spare tips in your pack’s side pocket for quick access during your hike.
Avoid Common Tip Mistakes
Even experienced hikers make errors that reduce safety and performance on the trail. Recognizing these pitfalls helps you get the most from your gear and stay safe.
Don’t Use Worn Tips for Technical Terrain
A flattened spike will not hold on steep rock securely. If your tip looks like a nail head instead of a point, replace it before attempting scrambles or icy trails.
Never Hike with Loose Tips
A wobbly tip affects feedback and balance negatively. If you hear clicking or feel instability, stop and tighten or replace the tip immediately.
Don’t Forget Rubber Tips on Approach Trails
Pavement grinds down carbide fast and ruins the point. Installing rubber tips during road walks preserves your metal spikes for the actual trail.
Store Tips Properly Off-Trail
How you store your poles affects tip lifespan significantly. Improper storage leads to bent tips and damaged threads that are hard to fix.
Remove Mud Before Storage
Always clean and dry your poles before packing them away for the season. Trapped moisture causes corrosion, especially at the tip-thread junction where metal meets metal.
Use Protective Caps at Home
Many poles come with storage caps for this exact purpose. Use them to prevent accidental pokes in your gear bag, shield threads from dust and impact, and keep tips sharp and ready for next use.
If you lost the caps, small rubber stoppers from hardware stores work as substitutes.
Hang Poles Vertically
Store poles suspended or standing upright to avoid putting pressure on the tips. Laying them under heavy gear can bend or crack the carbide point permanently.
Frequently Asked Questions About Trekking Pole Tips
When should I replace my trekking pole tips?
You should replace tips when they appear visibly flattened, chipped, or worn smooth. A tip that looks like a flat nail head instead of a sharp point will not provide adequate grip on rock or ice.
Can I use metal tips on paved roads?
You should avoid using metal tips on paved roads as they wear down quickly and create loud noise. Install rubber tips on pavement to protect both the trail surface and your metal spikes.
How do I stop my pole from sinking in mud?
Attach small trail baskets just above the tip to prevent sinking in mud or sand. These baskets spread the load like a snowshoe and keep the pole from disappearing into soft ground.
What is the best angle for planting trekking poles?
Plant carbide tips at a 45-degree angle pointing backward on hard terrain for propulsion. Use a vertical 90-degree angle on loose ground like scree or mud for maximum stability.
How do I clean mud off my pole tips?
Rinse the lower shaft and tip with water and use a soft brush to remove packed debris. Dry the pole thoroughly before storage to prevent corrosion at the tip connection.
Key Takeaways for Using Trekking Pole Tips
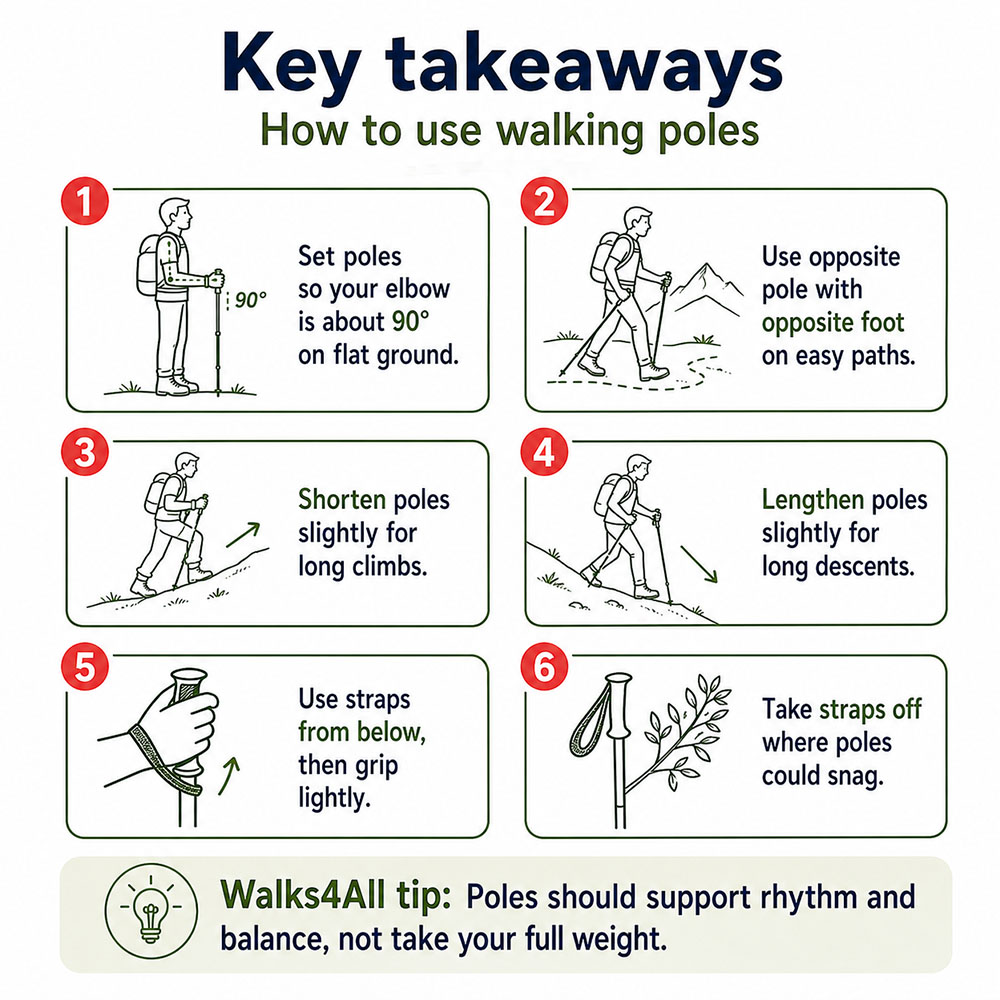
Mastering how to use trekking pole tips transforms your hiking experience by improving safety and efficiency. Selecting the correct tip for the terrain, maintaining sharp points, and adjusting your planting technique ensures stable footing on any trail.
Start checking your tips before every hike and carry rubber backups for paved sections. These small habits prevent falls and extend the life of your gear, allowing you to hike with confidence mile after mile.